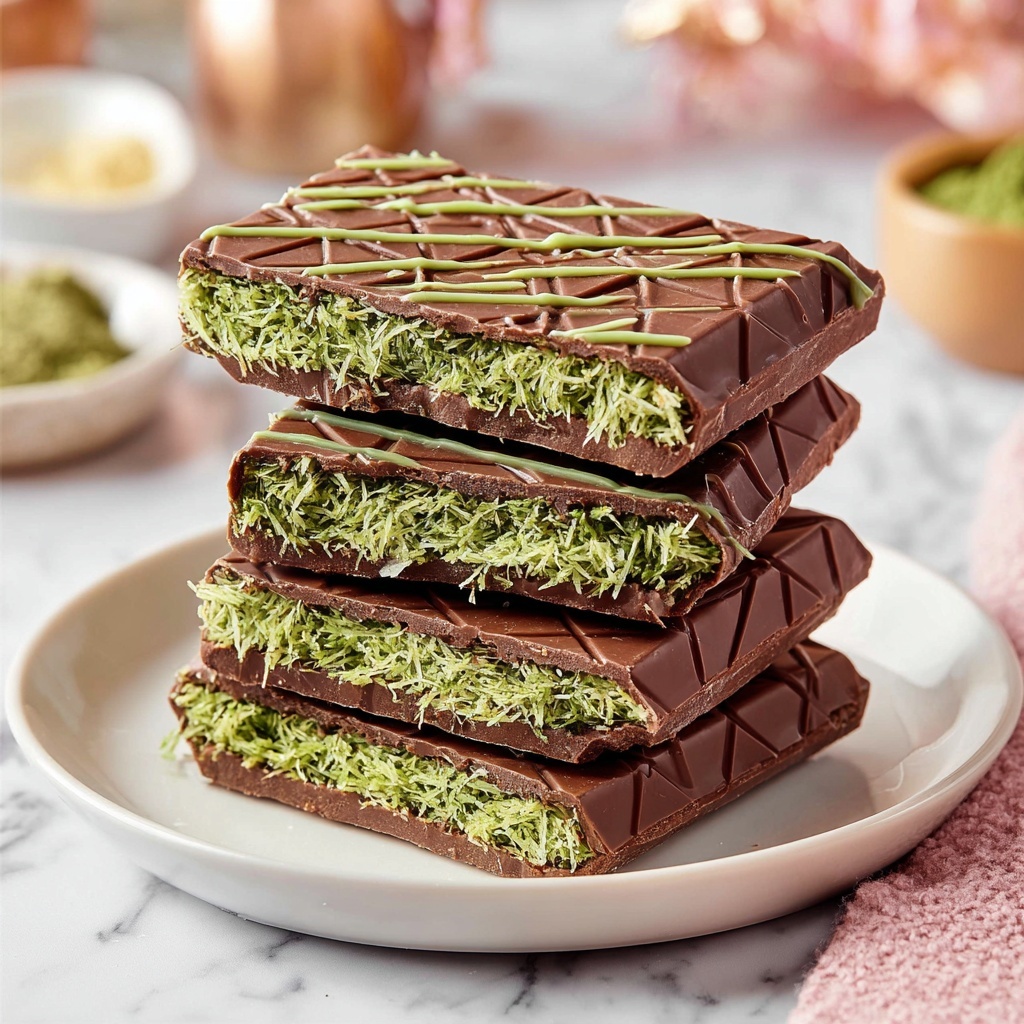
The Viral Dubai Chocolate Bar Recipe is a stunning treat that combines rich dark chocolate, vibrant green pistachio cream, and crunchy kataifi for a texture that will surprise and delight every bite. This beautifully layered dessert is not only visually captivating but also an irresistible harmony of flavors and textures that will have you hooked from the very first taste. Whether you’re looking to impress guests or simply indulge yourself, this recipe truly encapsulates why it has gone viral and become a favorite among chocolate lovers everywhere.
Ingredients You’ll Need
These ingredients are straightforward yet thoughtfully chosen to balance flavor, texture, and color. Each plays a crucial role in creating that perfect harmony that makes the Viral Dubai Chocolate Bar Recipe so beloved.
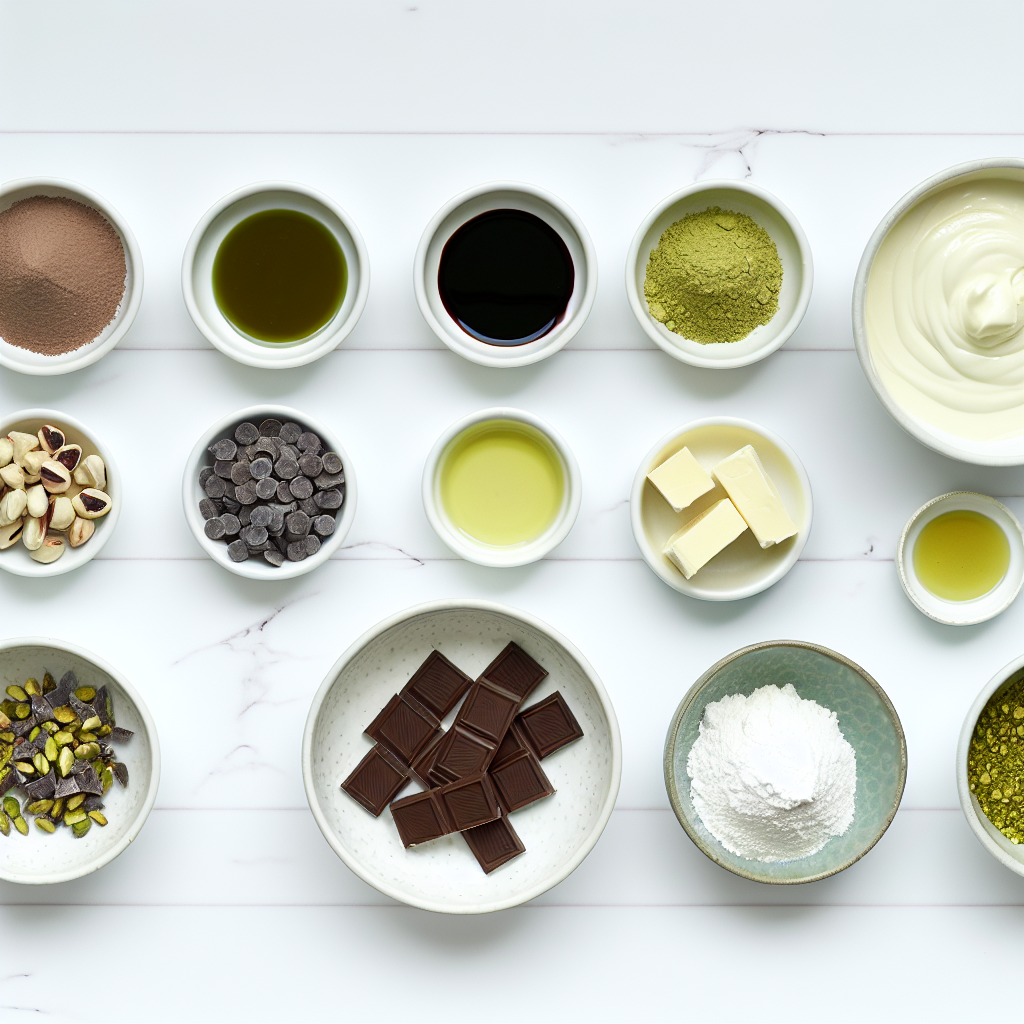
- ¼ cup white chocolate chips (46g): Provides a creamy base to mix with the green food coloring for a striking visual effect.
- 3 drops oil-based green food coloring: Gives the white chocolate a beautiful, vivid green color that hints at the pistachio flavor inside.
- 2 cups dark chocolate chips (370g): The rich, smooth coating that encases the bar and contrasts beautifully with the fillings.
- 6 ounces kataifi dough (shredded): Adds crispy, flaky texture that complements the creamy filling perfectly.
- 4 tablespoons salted butter (56g): Used to toast the kataifi, enhancing its golden color and giving it a delightful flavor boost.
- 12 ounces pistachio cream: The luscious green filling that pairs wonderfully with the dark chocolate shell.
- ⅓ cup tahini (80g): Adds a subtle nuttiness and smoothness, balancing richness and keeping the flavors interesting.
- ¼ teaspoon salt: Enhances all the flavors and rounds out the taste profile of the filling.
How to Make Viral Dubai Chocolate Bar Recipe
Step 1: Create the Green Chocolate Drizzle
Start by melting the white chocolate chips gently in a microwave-safe bowl, stirring frequently to avoid burning. Once smooth and melted, blend in the green food coloring until you achieve a vibrant, even hue. This step is essential for the eye-catching aesthetic that makes this recipe stand out.
Step 2: Prepare the Mold with Green Drizzle
Use a spoon or fork to drizzle the green chocolate artistically into each cavity of your mold. Pop it into the refrigerator for about 5 to 10 minutes, allowing this first layer to set firmly—this helps create that gorgeous green foundation.
Step 3: Melt the Dark Chocolate
In a medium bowl, melt the dark chocolate chips using short 30-second bursts in the microwave. Stir often until the chocolate is smooth and glossy. This rich coating will be both the shell and the top layer of your bars.
Step 4: Pour Dark Chocolate into Mold
Take the mold out of the fridge and pour approximately two-thirds of the melted dark chocolate evenly into each cavity. This step forms the sturdy outer shell of the bar.
Step 5: Spread Chocolate Shell
Using the back of a spoon or a pastry brush, spread the melted chocolate to cover the entire bottom and sides of each mold cavity. Remove excess chocolate from the edges for a clean finish. Refrigerate this until the shells are firm, about 10 to 15 minutes.
Step 6: Prep the Kataifi Dough
Break up the kataifi dough with your fingers into smaller pieces in a large bowl. This helps with even toasting and mixing later on.
Step 7: Toast the Kataifi
Melt the salted butter in a skillet over medium-low heat, then add the kataifi dough. Toast it while stirring constantly until it turns golden brown and crispy. This adds that signature crunch and a rich buttery flavor, which is key to the texture contrast in the bar. Let it cool completely before moving on.
Step 8: Make the Pistachio Filling
In a large bowl, combine pistachio cream, tahini, and salt. Stir these together thoroughly to create a smooth, nutty filling that perfectly complements the chocolate shell and crunchy kataifi.
Step 9: Fold in Toasted Kataifi
Once the kataifi is cooled, fold it gently into the pistachio mixture to evenly distribute those lovely crispy strands.
Step 10: Fill the Chocolate Shells
Spoon the pistachio filling into the chilled chocolate shells, pressing down gently by hand so the mixture is level and the cavities are filled. Leave a little space at the top to seal the bars with dark chocolate.
Step 11: Seal with Remaining Dark Chocolate
If needed, reheat any leftover melted chocolate until smooth again, then pour it over the pistachio filling, sealing the bars completely.
Step 12: Chill Until Set
Return the mold to the refrigerator for at least one hour to allow the bars to harden completely. This cooling step is crucial for the bars to hold their shape when unmolded.
Step 13: Unmold Your Bars
Once firm, carefully flip the mold and gently flex it to release your beautiful, glossy chocolate bars, revealing the vibrant green touch from the pistachio filling inside. Pat yourself on the back—you’ve just made the Viral Dubai Chocolate Bar Recipe!
How to Serve Viral Dubai Chocolate Bar Recipe
Garnishes
For a final flourish, sprinkle crushed pistachios or a light dusting of powdered sugar over the bars. These touches add a bit of texture and elevate the presentation, making them look as delightful as they taste.
Side Dishes
Serve these bars alongside a cup of strong Arabic coffee or a refreshing mint tea to complement the rich and nutty flavors. Their sweetness and crunch balance beautifully with these warming beverages.
Creative Ways to Present
Try serving the bars on individual dessert plates, garnished with edible gold leaf or alongside small spoons of pistachio cream for an indulgent, elegant dessert experience. These presentation ideas turn this viral recipe into a showstopper for any occasion.
Make Ahead and Storage
Storing Leftovers
Keep your viral Dubai chocolate bars in an airtight container in the refrigerator to maintain their texture and freshness. They will stay perfectly delicious for up to one week, ready when cravings strike.
Freezing
For longer storage, wrap each bar tightly in plastic wrap and place them in a freezer-safe container. Frozen, they keep well for up to 3 months. Thaw them in the fridge before serving to preserve that lovely texture.
Reheating
Since these bars are best enjoyed cool, reheating is not recommended. However, if you want a softer texture, briefly leave them at room temperature for 10 to 15 minutes before eating. This ensures the filling is creamy and the chocolate shell is slightly tender.
FAQs
Can I use other types of chocolate?
Absolutely! While dark and white chocolate work best for flavor and texture contrast, you can experiment with milk chocolate or even flavored chocolates to suit your taste. Just ensure they melt smoothly and not too sweet to balance the pistachio cream.
What if I can’t find kataifi dough?
If kataifi isn’t available near you, thin shredded phyllo dough or even toasted coconut flakes can add crunch, though the flavor will vary slightly. Toast carefully for the best texture.
Is tahini necessary in the pistachio filling?
Tahini adds a subtle nutty richness that complements the pistachio and balances sweetness. You can replace it with almond butter or cashew butter if preferred, but tahini remains the authentic choice for this recipe.
How do I prevent the chocolate from seizing when melting?
Make sure your utensils and bowl are completely dry since even a drop of water can cause chocolate to seize. Melt gently at 30-second intervals and stir often for smooth results.
Can I make this recipe vegan?
Yes, by using dairy-free chocolate chips and a plant-based butter substitute. Just check the pistachio cream ingredients or make your own vegan version to keep the flavors cohesive.
Final Thoughts
Making the Viral Dubai Chocolate Bar Recipe is truly a joyful journey of flavors and textures that results in a dessert so dazzlingly delicious, it’s no surprise that it has captured hearts around the world. Give it a try and watch it become your new favorite chocolate indulgence to share with friends and family. You won’t regret it!
Print
Viral Dubai Chocolate Bar Recipe
- Prep Time: 20 minutes
- Cook Time: 10 minutes
- Total Time: 30 minutes plus chilling time
- Yield: 4 bars
- Category: Dessert
- Method: Stovetop
- Cuisine: Middle Eastern Inspired
Description
This Viral Dubai Chocolate Bar recipe features a luxurious combination of dark chocolate shells filled with a rich pistachio cream blended with toasted kataifi dough for a delightful crunch, all finished with a decorative drizzle of green-tinted white chocolate. Perfect for impressing guests or treating yourself to a gourmet homemade chocolate bar experience.
Ingredients
Chocolate Coating and Decoration
- ¼ cup white chocolate chips (46g)
- 3 drops oil-based green food coloring
- 2 cups dark chocolate chips (370g)
- 4 tablespoons salted butter (56g)
Filling
- 6 ounces kataifi dough (shredded)
- 12 ounces pistachio cream
- ⅓ cup tahini (80g)
- ¼ teaspoon salt
Instructions
- Melt white chocolate and add coloring: In a small microwave-safe bowl, melt ¼ cup white chocolate chips at 30-second intervals, stirring between each one. Once melted, stir in 3 drops of oil-based green food coloring until you have a smooth, even green color.
- Drizzle and set green chocolate: Using a spoon or fork, drizzle the green chocolate into the bottom of each of the four cavities of the mold. Place the mold in the refrigerator for 5 to 10 minutes to set the drizzle.
- Melt dark chocolate: Melt 2 cups dark chocolate chips in a medium bowl in the microwave at 30-second intervals, stirring thoroughly until smooth.
- Pour dark chocolate into mold cavities: Remove the mold from the fridge and pour about two-thirds of the melted dark chocolate into the cavities, dividing evenly.
- Coat mold with chocolate and chill: Use the back of a spoon or pastry brush to spread chocolate so the bottoms and all sides are completely and thickly coated. Shake off excess chocolate and run the back of a knife around the flat top of the mold to remove overflow. Refrigerate for 10 to 15 minutes until firm.
- Prepare kataifi dough: Use your hands to crush the 6 ounces of kataifi dough in a large bowl and set aside.
- Toast kataifi dough: Melt 4 tablespoons salted butter in a large skillet over medium-low heat. Add kataifi dough and toast, stirring constantly for 8 to 10 minutes until deep golden brown and crispy. Transfer to a plate to cool completely.
- Make filling mixture: In a large bowl, stir together 12 ounces pistachio cream, ⅓ cup tahini, and ¼ teaspoon salt until well combined.
- Fold in toasted kataifi: Add the cooled kataifi dough to the pistachio mixture and fold until evenly distributed.
- Fill chocolate shells: Spoon the pistachio filling into the chilled chocolate shells, gently pressing and leveling the filling while leaving a small gap at the top for the final chocolate layer.
- Seal bars with chocolate: Reheat any remaining melted dark chocolate if needed, then pour it over the fillings to seal the bars.
- Chill bars until set: Place the mold back in the refrigerator for at least 1 hour or until the bars are completely solid.
- Unmold finished bars: Once fully set, carefully turn the mold over and gently flex it to release the completed chocolate bars.
Notes
- Ensure the butter and kataifi dough are cooled completely before folding into the pistachio mixture to maintain filling texture.
- Use a silicone mold specifically designed for chocolate bars for best results.
- If using a different mold size, adjust filling and chocolate amounts accordingly.
- Oil-based food coloring works best in chocolate as water-based can cause seizing.
- Store the finished bars in an airtight container in the refrigerator for up to one week.

