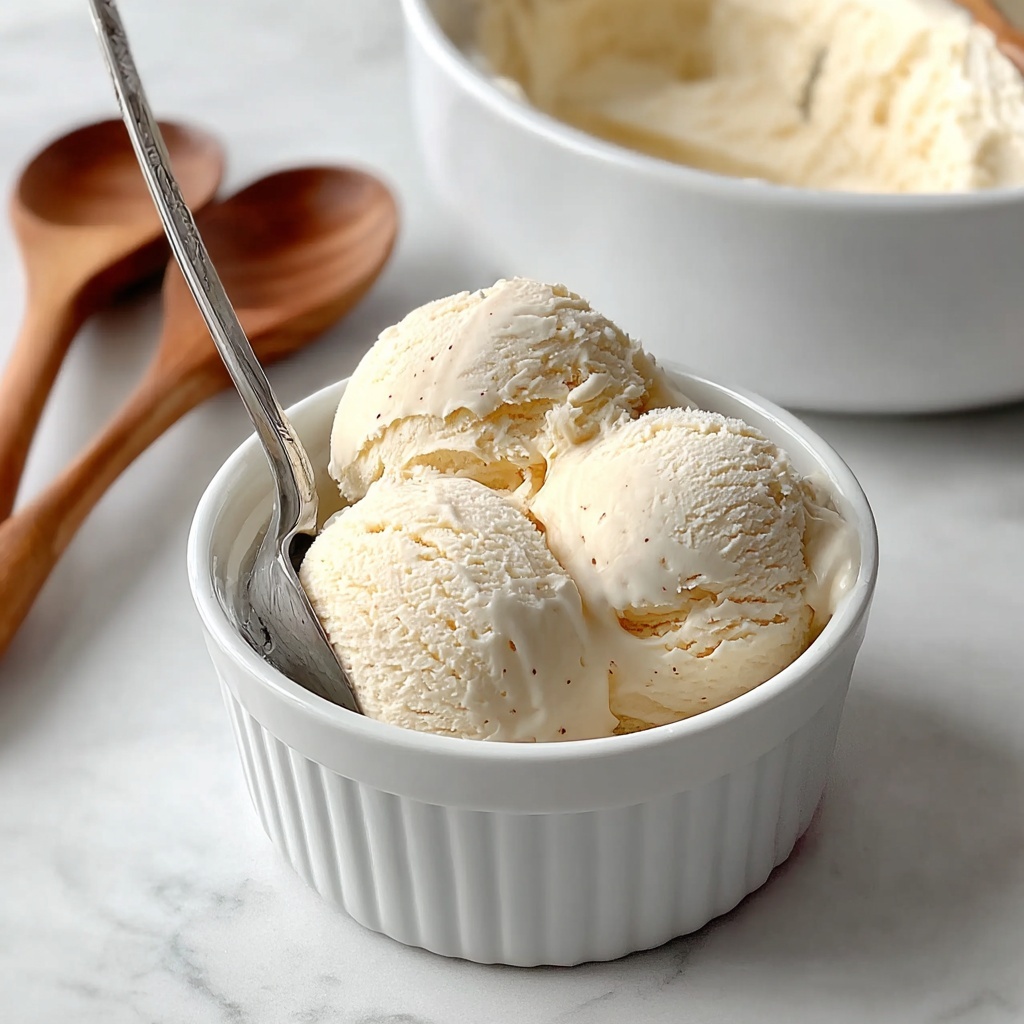
There is something truly magical about creating your own sweet, creamy treat from scratch, especially when it’s a plant-based delight like Vanilla Vegan Ice Cream: An Incredible Ultimate Recipe. This luscious dessert combines the richness of full-fat coconut milk with the warm, fragrant essence of vanilla, making it a satisfying alternative to traditional ice cream. Whether you are vegan, dairy-free, or simply craving a refreshing scoop, this recipe delivers impressive creaminess and flavor that feels indulgent yet wholesome. You’ll love how effortlessly it comes together with pantry staples and some chilled patience, perfect for sharing on sunny afternoons or cozy evenings.
Ingredients You’ll Need
Get ready for a recipe that shines in its simplicity. Every ingredient here plays a vital role, from the creamy coconut milk that forms the luxurious base to the sweeteners that bring perfect balance. Each addition enhances the flavor, texture, or overall appeal, ensuring your homemade ice cream tastes like a treat straight from your favorite artisanal creamery.
- Full-fat coconut milk (2 cans, 13.5 oz each): This rich, creamy base is crucial for that smooth, dairy-free texture everyone loves.
- Organic cane sugar (3/4 cup): Adds natural sweetness and ensures your ice cream tastes delightfully balanced without bitterness.
- Maple syrup (2 tablespoons): Provides a hint of warm complexity and helps with the soft scoop consistency.
- Pure vanilla extract (1 tablespoon): The heart of vanilla flavor, lending aromatic warmth and depth.
- Vanilla bean paste (1 teaspoon, optional): Intensifies the vanilla experience with pretty specks and richer taste.
- Salt (1/8 teaspoon): Enhances all the other flavors, giving the sweetness a perfect backdrop.
How to Make Vanilla Vegan Ice Cream: An Incredible Ultimate Recipe
Step 1: Warm and Combine the Base
Start by giving those cans of coconut milk a good shake to mix the cream and liquid well. Pour the milk into a medium saucepan and gently warm it over medium heat until it’s smooth and nicely combined—just watch carefully so it doesn’t boil. This warming step helps infuse the flavors and dissolve the sugars more thoroughly.
Step 2: Sweeten and Flavor
While the coconut milk is warming, stir in your organic cane sugar and maple syrup. Whisk continuously until all the sugar dissolves completely, avoiding any grainy bits. Remember, no boiling needed here—it’s about gentle warmth. Remove from heat and mix in the pure vanilla extract, optional vanilla bean paste, and a pinch of salt. These ingredients are what turn the mixture from simple to spectacular by layering in that signature vanilla kick and balancing sweetness.
Step 3: Chill the Mixture
Once combined, let the ice cream base cool down to room temperature—it’s important for texture and flavor development. After cooling, cover the mixture and refrigerate it for at least 4 hours. This chilling period is essential as it thickens the base, making it ready for the magical transformation in the ice cream maker.
Step 4: Churn to Perfection
Pour your thoroughly chilled mixture into an ice cream machine and let it churn following your machine’s instructions, usually 20 to 25 minutes. This step aerates the mixture, creating that creamy, dreamy texture we all crave. The mixture will thicken and become velvety, signaling it’s just about scoop-ready.
Step 5: Freeze for Firmness
Transfer the churned ice cream into a freezer-safe container and store it in the freezer for 2 to 4 hours if you prefer a firmer scoop—perfect for summer days or when you want that classic ice cream bite. When serving straight from the freezer, let it sit at room temperature for 5 to 10 minutes for easier scooping.
How to Serve Vanilla Vegan Ice Cream: An Incredible Ultimate Recipe

Garnishes
Elevate every scoop with fun and flavorful toppings. Fresh berries, a drizzle of dairy-free chocolate sauce, or crunchy toasted coconut flakes add texture and bursts of color, while a sprinkle of crushed nuts offers a satisfying crunch. These little touches make your ice cream experience feel extra special and personalized.
Side Dishes
This vanilla vegan ice cream pairs beautifully with warm desserts like freshly baked apple crisp, spicy ginger cookies, or vegan chocolate brownie bars. It also brightens up a simple fruit salad or stands on its own as the perfect refreshing ending to any meal. Its creamy richness contrasts wonderfully with warm or tart companions.
Creative Ways to Present
For a playful twist, serve the ice cream in colorful waffle cones or hollowed-out tropical fruits like pineapples or coconuts for an exotic flair. You can also layer it in parfait glasses with vegan granola and fruit compote for a visually stunning and delicious treat that will wow your guests or family.
Make Ahead and Storage
Storing Leftovers
If you find yourself with extra ice cream, store it in an airtight container to keep it fresh and prevent ice crystals from ruining the texture. This way, you can enjoy your vegan vanilla indulgence anytime, just remember to give it a quick stir before the next scoop.
Freezing
When freezing, make sure the ice cream is placed in a shallow, freezer-safe container to speed up freezing and ensure even texture. Avoid frequent thawing and refreezing to maintain that creamy goodness. Proper freezing ensures your ice cream retains its decadent mouthfeel for days to come.
Reheating
Since this ice cream is best served cold, reheating isn’t necessary. Instead, if it becomes too firm in the freezer, simply let it sit at room temperature for 5 to 10 minutes before scooping. This gentle softening allows for easy serving without compromising flavor or texture.
FAQs
Can I make this recipe without an ice cream maker?
Yes! You can pour the mixture into a shallow dish and freeze, stirring vigorously every 30 minutes for a few hours to break up ice crystals. While the texture won’t be as smooth as with an ice cream maker, it will still be deliciously creamy and satisfy your craving.
Is canned coconut milk always necessary?
Full-fat canned coconut milk is important here for its high fat content which creates the creamy base. Light coconut milk or carton varieties won’t give the same luscious texture and may result in icy ice cream.
Can I substitute the sugars for healthier options?
Absolutely. Swap organic cane sugar with coconut sugar to keep it refined sugar-free, or try date syrup for a natural sweetness. Just keep in mind that different sweeteners might subtly alter the flavor and texture.
How long does homemade vegan ice cream last in the freezer?
For the best quality, enjoy your Vanilla Vegan Ice Cream within 1 to 2 weeks. Over time, ice crystals can develop, and the texture may become less creamy.
Can I add mix-ins like chocolate chips or nuts?
Yes! Add your favorite vegan chocolate chips, crushed cookies, or nuts during the last 5 minutes of churning for fun texture and flavor surprises throughout your ice cream.
Final Thoughts
If you’re looking to wow yourself and your loved ones with a creamy, dreamy dessert that’s completely plant-based, this Vanilla Vegan Ice Cream: An Incredible Ultimate Recipe is a must-try. The combination of simple ingredients and straightforward steps makes this recipe approachable, while the results are impressively rich and indulgent. Grab your ice cream maker, get cozy in the kitchen, and enjoy every luscious, flavorful bite!
Print
Vanilla Vegan Ice Cream: An Incredible Ultimate Recipe
- Prep Time: 10 minutes
- Cook Time: 5 minutes
- Total Time: 4 hours 15 minutes
- Yield: 6 servings
- Category: Dessert
- Method: Churning
- Cuisine: American
- Diet: Vegan
Description
This Vanilla Vegan Ice Cream recipe is an incredibly creamy and delicious plant-based dessert made from full-fat coconut milk, sweetened with organic cane sugar and maple syrup, and flavored with pure vanilla. Perfect for those seeking a dairy-free, gluten-free, and vegan-friendly treat, this homemade ice cream delivers rich vanilla flavor and a smooth texture without any dairy or refined sugars.
Ingredients
Base Ingredients
- 2 cans (13.5 ounces each) full-fat coconut milk
- 3/4 cup organic cane sugar
- 2 tablespoons maple syrup
- 1 tablespoon pure vanilla extract
- 1 teaspoon vanilla bean paste (optional)
- 1/8 teaspoon salt
Instructions
- Prepare Coconut Milk Base: Shake the cans of coconut milk well before opening to ensure the cream and liquid are fully combined. Pour the coconut milk into a medium saucepan and warm it over medium heat, stirring occasionally until it is smooth and completely combined.
- Sweeten and Flavor: Stir in the organic cane sugar and maple syrup while whisking continuously to dissolve the sugar completely. Be careful not to let the mixture boil during this step to preserve the texture and flavor.
- Add Vanilla and Salt: Remove the saucepan from the heat and mix in the pure vanilla extract, optional vanilla bean paste for extra flavor, and salt, blending all ingredients well.
- Chill Mixture: Allow the mixture to cool down to room temperature. Once cooled, cover the saucepan and refrigerate for at least 4 hours or until the mixture is thoroughly chilled, which is essential for the best churning results.
- Churn Ice Cream: Pour the chilled mixture into an ice cream maker and churn according to the manufacturer’s instructions, typically about 20 to 25 minutes, until the ice cream thickens and becomes creamy.
- Freeze for Firmness: Transfer the churned ice cream into a freezer-safe container and freeze for 2 to 4 hours to achieve a firmer texture suitable for scooping and serving.
- Serve: Before serving, let the ice cream sit at room temperature for 5 to 10 minutes if it is too firm to scoop easily, then enjoy your homemade vegan vanilla ice cream.
Notes
- For extra creaminess, substitute 1/2 cup of the coconut milk with raw cashew cream blended until smooth.
- To make the recipe refined sugar-free, replace the cane sugar with coconut sugar.
- Enhance your ice cream by adding mix-ins such as dairy-free chocolate chips or crushed cookies during the last 5 minutes of churning.

