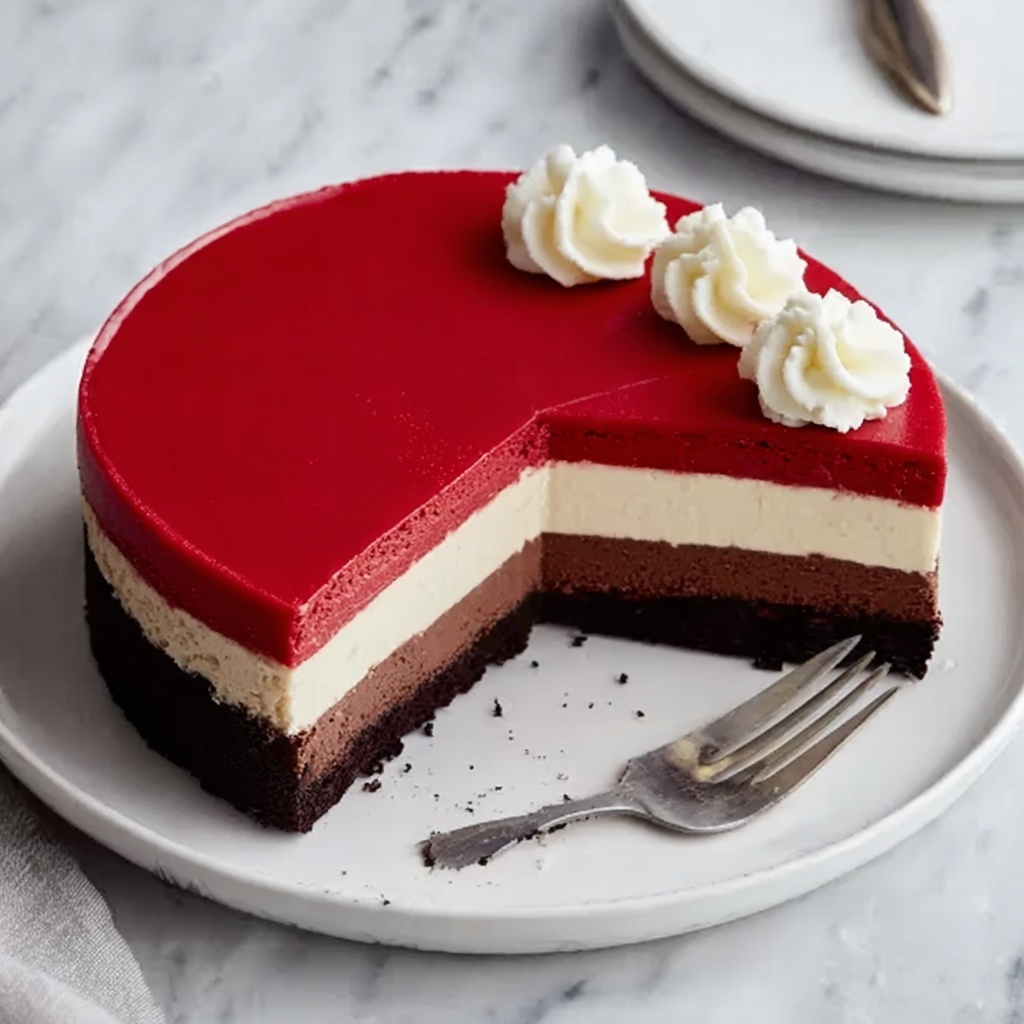
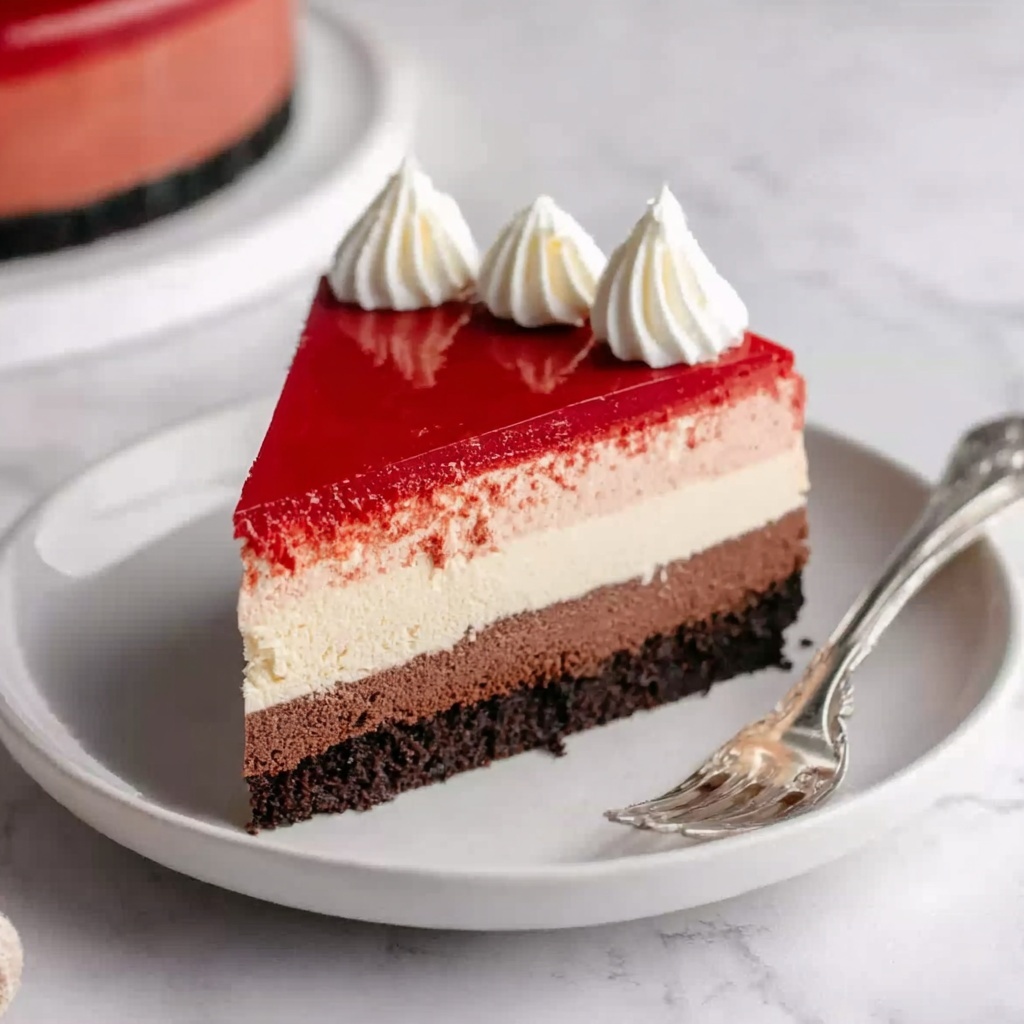
If you’ve ever dreamed of a dessert that’s as visually stunning as it is delicious, this Red Velvet No-Bake Cheesecake Recipe is going to steal your heart. It combines the rich, velvety flavors of traditional red velvet cake with the creamy, luscious texture of a no-bake cheesecake, making it a showstopper for any occasion. Whether you’re a cheesecake aficionado or a red velvet lover, this easy and elegant dessert promises effortless indulgence without turning on your oven.
Ingredients You’ll Need
Gathering simple, familiar ingredients is all it takes to bring this delightful treat to life. Each component plays a crucial role, from the red velvet cake mix providing that iconic flavor and gorgeous color, to the cream cheese and whipped topping that create the irresistibly smooth filling.
- Red velvet cake mix: The star ingredient giving this cheesecake its signature flavor and vibrant hue.
- Unsalted butter, melted: Helps bind the crust ingredients together while adding a rich, buttery note.
- Cream cheese, softened: The creamy base making the filling smooth and tangy.
- Sour cream: Adds a subtle tang and silky texture to the filling.
- Powdered sugar, sifted: Sweetens the cheesecake filling without any grittiness.
- Vanilla extract: Enhances the overall flavor with a warm, fragrant touch.
- Whipped topping: Lightens up the filling, giving it a delightful fluff and softness.
How to Make Red Velvet No-Bake Cheesecake Recipe
Step 1: Prepare the Crust
Start by mixing the melted unsalted butter with the red velvet cake mix in a bowl until the texture turns crumbly and holds together when pressed. This forms a luscious, velvety crust that’s both firm and full of flavor. Press this mixture firmly into the bottom of a springform pan—it’s the foundation for the whole dessert, so make sure it’s compacted evenly and solid.
Step 2: Make the Creamy Filling
In a separate bowl, beat the softened cream cheese and sour cream together until the mixture is completely smooth and silky. Slowly add the powdered sugar and vanilla extract, mixing well after each addition to ensure everything is fully blended and creamy. This creates a luscious filling that’s rich yet light.
Step 3: Fold in the Whipped Topping
Gently fold the whipped topping into your cream cheese mixture. Doing this with care ensures the cheesecake filling stays airy and fluffy, adding the perfect lightness that contrasts beautifully with the dense red velvet crust.
Step 4: Assemble and Chill
Pour the velvety filling over your prepared crust, spreading it evenly for a perfect layer. Cover the top with plastic wrap and pop it into the fridge. Allow the cheesecake to chill and set for at least four hours, or better yet, overnight. Patience here rewards you with a slice that holds its shape and melts in your mouth.
Step 5: Serve and Enjoy
Once chilled, gently remove the cheesecake from the springform pan. Slice it with a sharp knife for clean pieces and prepare to impress everyone with this stunning dessert that requires no oven but delivers all the flavor and texture of a classic cheesecake.
How to Serve Red Velvet No-Bake Cheesecake Recipe

Garnishes
A simple garnish can elevate the presentation and flavor of this cheesecake wonderfully. Consider decorating with a dusting of cocoa powder or finely grated white chocolate to nod to the red velvet’s hints of cocoa. Fresh raspberries or strawberries add a bright, juicy contrast, while a sprinkle of red velvet cake crumbs provides a charming textured finish.
Side Dishes
Pairing your Red Velvet No-Bake Cheesecake Recipe with light accompaniments enhances the overall dessert experience. A scoop of vanilla or cream cheese ice cream complements the creamy filling perfectly. Alternatively, enjoy it alongside a fresh fruit salad to balance the richness of the cheesecake with refreshing tartness.
Creative Ways to Present
For a fun presentation, prepare this cheesecake in individual jars or mini springform pans. This not only looks adorable but also makes serving a breeze when entertaining. You can also layer the filling and crust in clear glasses for a beautiful parfait-style dessert, letting the striking red velvet color shine through.
Make Ahead and Storage
Storing Leftovers
This cheesecake holds up beautifully in the refrigerator for up to 4 days when covered tightly with plastic wrap or stored in an airtight container. Keeping it chilled maintains that creamy texture and keeps the red velvet flavor fresh and vibrant.
Freezing
If you want to savor this Red Velvet No-Bake Cheesecake Recipe later, freezing is a great option. Wrap it well with plastic wrap and aluminum foil to avoid freezer burn and freeze for up to 2 months. Thaw overnight in the fridge before serving to keep its luscious texture intact.
Reheating
Since this is a no-bake cheesecake, reheating isn’t necessary or recommended. It’s best enjoyed chilled, allowing the creamy filling and crumbly crust to remain perfectly set and refreshing.
FAQs
Can I use a different cake mix for the crust?
Absolutely! While red velvet cake mix is essential for that signature flavor and color, you can experiment with chocolate or spice cake mixes to create fun variations. Just keep in mind that the flavor profile will change accordingly.
Is it possible to make this recipe dairy-free?
Yes, you can substitute cream cheese, sour cream, and whipped topping with plant-based alternatives found at most grocery stores. This way, you can enjoy the red velvet cheesecake without dairy, though texture might be slightly different.
Can I double this recipe for a larger batch?
Definitely! Doubling is straightforward—just double every ingredient and use a larger pan or multiple pans to accommodate the increased amount. Just be sure to extend chilling time slightly if needed for the cheesecake to set properly.
How do I prevent the cheesecake from becoming too watery?
A key tip is to ensure your whipped topping is well drained and your cream cheese is soft but not runny. Also, avoid overmixing once you fold in the whipped topping to preserve the airy texture without releasing excess liquid.
What’s the best way to get clean slices when serving?
Run a sharp knife under hot water, wipe it dry, then slice through the cheesecake. Repeat this warming and wiping method between slices to keep each piece looking neat and beautiful.
Final Thoughts
I can’t recommend the Red Velvet No-Bake Cheesecake Recipe enough for anyone who loves a dessert that’s elegant, easy, and irresistibly tasty. It’s the perfect way to impress guests or treat yourself without the fuss of baking. Once you try it, I’m sure it will become a beloved favorite that’s as fun to make as it is to eat!
Print
Red Velvet No-Bake Cheesecake Recipe
- Prep Time: 15 minutes
- Cook Time: 0 minutes
- Total Time: 4 hours 15 minutes
- Yield: 10 servings
- Category: Dessert
- Method: No-Cook
- Cuisine: American
Description
This Red Velvet No-Bake Cheesecake is a decadent and easy-to-make dessert featuring a rich red velvet cake crust and a creamy no-bake cream cheese filling. Perfect for those looking for a quick yet indulgent treat without the need for an oven. Chilled until set, this cheesecake combines classic red velvet flavors with a smooth, luscious texture.
Ingredients
Crust
- 1 cup red velvet cake mix
- ½ cup unsalted butter, melted
Filling
- 8 oz cream cheese, softened
- ½ cup sour cream
- 1 cup powdered sugar, sifted
- 1 tsp vanilla extract
- 1 cup whipped topping
Instructions
- Prepare the crust: In a bowl, combine 1 cup of red velvet cake mix with ½ cup of melted unsalted butter until the mixture becomes crumbly. Press this mixture firmly into the bottom of a springform pan to form an even crust layer.
- Make the filling: In a separate bowl, beat 8 oz of softened cream cheese and ½ cup of sour cream together until smooth and creamy. Gradually add 1 cup of sifted powdered sugar and 1 teaspoon of vanilla extract, mixing until well combined and free of lumps.
- Incorporate whipped topping: Gently fold in 1 cup of whipped topping to the cream cheese mixture, combining without deflating the light texture to maintain a fluffy consistency.
- Assemble the cheesecake: Pour the prepared filling over the red velvet crust in the springform pan, spreading it evenly with a spatula. Cover the pan tightly with plastic wrap and chill in the refrigerator for at least four hours or preferably overnight to allow it to set properly.
- Serve: Once fully chilled and set, remove the cheesecake from the springform pan carefully. Slice into portions and serve chilled for a refreshing, creamy dessert experience.
Notes
- For best results, chill the cheesecake overnight to ensure it is fully set.
- Use softened cream cheese to avoid lumps in the filling.
- You can garnish the cheesecake with red velvet cake crumbs or fresh berries for added presentation.
- This cheesecake does not require baking, making it a quick and convenient dessert option.
- Make sure to press the crust firmly to avoid it crumbling when slicing.


