
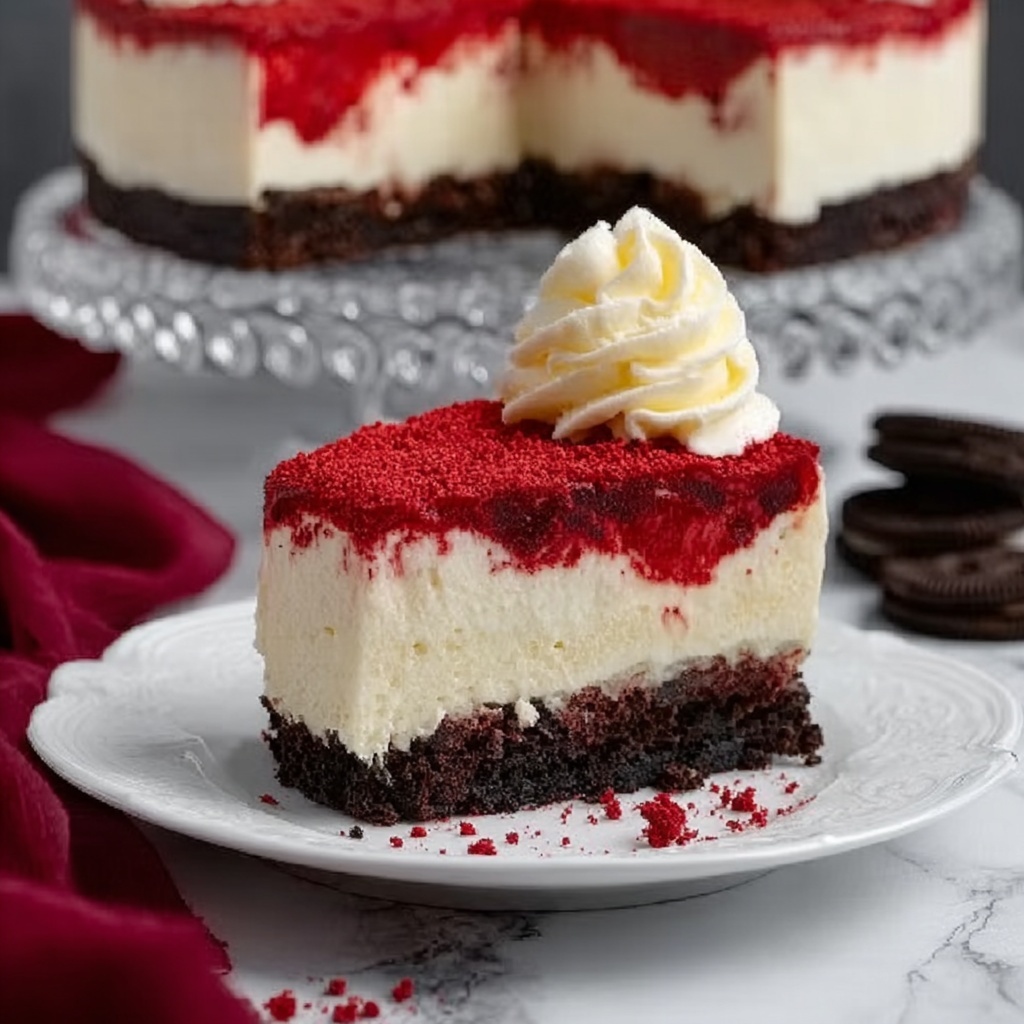
If you’ve ever dreamed of combining that rich, velvety texture of classic cheesecake with the iconic, vibrant flavors of red velvet cake, then this Red Velvet Cheesecake Recipe is exactly the treasure you need in your life. It’s a dazzling dessert that balances creamy, smooth cream cheese filling with a tender cocoa-infused red velvet twist, all nestled on a crisp chocolate cookie crust. Whether it’s for a celebration or just because, this dessert is guaranteed to wow friends and family with every luscious bite.
Ingredients You’ll Need
Every ingredient in this Red Velvet Cheesecake Recipe is simple yet essential, playing a big role in creating the perfect blend of flavor, color, and texture. From tangy cream cheese to velvety cocoa and the deep reds that make this cake pop, you’ll appreciate how each element contributes to the final magic.
- Chocolate sandwich cookie crumbs: For a rich, crunchy crust base that contrasts beautifully with the creamy filling.
- Unsalted butter, melted: To bind the crumbs for a sturdy crust with a buttery undertone.
- Cream cheese, softened: Provides the signature smooth, tangy foundation for the cheesecake layers.
- Granulated sugar: Sweetens the filling without overpowering the classic red velvet flavor.
- Sour cream: Adds moisture and a subtle tang that keeps each bite perfectly balanced.
- Vanilla extract: Enhances the overall flavor with its warm, familiar aroma.
- Large eggs: Give the cheesecake structure while keeping it luxuriously creamy.
- Unsweetened cocoa powder: Infuses that gentle chocolate note essential to red velvet’s distinctive taste.
- Red gel food coloring: Creates the classic deep red hue that makes this cheesecake visually stunning.
- Powdered sugar: Used in the frosting to add smooth sweetness and a delicate texture.
- Butter, softened: Combines with cream cheese for the luscious frosting finish.
How to Make Red Velvet Cheesecake Recipe
Step 1: Prepare the Crust
Start by preheating your oven to 325°F (160°C) and greasing a 9-inch springform pan, then wrapping the bottom with aluminum foil to prevent leaks. Mix the chocolate sandwich cookie crumbs with melted butter until the mixture resembles wet sand. Press this mixture firmly and evenly across the base of the pan to form a sturdy crust. Bake it for 10 minutes, then let it cool completely—this sets the foundation for your decadent cheesecake.
Step 2: Make the Cheesecake Layer
In a large bowl, beat the softened cream cheese with granulated sugar until absolutely smooth—no lumps here! Add the sour cream and vanilla extract, mixing well. Then, add eggs one at a time, ensuring each is fully incorporated before adding the next. This slow mixing keeps your batter velvety and airy. Next, stir in the cocoa powder and red gel food coloring, which lend the cheesecake that unmistakable red velvet flavor and vibrant color. Pour the batter carefully over the cooled crust, smoothing the top.
Step 3: Bake with the Water Bath
To achieve that classic creamy texture with no cracks, place your springform pan inside a larger baking dish filled with hot water halfway up the sides of the pan—a water bath. Bake in the preheated oven for 55 to 65 minutes. When done, the edges should be set but the center still slightly jiggly. Turn off the oven and let the cheesecake cool inside for one hour; this slow cooling helps prevent cracks. Afterward, refrigerate the cheesecake for at least 6 hours or overnight to fully set.
Step 4: Prepare the Frosting
While your cheesecake chills, whip up the frosting by beating together softened cream cheese and butter until perfectly smooth and light. Gradually add powdered sugar, mixing well after each addition, then finish with vanilla extract. This luscious frosting is the ideal finish for your Red Velvet Cheesecake Recipe, adding sweetness and extra creaminess on top.
Step 5: Assemble and Serve
Once chilled and firm, carefully remove the cheesecake from the springform pan. Spread the cream cheese frosting evenly over the top using an offset spatula for a smooth finish. Now your masterpiece is ready to be garnished and enjoyed—keep reading for some fantastic serving ideas!
How to Serve Red Velvet Cheesecake Recipe

Garnishes
Think beyond plain frosting! Fresh berries like raspberries or strawberries add a bright, juicy contrast and a burst of color. A sprinkle of crushed chocolate sandwich cookies on top adds crunch and ties back to the crust. For an elegant touch, a few white chocolate curls or edible rose petals can transform your cheesecake into a true showstopper.
Side Dishes
Pair this luscious cheesecake with light, refreshing sides to balance the richness. A small bowl of mixed berries or a simple citrus salad with orange and grapefruit segments complements the creamy texture beautifully. For coffee lovers, a smooth cappuccino or latte is the perfect beverage to bring out the subtle cocoa notes.
Creative Ways to Present
Slice your Red Velvet Cheesecake Recipe into neat wedges and arrange them on a chic serving platter, garnished with mint leaves for freshness. Alternatively, create mini versions using muffin tins for individual servings at parties. You can also turn leftovers into indulgent parfaits layered with whipped cream and crushed cookies—each spoonful feels like a new dessert adventure.
Make Ahead and Storage
Storing Leftovers
Once decorated, keep your cheesecake tightly covered with plastic wrap or in an airtight container in the refrigerator. This helps the dessert stay creamy and moist while preventing it from picking up any fridge odors. Stored correctly, your cheesecake will stay delicious for up to 4-5 days.
Freezing
You can absolutely freeze this cheesecake to extend its life. Wrap it tightly in plastic wrap and then foil to protect against freezer burn. When you’re ready to indulge, thaw it overnight in the refrigerator—this ensures the texture remains smooth and creamy, just like freshly made.
Reheating
Cheesecake is best served chilled, so reheating is generally not recommended. If you prefer it slightly less cold, let any leftovers sit out at room temperature for 20-30 minutes before serving to soften the texture without warming it up too much.
FAQs
Can I use regular food coloring instead of gel?
You can, but gel food coloring offers much richer color without adding extra liquid, which helps maintain the perfect texture of the cheesecake.
Do I really need to use a water bath when baking?
Yes! The water bath gently and evenly distributes heat, preventing cracks and ensuring that silky smooth texture that makes this Red Velvet Cheesecake Recipe so irresistible.
Can I make this cheesecake gluten-free?
Absolutely! Just swap the chocolate sandwich cookie crumbs for a gluten-free brand. The crust will still hold firm and taste amazing.
Is it necessary to use sour cream in the recipe?
Sour cream adds moisture and slight tanginess that balances sweetness beautifully, but you could substitute with Greek yogurt if needed.
How do I prevent the cheesecake from cracking?
Using room temperature ingredients, avoiding overmixing, baking it in a water bath, and cooling it gradually inside the oven all contribute to a crack-free cheesecake.
Final Thoughts
This Red Velvet Cheesecake Recipe is a true celebration in every slice—rich, creamy, and full of that charming red velvet flair. Whether you’re sharing it with friends, serving it at a special occasion, or simply treating yourself, it’s a dessert that feels like a warm hug. I can’t wait for you to try making it and fall in love with those velvety textures and vibrant flavors just like I did.
Print
Red Velvet Cheesecake Recipe
- Prep Time: 20 minutes
- Cook Time: 1 hour 15 minutes
- Total Time: 8 hours 35 minutes
- Yield: 12 servings
- Category: Dessert
- Method: Baking
- Cuisine: American
Description
This Red Velvet Cheesecake combines the rich and creamy texture of classic cheesecake with the bold flavors and vibrant color of red velvet cake. With a chocolate cookie crust, a smooth red velvet cream cheese filling, and a luscious cream cheese frosting, this dessert is perfect for special occasions or any time you want a decadent treat.
Ingredients
Crust
- 1 1/2 cups chocolate sandwich cookie crumbs (e.g., Oreos)
- 1/4 cup unsalted butter, melted
Cheesecake Layer
- 24 ounces (3 blocks) cream cheese, softened
- 1 cup granulated sugar
- 1/4 cup sour cream
- 1 teaspoon vanilla extract
- 3 large eggs
- 1 tablespoon unsweetened cocoa powder
- 1 teaspoon red gel food coloring
Frosting
- 8 ounces cream cheese, softened
- 1/4 cup unsalted butter, softened
- 1 1/2 cups powdered sugar
- 1 teaspoon vanilla extract
Instructions
- Prepare the Crust: Preheat your oven to 325°F (160°C). Grease a 9-inch springform pan and wrap the bottom with aluminum foil to prevent leaks. In a bowl, combine the chocolate sandwich cookie crumbs and melted butter, then press this mixture firmly into the bottom of the prepared pan. Bake the crust for 10 minutes, then remove from oven and allow it to cool completely.
- Make the Cheesecake Layer: In a large bowl, beat the softened cream cheese with granulated sugar until smooth and creamy using a hand mixer or stand mixer. Add the sour cream and vanilla extract, mixing well. Then incorporate the eggs one at a time, ensuring each is fully blended before adding the next. Stir in the unsweetened cocoa powder followed by the red gel food coloring, mixing until the batter is evenly colored and smooth. Pour this batter over the cooled crust, spreading evenly.
- Bake the Cheesecake: Place the springform pan into a larger roasting pan or baking dish. Pour hot water into the larger pan halfway up the sides of the springform to create a water bath; this helps the cheesecake bake evenly and prevents cracking. Bake the cheesecake in the preheated oven for 55 to 65 minutes, until the edges are set but the center still slightly jiggles. Turn off the oven and leave the cheesecake inside for 1 hour to cool gradually, then remove it and refrigerate for at least 6 hours or overnight to fully set.
- Prepare the Frosting: Beat the softened cream cheese and softened butter together until smooth and creamy. Gradually add the powdered sugar, continuing to beat until fluffy. Mix in the vanilla extract to complete the frosting.
- Assemble and Serve: Carefully remove the cheesecake from the springform pan. Spread the cream cheese frosting evenly over the top of the cheesecake. Optionally garnish as desired with additional cookie crumbs or decorations. Serve chilled for the best flavor and texture.
Notes
- For best results, ensure all cream cheese is at room temperature before mixing to avoid lumps.
- Using a water bath during baking helps prevent cracks in the cheesecake.
- You can substitute regular unsweetened cocoa powder with Dutch-processed cocoa powder for a slightly different flavor.
- If you don’t have red gel food coloring, you can use liquid food coloring but the color may be less vibrant.
- Be careful not to overmix the batter once eggs have been added to prevent too much air incorporation, which can cause cracking.
- Make sure the cheesecake is fully chilled before frosting and serving for clean slices.


