“`html
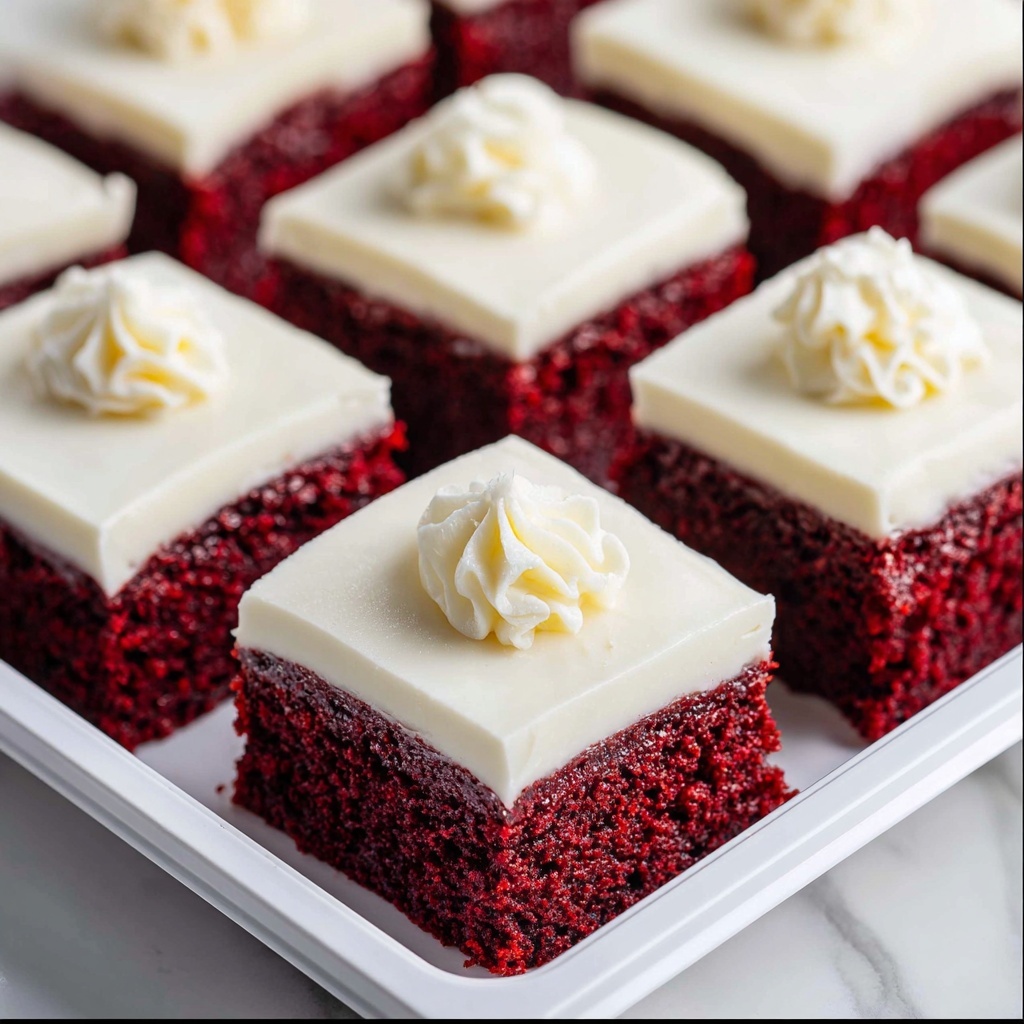
If you’re craving something rich, decadent, and irresistibly beautiful, this Red Velvet Brownies with Cream Cheese Frosting Recipe is an absolute must-try. Imagine the perfect harmony of fudgy, chocolate-infused red velvet brownies topped with a luscious, tangy cream cheese frosting that will have you coming back for more. It’s a spectacular twist on classic brownies that brings a vibrant pop of color and an extra layer of flavor, making any occasion feel just a little bit more special.
Ingredients You’ll Need
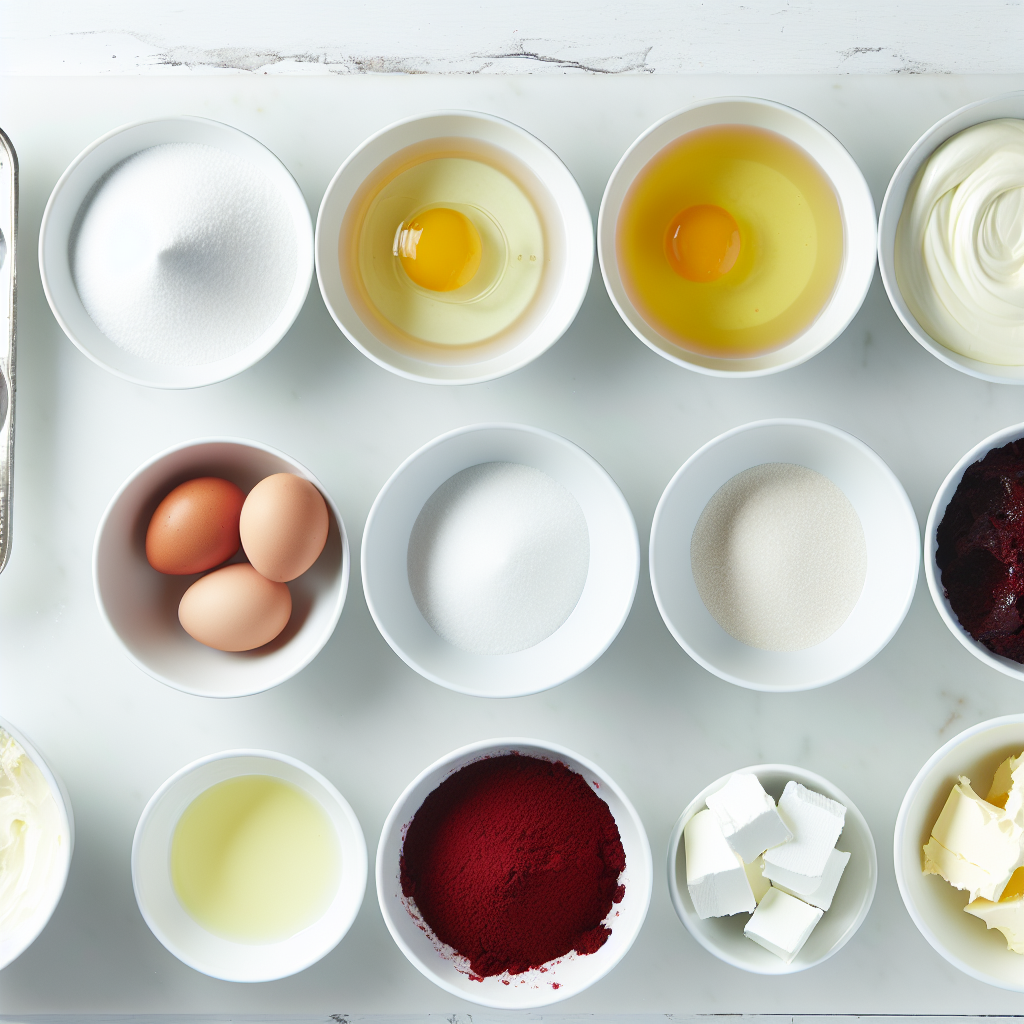
The magic of this Red Velvet Brownies with Cream Cheese Frosting Recipe lies in its simple but carefully chosen ingredients. Each one plays a vital role in building the perfect texture, taste, and that stunning red hue that makes these brownies so eye-catching.
- 1 cup Unsalted Butter (Melted): Provides rich moisture and a silky texture to the brownies.
- 2 cups Granulated Sugar: Sweetens evenly while helping with the tender crumb.
- 4 large Eggs: Bind everything together and add structure and richness.
- 2 teaspoons Vanilla Extract: Enhances all the flavors with a warm, aromatic touch.
- 2 cups All-Purpose Flour: The backbone for the brownies’ dense but soft texture.
- 1/2 cup Unsweetened Cocoa Powder: Infuses deep chocolate flavor and balances the sweetness.
- 1 teaspoon Baking Powder: Helps achieve just the right rise and fluffiness.
- 1 teaspoon Baking Soda: Works with the acidic ingredients for tenderness and color.
- 1 teaspoon Salt: Enhances sweetness and intensifies the chocolate notes.
- 1 tablespoon Red Food Coloring: Gives that iconic, vibrant red color unique to red velvet treats.
- 8 ounces Cream Cheese (Softened): Creates the creamy, tangy base for the frosting.
- 1/2 cup Unsalted Butter (Softened): Adds richness and smoothness to the frosting.
- 4 cups Powdered Sugar: Sweetens the frosting while keeping it light and fluffy.
- 1 teaspoon Vanilla Extract: Infuses the frosting with warmth and complexity.
- 2 tablespoons Heavy Cream (Optional for consistency): Helps adjust frosting thickness perfectly for spreading.
How to Make Red Velvet Brownies with Cream Cheese Frosting Recipe
Step 1: Preheat and Prepare Your Pan
Begin by preheating your oven to 350°F (175°C). Grease a 9×13-inch baking pan with butter or line it with parchment paper to ensure your brownies come out easily without sticking—this simple step sets the stage for perfect baking.
Step 2: Combine the Wet Ingredients
In a large mixing bowl, melt the unsalted butter and let it cool slightly. Once it’s warm but not hot, add the granulated sugar and whisk it together until the mixture is smooth and glossy. Next, add the eggs one at a time, making sure to mix thoroughly after each addition so every bite is luscious and evenly textured. Finally, stir in the vanilla extract for that inviting sweet aroma.
Step 3: Sift and Mix the Dry Ingredients
In a separate bowl, sift together the all-purpose flour, cocoa powder, baking powder, baking soda, and salt. This ensures there are no lumps and that your brownies will have an even texture. Gradually add this dry blend to the wet ingredients while stirring gently until just combined—you want to avoid overmixing to keep the brownies fudgy.
Step 4: Add the Color and Bake
Now comes the fun part: fold in the red food coloring gradually until the batter is evenly and vibrantly red. Pour this beautiful batter into your prepared baking dish and smooth the surface with a spatula. Bake for about 25 to 30 minutes, or until you can insert a toothpick and it comes out with just a few moist crumbs attached. This carefully timed baking produces brownies that are moist but set perfectly.
Step 5: Cool Completely Before Frosting
Let the brownies cool in the pan for 15 to 20 minutes. Then lift them out and transfer to a wire rack to cool completely. This step is crucial because the cream cheese frosting will slide off if the brownies are still warm, and you want the top to be firm enough to hold that luscious layer.
Step 6: Make the Cream Cheese Frosting
While the brownies chill, combine the softened cream cheese and butter in a bowl and beat until the mixture is smooth and silky. Gradually add the powdered sugar and continue mixing until the frosting is thick and creamy. If needed, add the optional heavy cream one tablespoon at a time to get the perfect spreading consistency. Finally, stir in the vanilla extract to make the frosting flavorful and inviting.
Step 7: Frost and Serve
Spread the cream cheese frosting generously over the cooled brownies. Make sure you cover every inch for that perfect bite of creaminess on top of the rich red velvet base. After frosting, cut into squares or rectangles and get ready to enjoy these irresistible treats!
How to Serve Red Velvet Brownies with Cream Cheese Frosting Recipe
Garnishes
A sprinkle of finely chopped pecans or a dusting of cocoa powder can add texture and an extra pop of flavor. If you’re feeling fancy, a few fresh raspberries or edible rose petals make these brownies look as beautiful as they taste.
Side Dishes
These brownies pair wonderfully with a scoop of vanilla ice cream or a dollop of whipped cream, perfect for balancing their richness. A hot cup of coffee or a milky chai latte also complements the deep chocolate and creamy frosting flavors, making a cozy treat any time of day.
Creative Ways to Present
For parties, serve the brownies on a decorative platter with a drizzle of white chocolate or caramel sauce. You might even cut them into bite-sized squares and place them on skewers for a fun and festive finger food option. Layering the brownies with frosting as a trifle dessert is another creative way to enjoy this recipe.
Make Ahead and Storage
Storing Leftovers
These brownies keep beautifully in an airtight container at room temperature for about 2 days, but to maintain freshness and prevent the cream cheese frosting from drying out, refrigerating is your best bet. Stored in the fridge, they can last up to 5 days.
Freezing
If you want to save the brownies for later, freezing is a great option. Cut the brownies into individual pieces and wrap each one tightly in plastic wrap, then place them in a freezer-safe bag. When properly frozen, they can last for up to 3 months. Thaw overnight in the refrigerator before serving.
Reheating
To enjoy warm brownies, let them come to room temperature or microwave individual pieces for 10-15 seconds. Be careful not to overheat as the cream cheese frosting can melt or become oily. A warm bite with cool frosting is a delicious contrast that makes every mouthful heavenly.
FAQs
Can I use a different type of food coloring?
Absolutely! Gel food coloring is usually preferred for its vibrant color without adding too much liquid, but liquid food coloring works fine too—just expect a slightly less intense shade of red.
Is it possible to make this recipe gluten-free?
Definitely. You can substitute the all-purpose flour with a gluten-free flour blend designed for baking. Make sure it contains xanthan gum for structure, or add it separately if necessary.
Can I prepare the frosting ahead of time?
Yes, you can make the cream cheese frosting a day in advance. Store it tightly covered in the refrigerator, then bring it back to room temperature and give it a quick whip before spreading it on the brownies.
What if I don’t have unsweetened cocoa powder?
You can substitute Dutch-processed cocoa powder if that’s what you have. It has a smoother, less acidic flavor but keep in mind it might slightly alter the taste and texture.
Can these brownies be made into cupcakes or individual portions?
Yes! You can pour the batter into cupcake liners and bake for about 18 to 22 minutes. Just adjust the frosting quantity accordingly for a charming, portion-controlled treat.
Final Thoughts
There’s something so magical about baking that results in a treat as stunning and delicious as this Red Velvet Brownies with Cream Cheese Frosting Recipe. Whether you’re making them for a special occasion or just because, they’re sure to light up any dessert table and warm hearts with every bite. So put on your apron and give this delightful recipe a try—you won’t regret it!
“`
Print
Red Velvet Brownies with Cream Cheese Frosting Recipe
- Prep Time: 15 minutes
- Cook Time: 30 minutes
- Total Time: 45 minutes
- Yield: 12 servings
- Category: Dessert
- Method: Baking
- Cuisine: American
- Diet: Vegetarian
Description
Delight in these rich and moist red velvet brownies topped with a smooth and creamy cream cheese frosting. Perfectly balanced with a hint of cocoa and vibrant red coloring, these brownies offer a luscious twist on the classic dessert, ideal for gatherings, celebrations, or whenever you’re craving a decadent treat.
Ingredients
Brownie Batter
- 1 cup Unsalted Butter (Melted)
- 2 cups Granulated Sugar
- 4 large Eggs
- 2 teaspoons Vanilla Extract
- 2 cups All-Purpose Flour
- 1/2 cup Unsweetened Cocoa Powder
- 1 teaspoon Baking Powder
- 1 teaspoon Baking Soda
- 1 teaspoon Salt
- 1 tablespoon Red Food Coloring
Cream Cheese Frosting
- 8 ounces Cream Cheese (Softened)
- 1/2 cup Unsalted Butter (Softened)
- 4 cups Powdered Sugar
- 1 teaspoon Vanilla Extract
- 2 tablespoons Heavy Cream (Optional for consistency)
Instructions
- Preheat Oven: Preheat your oven to 350°F (175°C) to ensure even baking when you place the brownies inside.
- Prepare Pan: Grease a 9×13-inch baking pan with butter or line it with parchment paper to prevent sticking and facilitate easy removal.
- Melt Butter: Melt the unsalted butter in a large mixing bowl and let it cool slightly, avoiding cooking the eggs later by adding hot butter.
- Mix Sugar and Butter: Add granulated sugar to the melted butter and whisk thoroughly until well combined and slightly thickened.
- Add Eggs and Vanilla: Incorporate eggs one at a time, mixing well after each addition, then stir in the vanilla extract for flavor.
- Combine Dry Ingredients: In a separate bowl, sift together flour, cocoa powder, baking powder, baking soda, and salt to ensure a uniform dry mixture.
- Mix Wet and Dry Ingredients: Gradually add the sifted dry mixture to the wet ingredients, stirring gently until just combined to avoid overmixing.
- Add Food Coloring: Gently fold in the red food coloring until the batter achieves an even vibrant red shade.
- Pour and Smooth Batter: Pour the prepared batter into the baking pan and smooth the surface with a spatula for even baking.
- Bake Brownies: Bake for 25-30 minutes, checking doneness with a toothpick inserted into the center; it should come out with a few moist crumbs.
- Cool Brownies: Let the brownies cool in the pan for 15-20 minutes to set, then transfer them to a wire rack to cool completely.
- Prepare Frosting: Beat softened cream cheese and butter together until smooth and creamy, forming the base of the frosting.
- Add Powdered Sugar: Gradually add powdered sugar to the mixture, beating continuously; if frosting is too thick, add heavy cream a little at a time to reach desired consistency.
- Flavor Frosting: Stir in vanilla extract thoroughly to enhance the frosting’s flavor.
- Frost Brownies: Spread the cream cheese frosting evenly over the cooled brownies using a spatula.
- Serve: Cut the frosted brownies into squares or rectangles and serve immediately or store for later enjoyment.
Notes
- Allow brownies to cool completely before frosting to prevent melting.
- Use gel-based red food coloring for more vibrant color without thinning the batter.
- Store brownies in an airtight container in the refrigerator for up to 5 days.
- Bring cream cheese and butter to room temperature for smoother frosting.
- For a dairy-free option, substitute cream cheese and butter with plant-based alternatives and heavy cream with coconut cream.


