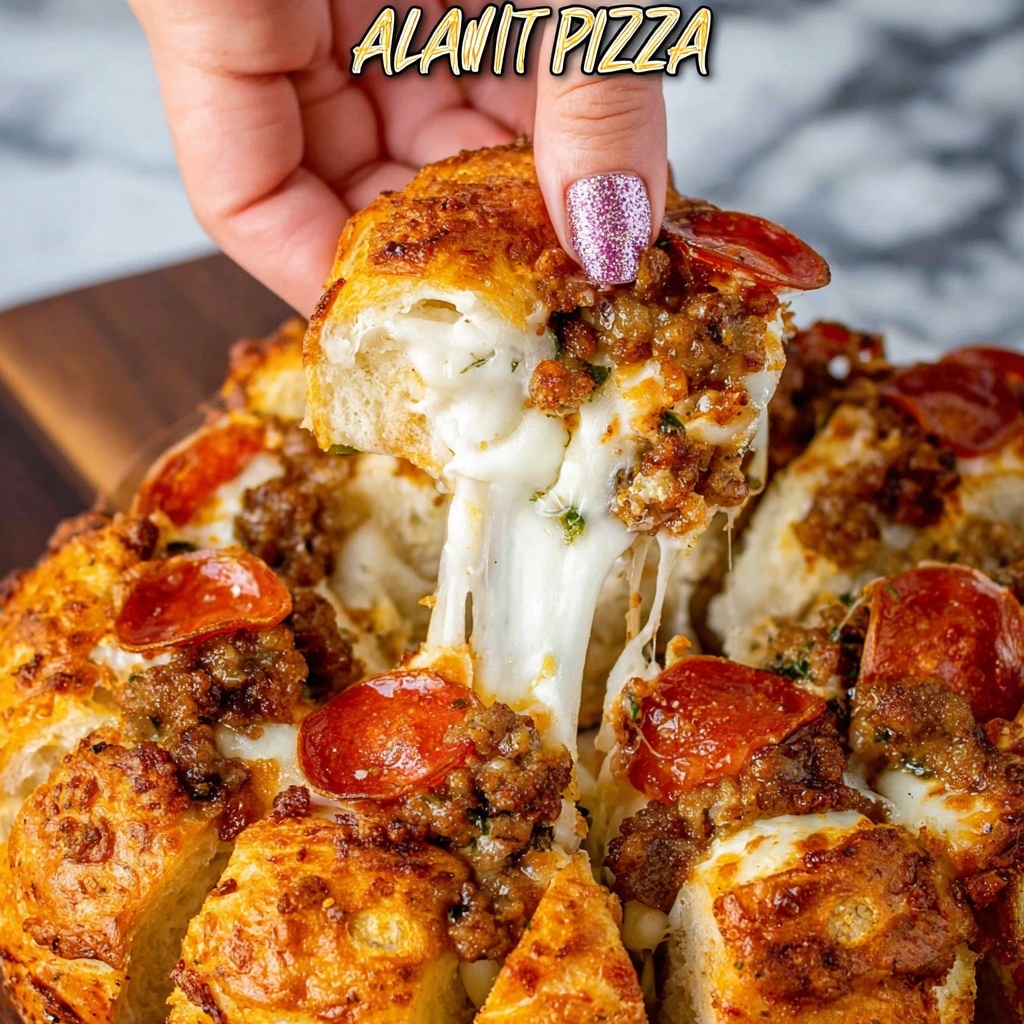
If you have ever dreamed of sinking your teeth into a gooey, cheesy, and utterly irresistible pizza that also doubles as a fun, shareable snack, then you are going to adore this Pull-Apart Pizza Recipe. It’s like a pizza party in bite-sized form, where each piece pulls away easily from the next, loaded with bubbling mozzarella and your favorite pizza toppings. Perfect for movie nights, casual gatherings, or anytime you want pizza with a playful twist, this recipe brings the best of classic flavors and an interactive, hands-on eating experience that everyone will love.

Ingredients You’ll Need
This Pull-Apart Pizza Recipe uses simple, easy-to-find ingredients that pack incredible flavor and texture. Each element has a crucial role in building that perfect pull-apart effect and delivering satisfying pizza flavor in every bite.
- Refrigerated French bread dough: This soft dough forms the perfect base with a tender yet slightly crispy crust when baked.
- Pizza sauce: Choose a good-quality sauce or homemade to add that rich, tangy tomato flavor that complements the cheese perfectly.
- Shredded mozzarella cheese: The melty, stretchy cheese that defines pizza and makes every piece deliciously gooey.
- Pizza toppings: Think pepperoni, olives, bell peppers, mushrooms, or fresh basil—these personalize your pull-apart pizza with layers of texture and taste.
How to Make Pull-Apart Pizza Recipe
Step 1: Prepare Your Oven and Pan
Start by heating your oven to 400ºF, giving it plenty of time to reach that perfect baking temperature. Lightly grease a round pizza pan or pizza stone to prevent sticking—this prep ensures your pull-apart pizza cooks evenly and is easy to serve.
Step 2: Slice the Dough
Take one package of the refrigerated French bread dough and place it on your cutting board. Cut the loaf in half lengthwise, then slice each half crosswise into 16 even slices. Repeat this with the second dough package, so you end up with 64 dough slices in total. These slices form the individual “pull-apart” pieces that make this recipe so fun and unique.
Step 3: Arrange and Top the Dough
Arrange all your dough slices on the prepared pan or stone in a close circular pattern. Then, generously spoon on the pizza sauce, ensuring each dough piece gets a touch of that vibrant flavor. Next, evenly sprinkle shredded mozzarella cheese over the top, followed by your favorite pizza toppings. This layering leads to pockets of tasty, cheesy goodness between each pull-apart slice.
Step 4: Bake to Perfection
Slide your pan into the oven and bake for 14 to 16 minutes. Keep an eye out for a golden brown crust and for the cheese to be melted and bubbling marvelously. This step locks in all the wonderful flavors while giving the dough that irresistible crust that’s just crispy enough.
How to Serve Pull-Apart Pizza Recipe

Garnishes
Add some fresh chopped basil or a sprinkle of crushed red pepper flakes just before serving to brighten the flavors and add a little kick. A drizzle of extra virgin olive oil can also elevate the pizza’s aroma and richness.
Side Dishes
This recipe pairs wonderfully with a crisp green salad tossed in a light vinaigrette to balance the richness of the cheese and dough. For more indulgence, serve with some garlicky roasted vegetables or a bowl of soup for the ultimate comfort food combo.
Creative Ways to Present
Try serving this Pull-Apart Pizza Recipe in a fun, communal style so guests can pull their own slices apart. For gatherings, arrange each pizza on a colorful serving platter or even inside a bread basket lined with parchment for a charming, rustic look.
Make Ahead and Storage
Storing Leftovers
Leftover pull-apart pizza can be stored in an airtight container in the refrigerator for up to 3 days. To keep those layers from sticking together, you might place parchment paper between layers before sealing.
Freezing
If you want to save this delightful dish for longer, freeze the fully cooked pull-apart pizza wrapped tightly in plastic wrap and then foil. It can stay in the freezer for up to 2 months without losing its delicious texture and flavor.
Reheating
Reheat leftovers in the oven at 350ºF for about 10 minutes to revive that fresh-baked crust and melty cheese. Avoid microwaving as it might make the dough gummy rather than crisp and delightful.
FAQs
Can I use homemade pizza dough instead of refrigerated French bread dough?
Absolutely! Homemade dough can add a fresh, personal touch to your Pull-Apart Pizza Recipe. Just make sure the dough is soft enough to slice and holds shape when arranged on your pan.
What toppings work best for this recipe?
Classic toppings like pepperoni, mushrooms, bell peppers, onions, and olives work brilliantly. Feel free to get creative—the pull-apart style accommodates whatever pizza favorites you love most.
Can this recipe be made gluten-free?
Yes, if you have access to gluten-free bread dough or pizza dough, you can substitute it directly. Just keep baking times in mind, as gluten-free dough may bake a bit differently.
Is the pull-apart pizza better warm or at room temperature?
Warm is definitely best! The cheese is at its meltiest, and the dough is soft yet slightly crispy. It’s a much more satisfying experience compared to room temperature.
Can I prepare this recipe ahead of time before baking?
You can assemble the pull-apart pizza a few hours ahead and keep it covered in the refrigerator. Just bring it back to room temperature before baking for the best results.
Final Thoughts
This Pull-Apart Pizza Recipe is a joyful twist on traditional pizza that brings everyone together at the table with its fun form and irresistible flavor. Whether you’re hosting friends or craving a comforting snack, it’s a dish you’ll want to make again and again. Trust me, once you try it, pulling apart this delicious pizza will become your new favorite way to enjoy a classic meal.
Print
Pull-Apart Pizza Recipe
- Prep Time: 10 minutes
- Cook Time: 15 minutes
- Total Time: 25 minutes
- Yield: 4 servings
- Category: Main Dish
- Method: Baking
- Cuisine: Italian-American
Description
This Pull-Apart Pizza recipe is a fun and interactive way to enjoy a classic pizza with a twist. Soft, sliced French bread dough is topped with rich pizza sauce, melted mozzarella cheese, and your favorite pizza toppings, then baked to golden perfection. Perfect for sharing, this recipe turns pizza night into a social feast where guests can easily pull apart their own delicious portions.
Ingredients
Pizza Dough
- 2 (11-oz) packages refrigerated French bread dough
Toppings
- 1½ cups pizza sauce
- 2 cups shredded mozzarella cheese
- Assorted pizza toppings of your choice (pepperoni, sliced bell peppers, mushrooms, olives, etc.)
Instructions
- Preheat the oven: Set your oven to 400ºF (204ºC). Lightly grease a round pizza pan or pizza stone to prevent sticking and ensure even baking.
- Slice the dough: Place one loaf of refrigerated French bread dough onto a cutting board. Cut the dough in half lengthwise to create two long halves. Then slice each half crosswise into 16 equal slices, resulting in 32 slices per loaf. Repeat this process with the second loaf to yield a total of 64 slices.
- Arrange and top: Spread the dough slices evenly on your prepared pizza pan or stone, arranging them close together but not overlapping. Generously spoon the pizza sauce over the dough slices, sprinkle the shredded mozzarella evenly on top, and add your choice of pizza toppings to create your perfect flavor combination.
- Bake: Place the pan in the preheated oven and bake for 14 to 16 minutes, or until the crust turns golden brown and the cheese is bubbly and melted. Remove from oven and let cool slightly before serving.
Notes
- You can customize the pizza toppings to suit your preferences. Popular choices include pepperoni, mushrooms, bell peppers, olives, and onions.
- For a crispier crust, use a pizza stone preheated in the oven and ensure the dough slices are placed evenly.
- Make sure to allow the baked pizza to cool for a few minutes before pulling apart to prevent burns and help the cheese set slightly.
- If using frozen dough, thaw according to package instructions before slicing.
