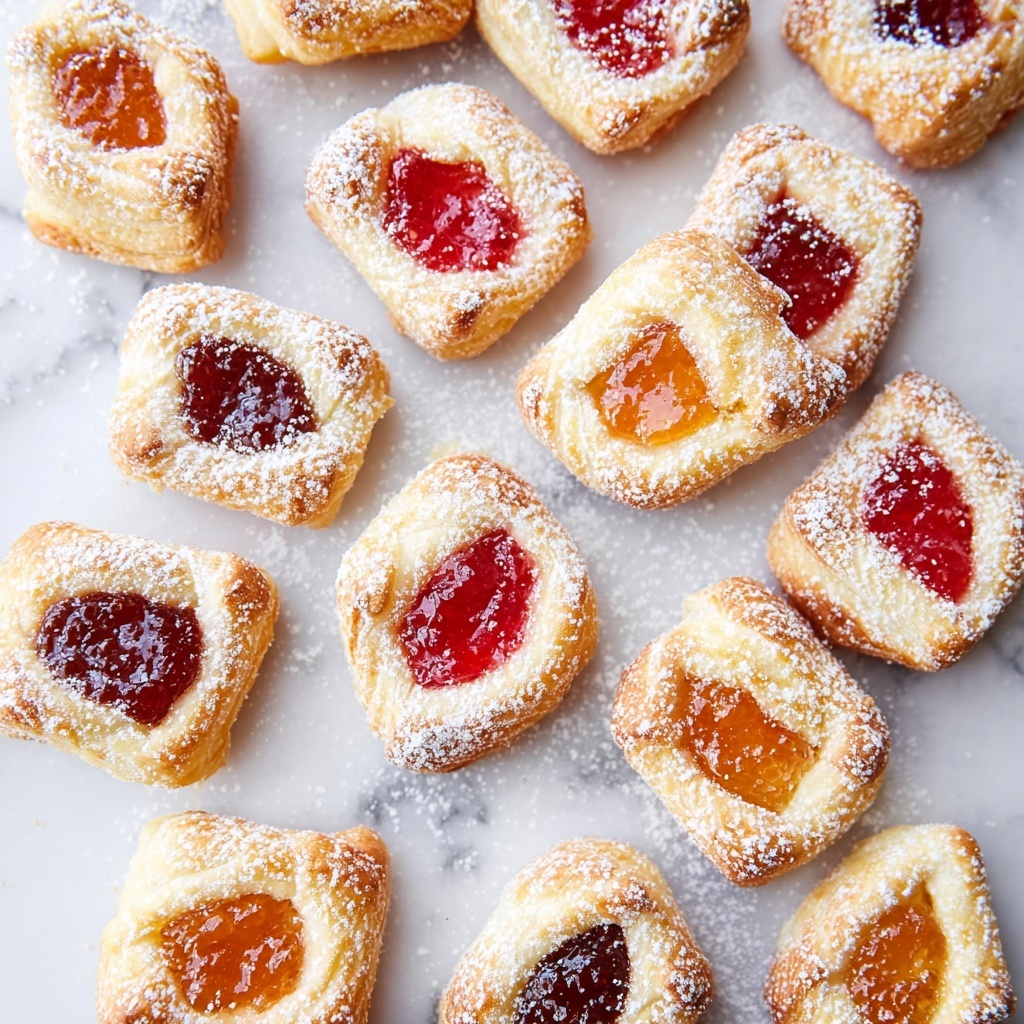
If you have a sweet tooth that craves something delicate, buttery, and filled with fruity goodness, then you’re going to adore this Polish Kolaczki Cookies Recipe. These delightful little pastries are a cherished traditional treat from Poland, known for their tender, cream cheese-infused dough and luscious jam centers. Perfect for sharing at holiday gatherings or enjoying with a cup of tea, these cookies offer a melt-in-your-mouth experience paired with a subtle tanginess that keeps you coming back for more. Trust me, once you bake this Polish Kolaczki Cookies Recipe, it will quickly become a staple in your recipe collection.
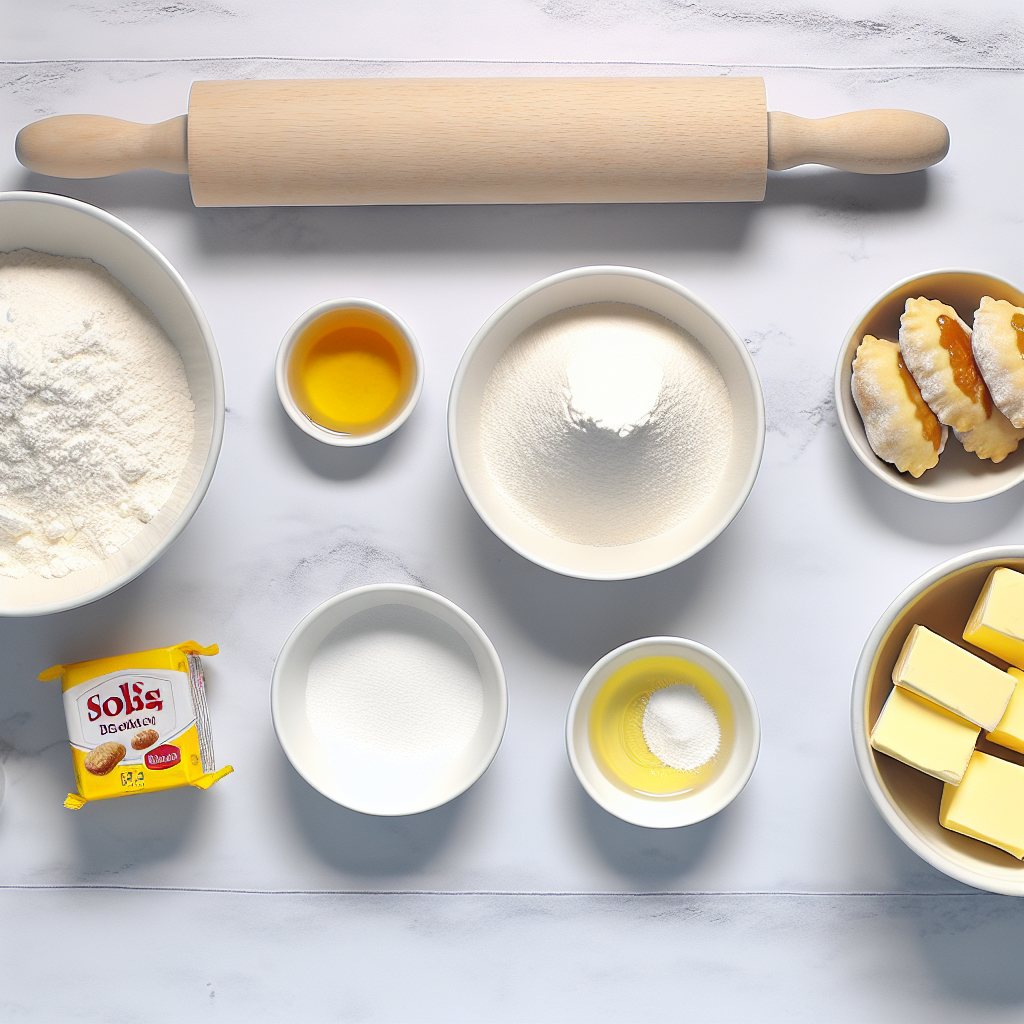
Ingredients You’ll Need
The beauty of this recipe lies in its simplicity. Each ingredient plays a crucial role in creating that authentic texture and flavor that defines Polish Kolaczki cookies. From the rich cream cheese to the tangy filling, every component works together to deliver a perfectly balanced treat.
- Unsalted butter (226 grams, 1 cup, 2 sticks): Provides richness and tender flakiness to the dough, ensuring the perfect buttery base.
- Cream cheese (226 grams, 8 ounces): Adds creaminess and a slight tang, giving the dough its signature soft and tender crumb.
- Vanilla extract (¼ teaspoon): Enhances the overall flavor with warm, aromatic notes.
- Kosher salt (½ teaspoon): Balances the sweetness and deepens the flavor complexity.
- All purpose flour (270 grams, 2 ¼ cups): The structure-builder that holds everything together without weighing down the dough.
- Powdered sugar: For rolling and dusting, adding a subtle sweetness and that lovely finished look.
- Filling of choice: Solo brand filling is recommended, but any fruit jam or preserve you love works beautifully here.
How to Make Polish Kolaczki Cookies Recipe
Step 1: Cream Butter and Cream Cheese
Start by creaming together the unsalted butter and cream cheese in a stand mixer with a paddle attachment or with a hand mixer. Beat them on medium-high speed until the mixture is light and fluffy, which should take around two minutes. This step is essential for creating that tender, melt-in-your-mouth dough that Kolaczki are famous for.
Step 2: Add Vanilla and Salt
Next, mix in the vanilla extract and kosher salt until everything is evenly combined. These small but powerful additions lift the flavor profile and make the cookies irresistibly aromatic.
Step 3: Incorporate the Flour
With your mixer running on low speed, slowly add the all-purpose flour. The dough will become thick and sticky, but this is exactly what you want. It’s this texture that ensures the delicate crumb of the finished cookies.
Step 4: Divide and Flatten the Dough
Divide the dough into four equal parts, using a scale for precision or an eye estimate. Place each portion between two sheets of plastic wrap or parchment paper and flatten to about ½ inch thick. This makes the dough easier to chill and roll out later.
Step 5: Chill the Dough
Chill those flattened dough discs in the refrigerator for 45 minutes to an hour, or until they’re easier to handle. You can chill for longer if needed, but just let them come to room temperature briefly before rolling for best results.
Step 6: Preheat the Oven
While your dough chills, go ahead and preheat your oven to 350°F (175°C). This will have it ready to bake your cookies as soon as they’re shaped and filled.
Step 7: Roll Out with Powdered Sugar
On a surface dusted generously with powdered sugar, take one dough disc at a time and roll it out to about ¼ inch thick. Dust the top of the dough with powdered sugar as well to prevent sticking and to help with easy handling.
Step 8: Cut into Squares
Using a pizza cutter or bench knife, slice the dough into 2×2 inch squares. This size is perfect for a single-bite treat packed with flavor.
Step 9: Add Filling and Fold
Spoon about one teaspoon of your chosen filling diagonally across each square. To fold, dab a little water on one corner without filling, then bring that corner to the center and seal it together with the opposite corner. Make sure to press firmly so the filling stays inside while baking.
Step 10: Bake Gently
Place the filled cookies on a parchment-lined baking sheet, spacing them fairly close since they won’t spread much. Bake for 14 to 18 minutes, just until the cookies turn a barely golden color. The key here is gentle baking to keep that tender crumb intact.
Step 11: Cool and Dust with Sugar
Transfer the cookies to wire racks to cool completely before dusting generously with powdered sugar. If not serving immediately, wait until just before serving to add the sugar to keep the cookies fresh and beautiful.
Step 12: Store Properly
Keep your Kolaczki cookies covered at room temperature for up to three days. Avoid airtight containers as the cookies can become soggy; instead, cover loosely with foil or plastic wrap. Fresh is best, so enjoy them soon!
How to Serve Polish Kolaczki Cookies Recipe
Garnishes
Simple powdered sugar dusting is classic, but you can also sprinkle with a pinch of finely chopped nuts or a light drizzle of melted white chocolate for an elegant twist that complements the fruity filling.
Side Dishes
Kolaczki cookies pair wonderfully with a hot cup of tea, coffee, or even a creamy hot chocolate. For festive occasions, serve alongside a cheese platter or fresh fruit for a delightful balance of flavors.
Creative Ways to Present
Try arranging your cookies on a tiered dessert tray for a charming presentation at gatherings. You can also use decorative tins tied with ribbons as gifts, highlighting the homemade love behind this Polish Kolaczki Cookies Recipe.
Make Ahead and Storage
Storing Leftovers
If any of these delightful cookies remain, store them loosely covered at room temperature. They maintain their texture best this way but should ideally be eaten within three days to avoid sogginess.
Freezing
You can freeze unbaked dough portions wrapped tightly in plastic wrap and then foil for up to three months. Thaw overnight in the fridge before rolling and baking for fresh-baked goodness anytime.
Reheating
To revive a batch of previously baked Kolaczki, warm them gently in a low oven for a few minutes. This refreshes their delicate texture without drying them out.
FAQs
Can I use any type of jam for the filling?
Absolutely! Classic choices like apricot or raspberry jam are common, but feel free to experiment with your favorites. Just make sure the filling isn’t too watery to prevent soggy dough.
What if I don’t have cream cheese?
Cream cheese is key for that tender texture, but in a pinch, you can try using mascarpone or a softened mild goat cheese. The flavor profile will differ slightly but should still be delicious.
Can I make these cookies gluten-free?
To make a gluten-free version of this Polish Kolaczki Cookies Recipe, substitute the all-purpose flour with a gluten-free flour blend that includes xanthan gum for structure. Expect a slight difference in texture but still tasty results.
How long do Kolaczki cookies last?
Best eaten fresh within three days. Beyond that, they may lose their characteristic tenderness and become soggy, especially if stored airtight.
Why is powdered sugar used instead of granulated sugar?
Powdered sugar prevents the dough from sticking without adding crunch, and dusting the finished cookies with it gives that classic sweet finish and attractive look that granulated sugar cannot.
Final Thoughts
There is something truly special about making and sharing this Polish Kolaczki Cookies Recipe with friends and family. It brings together simple ingredients to create a delicate, flavorful treat that feels both nostalgic and festive. I wholeheartedly encourage you to try baking these charming cookies yourself—once you taste their buttery elegance and luscious filling, you’ll understand why Kolaczki have earned a spot in so many hearts and kitchens. Happy baking!
Print
Polish Kolaczki Cookies Recipe
- Prep Time: 30 minutes
- Cook Time: 16 minutes
- Total Time: 46 minutes
- Yield: 5 dozen cookies
- Category: Dessert
- Method: Baking
- Cuisine: Polish
- Diet: Vegetarian
Description
Delight in these classic Polish Kolaczki Cookies, featuring a rich and tender cream cheese and butter dough filled with your choice of sweet jam or preserves. These delicate pastries are perfectly dusted with powdered sugar, baked until just golden, and ideal for festive occasions or a cozy tea time treat.
Ingredients
Dough
- 226 grams (1 cup, 2 sticks) unsalted butter, room temperature
- 226 grams (8 ounces) cream cheese, room temperature
- ¼ teaspoon vanilla extract
- ½ teaspoon kosher salt
- 270 grams (2 ¼ cups) all purpose flour
For Rolling and Filling
- Powdered sugar, for dusting and rolling
- Solo brand filling of choice (such as jam, preserves, or fruit spread) – about 1 teaspoon per cookie
Instructions
- Cream Butter and Cream Cheese: In the bowl of a stand mixer fitted with the paddle attachment, or using a hand mixer in a large bowl, cream together the unsalted butter and cream cheese on medium-high speed until the mixture becomes light and fluffy, approximately 2 minutes.
- Add Vanilla and Salt: Mix in the vanilla extract and kosher salt until thoroughly combined, ensuring even seasoning throughout the dough.
- Incorporate Flour: With the mixer on low speed, gradually add the all-purpose flour until fully incorporated into a very thick and sticky dough.
- Divide Dough: Portion the dough into four equal parts, using a scale or estimating by sight. Place each portion between two sheets of plastic wrap or parchment paper and flatten to about ½ inch (1.27 cm) thick.
- Chill Dough: Refrigerate the flattened dough portions for 45 minutes to 1 hour until firm enough to handle. Longer chilling is acceptable but may require allowing dough to warm slightly before rolling.
- Preheat Oven: Set the oven to 350°F (175°C) to preheat while dough chills.
- Roll Dough: Lightly dust a clean work surface with powdered sugar. Remove one dough disc, dust the top with powdered sugar, and roll out to a square approximately ¼ inch (0.6 cm) thick. Keep remaining dough refrigerated during this process.
- Cut Squares: Using a pizza cutter or bench knife, slice the rolled dough into 2×2 inch (5×5 cm) squares.
- Fill and Seal: Spread about 1 teaspoon of your chosen filling diagonally from corner to corner on each square. Lightly dab water on one unfilled corner and fold it to meet the opposite corner, pressing firmly to seal and prevent filling leakage during baking. Transfer cookies to parchment-lined baking sheets.
- Bake Cookies: Bake for 14 to 18 minutes until cookies are just barely golden; they will retain a pale color but be firm to touch.
- Cool and Dust: Transfer baked cookies to wire racks to cool completely. Once cooled, dust generously with powdered sugar before serving.
- Storage: Store cookies covered loosely at room temperature for up to 3 days to avoid sogginess. Avoid airtight containers, instead covering gently with foil or plastic wrap.
Notes
- Use a scale for precise dough portions to ensure even baking.
- Chilling the dough is crucial for easy handling and to prevent spreading during baking.
- Choose your favorite filling like apricot, raspberry, or prune preserves for authentic flavors.
- If storing longer, avoid airtight containers to prevent soggy texture; consume within a few days for best freshness.
- Dust with powdered sugar only right before serving for optimal presentation.

