
If you love a tangy, flavorful snack that’s as vibrant in taste as it is in color, then you are going to adore this Pickled Eggs Recipe. It’s a classic treat that combines the creamy, protein-packed goodness of hard-boiled eggs with the zesty sharpness of a seasoned vinegar brine. Whether you’re new to pickling or a seasoned fan, this recipe transforms simple eggs into a delightful, shelf-friendly appetizer that’s perfect for snacking, salads, or even as a unique addition to your charcuterie board.
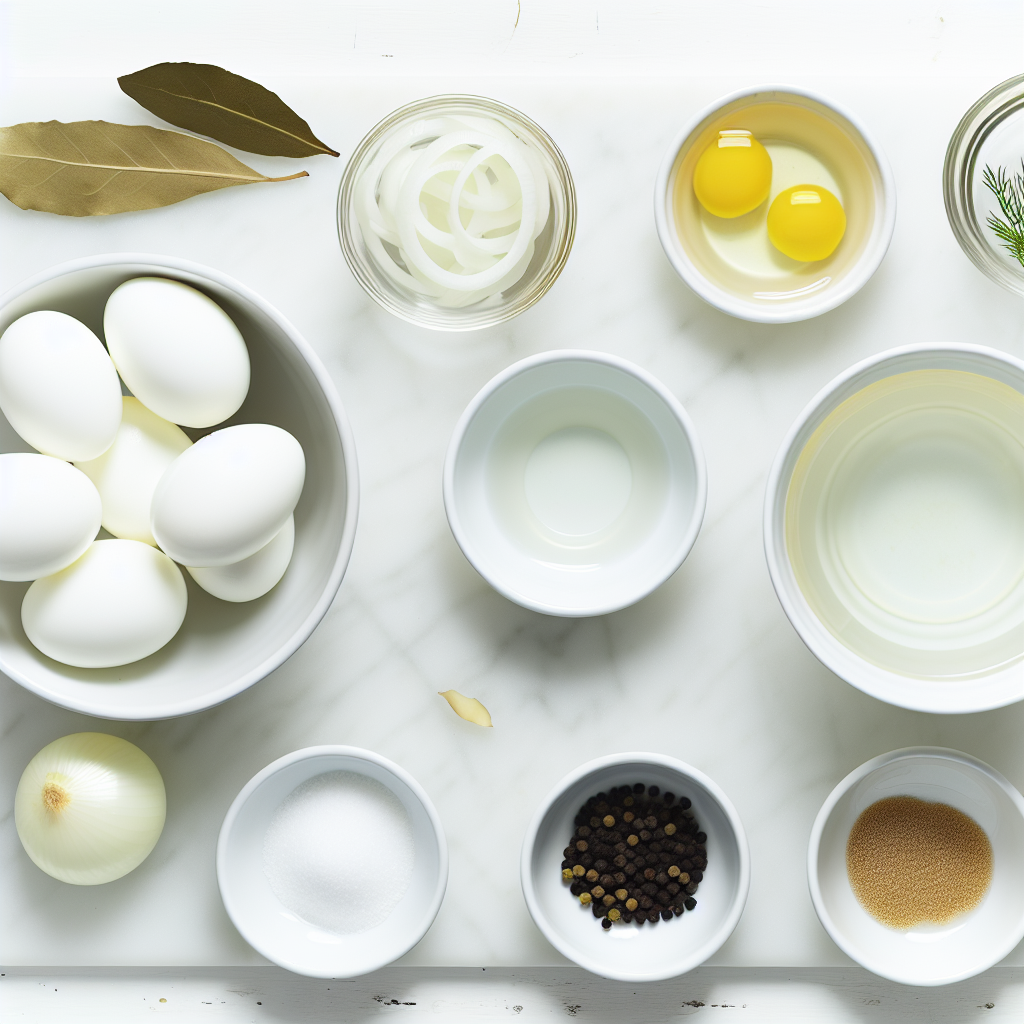
Ingredients You’ll Need
Each ingredient in this Pickled Eggs Recipe plays an essential role, contributing layers of flavor and texture that make the final dish unforgettable. From the tartness of the vinegar to the aromatic hints of dill and mustard seeds, these simple components come together perfectly.
- 12 large hard-boiled eggs (peeled): These provide the creamy base and protein-packed heart of the dish.
- 3 cups white vinegar: The key sour element that pickles and flavors the eggs beautifully.
- 1 medium onion (sliced): Adds a subtle sweetness and crunch to balance the acidity.
- ⅓ cup sugar: Just enough sweetness to soften the sharpness of the vinegar.
- 1 clove garlic (smashed): Infuses a mellow pungency that rounds out the flavor profile.
- 2 bay leaves: Provide a warm, fragrant undertone to the brine.
- 2 sprigs fresh dill: Adds a bright herbal note that’s classic in pickling recipes.
- 1 tablespoon salt: Essential for seasoning and enhancing all the other flavors.
- 1 teaspoon black peppercorns: Introduce subtle heat and complexity.
- 1 teaspoon yellow mustard seeds: Bring a slight crunch and pungent bite to every bite.
- 1 cup cold water: Dilutes the vinegar slightly, balancing the brine’s intensity.
How to Make Pickled Eggs Recipe
Step 1: Prepare the Eggs
Start by hard boiling your eggs, then peel them carefully to ensure they remain intact. Place these beautiful peeled eggs into a large jar or container that allows enough room for the brine to cover them completely later on.
Step 2: Make the Brine
In a small saucepan, combine white vinegar, sliced onion, sugar, smashed garlic, bay leaves, fresh dill, salt, black peppercorns, and yellow mustard seeds. Bring all these ingredients to a boil, then reduce the heat to a gentle simmer for 5 minutes to marry the flavors beautifully.
Step 3: Cool and Dilute the Brine
After simmering, remove the pan from heat and stir in the cold water to cool the mixture down slightly. Let the brine cool for an additional 5 to 10 minutes. This step is crucial as pouring hot brine directly onto the eggs might affect their texture.
Step 4: Combine and Refrigerate
Pour the cooled brine over the eggs in your jar, ensuring they are fully submerged to soak up that incredible flavor. Seal the container tightly and place it in the refrigerator. For the best taste, let your eggs marinate for at least 2 days, allowing the brine to transform them inside out.
How to Serve Pickled Eggs Recipe
Garnishes
Serving pickled eggs with a sprinkle of fresh herbs like chopped dill or chives adds a vibrant pop of color and a fresh note that perfectly complements the eggs’ tangy bite. A pinch of cracked pepper can also enhance the naturally complex flavors.
Side Dishes
Pickled eggs pair wonderfully with salty, crunchy sides such as saltine crackers or crisp pickles. They’re also fantastic alongside charcuterie boards, adding a protein-packed, tangy twist that balances cured meats and rich cheeses.
Creative Ways to Present
For a party or casual get-together, try slicing the eggs and layering them atop a salad of mixed greens and roasted vegetables. Or, halve the eggs and top each with a dab of horseradish cream or smoked paprika for an elegant appetizer. The possibilities with this Pickled Eggs Recipe are as fun as they are delicious.
Make Ahead and Storage
Storing Leftovers
Keep your pickled eggs chilled in a tightly sealed container in the refrigerator. They will keep perfectly for up to 2 weeks, during which the flavors continue to deepen. Always ensure the eggs remain fully submerged in the brine to maintain freshness and safety.
Freezing
Freezing pickled eggs is not recommended as it changes their texture, making them rubbery and less enjoyable. For best results, enjoy this recipe fresh from the fridge within the suggested storage time.
Reheating
There’s no need to reheat pickled eggs since they are enjoyed cold or at room temperature. Serving them chilled maximizes their refreshing tang and satisfying texture.
FAQs
How long do I need to pickle the eggs before they’re ready to eat?
The eggs should marinate in the brine for at least 2 days to let all those flavors soak in fully, but they taste even better after a week of pickling.
Can I use other types of vinegar for this recipe?
Absolutely! While white vinegar is traditional and provides a clean, sharp acidity, apple cider vinegar or rice vinegar can bring different but equally tasty dimensions to your pickled eggs.
Is it necessary to peel the eggs before pickling?
Yes, peeling is essential because the brine needs to directly flavor the egg white, ensuring that delicious tangy taste penetrates thoroughly.
Can I add other spices or flavorings to the brine?
Definitely! Feel free to experiment with spices like coriander seeds, red pepper flakes, or even fresh herbs like thyme or rosemary to customize your Pickled Eggs Recipe.
Are pickled eggs safe to eat after how many days?
When properly refrigerated and submerged in brine, pickled eggs are safe to eat for up to 2 weeks, but always check for off smells or mold before consuming.
Final Thoughts
There’s something truly special about making your own Pickled Eggs Recipe at home — it’s simple, fun, and rewarding. This tangy, flavorful snack doesn’t just satisfy hunger but offers a delightful way to elevate everyday ingredients. I can’t wait for you to try it and add your own twist to this timeless classic. Happy pickling!
Print
Pickled Eggs Recipe
- Prep Time: 10 minutes
- Cook Time: 5 minutes
- Total Time: 2 days 15 minutes
- Yield: 12 servings
- Category: Pickling
- Method: No-Cook
- Cuisine: American
Description
Classic pickled eggs soaked in a tangy and slightly sweet vinegar brine infused with garlic, fresh dill, bay leaves, and aromatic spices. Perfect as a flavorful snack or addition to salads and sandwiches.
Ingredients
Eggs
- 12 large hard-boiled eggs (peeled)
Brine
- 3 cups white vinegar
- 1 medium onion (sliced)
- ⅓ cup sugar
- 1 clove garlic (smashed)
- 2 bay leaves
- 2 sprigs fresh dill
- 1 tablespoon salt
- 1 teaspoon black peppercorns
- 1 teaspoon yellow mustard seeds
- 1 cup cold water
Instructions
- Prepare the eggs: Place the peeled hard-boiled eggs in a large jar, setting them aside while you prepare the brine.
- Make the brine: In a small saucepan, combine the white vinegar, sliced onion, sugar, smashed garlic, bay leaves, fresh dill, salt, black peppercorns, and yellow mustard seeds. Bring the mixture to a boil over medium heat, then reduce the heat and simmer for 5 minutes to allow the flavors to meld.
- Cool the brine: Remove the saucepan from heat and stir in the cold water to slightly cool the brine. Let it cool further for 5 to 10 minutes.
- Combine and refrigerate: Pour the cooled brine over the eggs in the jar, ensuring they are fully submerged. Seal the jar and refrigerate for at least 2 days before consuming to develop the pickled flavor.
Notes
- For best flavor, allow the eggs to pickle for 3–5 days.
- You can customize the spices by adding chili flakes for heat or coriander seeds for extra aroma.
- Use fresh hard-boiled eggs peeled carefully to avoid damage to the eggs.
- Store pickled eggs in the refrigerator and consume within 2-3 weeks.
- Adjust sugar and salt levels to taste if desired.


