Description
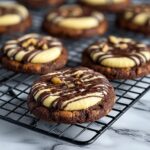
These Peanut Butter Chocolate Thumbprint Cookies are a delightful treat combining rich cocoa, creamy peanut butter, and crunchy peanuts. Perfectly baked with a soft center filled with sweet peanut butter and topped with melted chocolate drizzle, these cookies are irresistible for peanut butter and chocolate lovers alike.
Ingredients
Scale
Dry Ingredients
- 1 cup All-purpose flour
- 1/2 cup Cocoa powder
- 1/4 teaspoon Salt
Wet Ingredients
- 1/2 cup Unsalted butter (softened)
- 2/3 cup Sugar
- 1 Egg (separated, save the egg white)
- 2 Tablespoons Milk
- 1 teaspoon Vanilla extract
Toppings and Fillings
- 1 cup Peanuts (finely chopped)
- 1 cup Peanut Butter
- 1/4 cup Powdered sugar
- 1/2 cup Chocolate Chips
Instructions
- Mix Dry Ingredients: In a small bowl, whisk together the all-purpose flour, cocoa powder, and salt until evenly combined.
- Cream Butter and Sugar: In a large mixing bowl, combine the softened unsalted butter and sugar and mix until light and fluffy, which takes about 5 minutes with a mixer.
- Add Wet Ingredients: Add the egg yolk, milk, and vanilla extract to the creamed butter and sugar mixture and continue mixing until the egg yolk is fully incorporated.
- Combine Dry and Wet: Gradually add the dry ingredients to the wet ingredients, about half a cup at a time, mixing until the dough comes together smoothly.
- Chill Dough: Cover the bowl with plastic wrap and refrigerate the dough for 1 hour to firm up for easier handling.
- Preheat Oven: Preheat your oven to 350°F (175°C) to prepare for baking the cookies.
- Form Dough Balls: Remove the dough from the refrigerator and roll it into 1-inch balls, using approximately 1 ½ tablespoons of dough per ball.
- Coat with Egg White and Peanuts: Dip the bottom half of each dough ball into the reserved egg white, then dip it into finely chopped peanuts, pressing them gently to adhere.
- Create Indentations: Use the back of a teaspoon to press a deep indentation in the center of each dough ball to create the thumbprint shape.
- Bake Cookies: Place the cookies on a baking sheet and bake for 10 to 12 minutes until set but still soft.
- Enhance Indentations: After baking, immediately press the back of the teaspoon into each cookie to deepen the thumbprint if needed for the filling.
- Cool Cookies: Let the cookies cool for 5 minutes on the baking sheet, then transfer them to a cooling rack to cool completely.
- Prepare Peanut Butter Filling: In a microwave-safe bowl, mix the peanut butter and powdered sugar together until well combined.
- Heat Peanut Butter: Microwave the peanut butter mixture for 15 seconds at a time, stirring between intervals, until it reaches a smooth, pourable consistency (approximately 30 seconds total).
- Fill Cookies: Use a ½ teaspoon to fill the thumbprint indentations in each cookie with the peanut butter mixture.
- Melt Chocolate Chips: Place the chocolate chips in a microwave-safe dish and microwave in 5-second intervals, stirring after each, until they are melted and smooth.
- Drizzle Chocolate: Spoon the melted chocolate over the peanut butter-filled cookies in a decorative drizzle pattern.
- Set Cookies: Allow the cookies to sit at room temperature until the chocolate and peanut butter filling have firmed up, about 20-30 minutes.
Notes
- Ensure the butter is softened to room temperature for easy creaming with sugar.
- Save and use the egg white to help the peanuts stick to the cookie dough balls.
- The chilling step is essential to make the dough easier to handle and prevent spreading during baking.
- Use a gentle hand when pressing indentations before and after baking to avoid cracking.
- Storing cookies in an airtight container helps maintain freshness and texture.
- These cookies can be stored at room temperature for up to 3 days or refrigerated for up to a week.