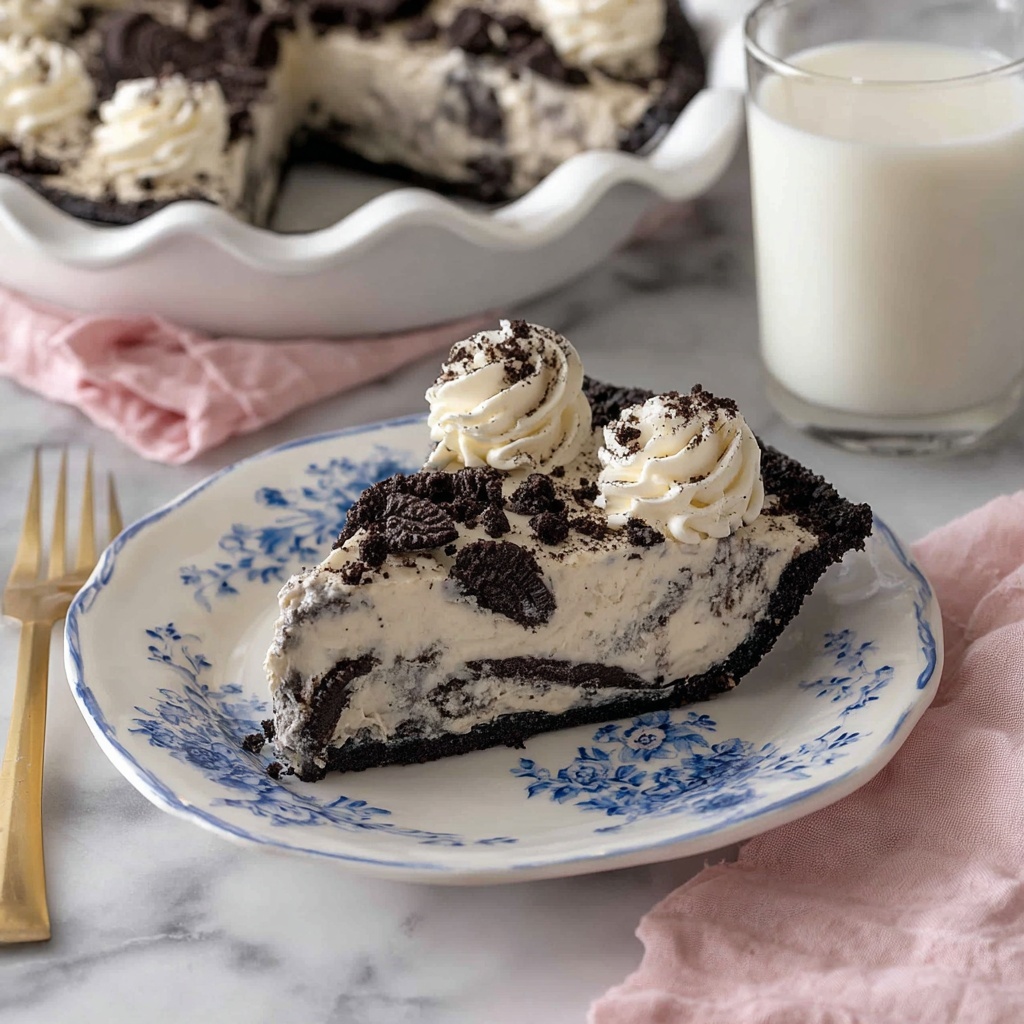
If you have a sweet tooth that’s begging for a show-stopping dessert, this Oreo Pie Recipe is your dream come true. Imagine a crunchy Oreo crust hugging a creamy, dreamy filling studded with chunks of Oreos, lightened with whipped cream and cream cheese, and finished with an irresistible topping of more cookies and fluffy whipped cream. It’s the kind of pie that everyone will rave about, perfect for gatherings, special occasions, or simply indulging yourself after a long day. This Oreo Pie is not just a recipe; it’s a love letter to cookie lovers everywhere.
Ingredients You’ll Need
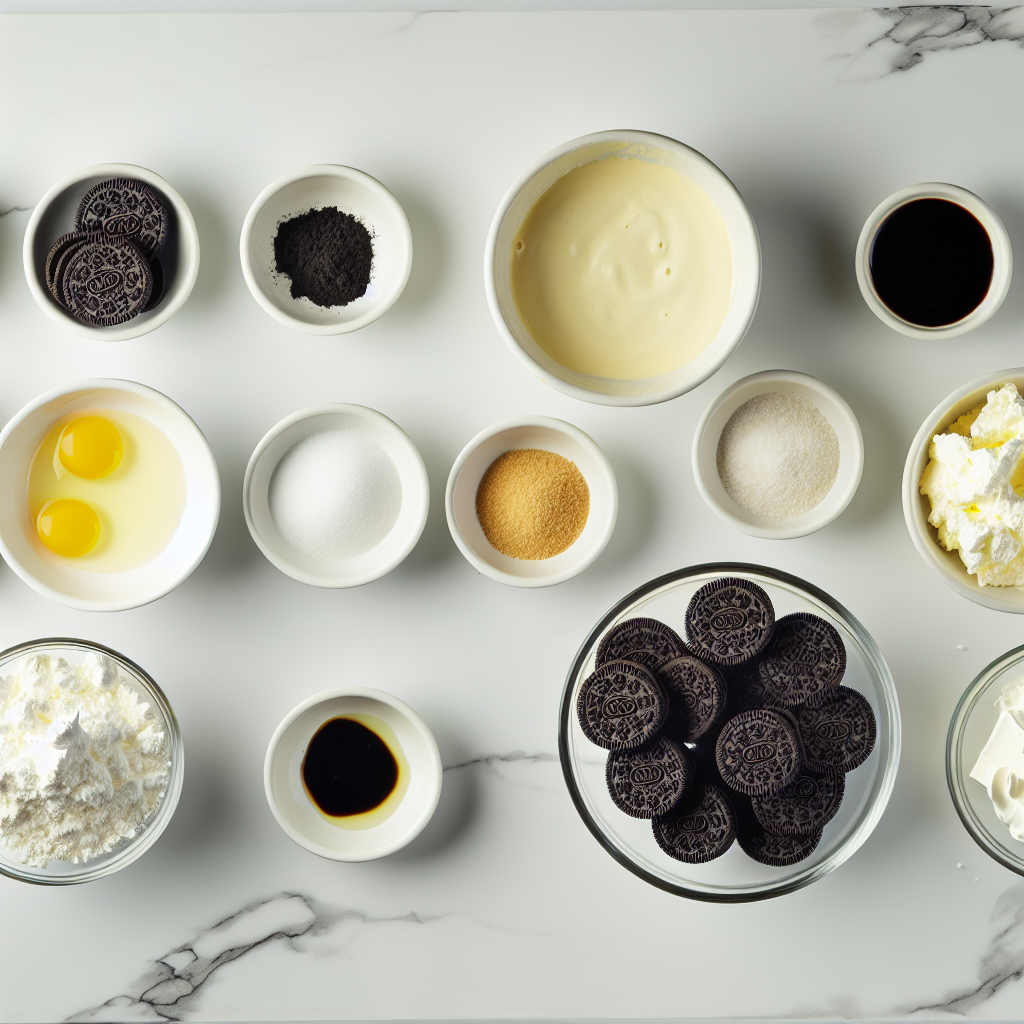
The magic behind this Oreo Pie Recipe lies in its simple, yet perfectly balanced ingredients. Each one plays a crucial role, from creating the sturdy Oreo crust to the silky, rich filling that melts in your mouth. Here’s what you’ll need to bring this delicious vision to life:
- 24 Oreos: These cookies form the crunchy crust base, providing that iconic chocolatey crunch.
- ¼ cup unsalted butter (melted): Butter binds the Oreo crumbs into a crust that holds shape with just the right richness.
- 1 cup heavy whipping cream: Whipped to soft peaks, it adds lightness and volume to the pie filling.
- 1 (8-ounce) block cream cheese (room temperature): This gives the filling creaminess and a slight tang to balance the sweetness.
- ¾ cup confectioners’ sugar: Powdered sugar sweetens and smooths the filling perfectly.
- 1½ teaspoons vanilla extract: Adds warm depth and aroma to the pie’s flavor.
- 20 Oreos (chopped, plus more for garnish): Chopped Oreos mix right into the filling to give delightful cookie bits in every bite.
- Whipped cream (for serving): Adds a soft, decorative topping to your pie for extra indulgence.
How to Make Oreo Pie Recipe
Step 1: Create the Crust
Start by lightly spraying a 9-inch pie pan with cooking spray to ensure your crust releases easily later. Then, blitz 24 Oreos in a food processor until they become fine crumbs, about 30 to 45 seconds. Mix these crumbs with melted butter until combined, then firmly press the mixture into the bottom and up the sides of your pie pan. This forms the base of your Oreo Pie Recipe. Chill the crust in the freezer for at least 30 minutes so it sets perfectly and holds its shape.
Step 2: Whip the Cream
Next, whip 1 cup of heavy cream in a large bowl using an electric mixer until stiff peaks form. This airy component lightens the filling, making it fluffy and luscious—just what you want for that melt-in-your-mouth texture.
Step 3: Prepare the Cream Cheese Mixture
In another bowl, beat the cream cheese until smooth and fluffy, about two minutes on medium-high speed. Then add the confectioners’ sugar and vanilla extract, mixing until everything is silky and well combined. This rich mixture forms the creamy heart of your pie, balancing sweetness with just a hint of tang.
Step 4: Fold Ingredients Together
Now gently fold the whipped cream and chopped Oreos into the cream cheese mixture. Folding carefully preserves the airiness from the whipped cream while dispersing those cookie chunks perfectly throughout. This step is where your Oreo Pie Recipe filling truly comes to life!
Step 5: Assemble and Chill
Spoon the luscious filling into your chilled Oreo crust and spread it evenly. Cover the pie loosely with plastic wrap and place it in the refrigerator to set for at least 6 hours, or up to 2 days. Patience here rewards you with the ideal creamy set and flavor melding.
Step 6: Garnish and Serve
Just before serving, add a swirl of fresh whipped cream and sprinkle on extra Oreo pieces for that wow factor. It’s the perfect finishing touch on a pie that’s as eye-catching as it is delicious.
How to Serve Oreo Pie Recipe
Garnishes
A generous dollop of freshly whipped cream topped with a few extra Oreo cookies adds not only visual appeal but also a delightful complementary texture. Chocolate shavings or a drizzle of chocolate syrup can also jazz it up beautifully, making the pie even more tempting.
Side Dishes
This Oreo Pie pairs wonderfully with a simple scoop of vanilla ice cream or a cup of hot coffee for contrast. For something lighter, a fresh berry salad or sliced strawberries alongside the pie can add a refreshing bite that balances the rich sweetness perfectly.
Creative Ways to Present
Try serving the pie in individual clear glasses or parfait cups layered with alternating Oreo crumbles and cream for a fun twist on the classic presentation. You can also use mini Oreo cookies as edible “plates” for small dollops of pie filling—perfect for parties!
Make Ahead and Storage
Storing Leftovers
Oreo Pie stores beautifully in the refrigerator, covered tightly with plastic wrap or in an airtight container. It keeps well for up to 3 days without losing any of its luscious texture or flavor, making it an excellent make-ahead dessert for gatherings.
Freezing
If you want to keep your Oreo Pie longer, freezing is also an option. Wrap the pie tightly in plastic wrap and a layer of aluminum foil before freezing. It will maintain its quality for up to one month. Just thaw in the refrigerator overnight before serving to enjoy the creamy goodness without any compromise.
Reheating
This pie is best enjoyed chilled, so reheating isn’t recommended. Simply let any frozen pie thaw fully in the fridge and serve cold to get that perfect creamy texture intact.
FAQs
Can I use reduced-fat cream cheese or whipped cream?
While you can substitute with reduced-fat versions, keep in mind that the texture and richness might be slightly different. The full-fat ingredients give the best creamy, luscious results in this Oreo Pie Recipe.
How do I prevent the crust from getting soggy?
Freezing the crust before adding the filling helps it firm up and keeps it from sogging. Also, pressing the crust firmly when making it creates a tighter seal that helps maintain the crunch.
Can I make this Oreo Pie Recipe vegan or dairy-free?
It’s definitely possible with dairy-free cream cheese and non-dairy whipped cream alternatives, but you’ll want to use Oreo cookies that are free from dairy (check the label). The texture and taste will be slightly different but still delicious!
How long does it take to set in the fridge?
Plan on at least 6 hours for the pie to properly set, though overnight is ideal for the best texture and flavor melding.
Can I use other cookies for the crust?
Absolutely! You can experiment with different chocolate sandwich cookies, or even chocolate wafers. Just make sure they are finely crushed and combined well with melted butter to hold the crust together just right.
Final Thoughts
This Oreo Pie Recipe is honestly a crowd-pleaser that shines every time. It’s simple to make but feels super special, with that perfect balance of creamy, crunchy, sweet, and slightly tangy flavors that keep you coming back for more. Whether you’re a cookie fanatic or just love desserts that melt in your mouth, this pie will quickly become a cherished favorite. So go ahead — dive in and share this luscious Oreo Pie with your loved ones; I promise it’ll brighten up any day!
Print
Oreo Pie Recipe
- Prep Time: 20 minutes
- Cook Time: 0 minutes
- Total Time: 6 hours 20 minutes
- Yield: 8 servings
- Category: Dessert
- Method: No-Cook
- Cuisine: American
- Diet: Vegetarian
Description
This Oreo Pie is a no-bake creamy dessert featuring a crunchy Oreo cookie crust and a luscious filling made with cream cheese, whipped cream, and chopped Oreos. Perfectly sweet and rich, it’s an easy-to-make treat that requires chilling for set-up and can be garnished with extra whipped cream and Oreos for an impressive presentation.
Ingredients
Crust
- 24 Oreos (275g)
- ¼ cup unsalted butter, melted (56g)
Filling
- 1 cup heavy whipping cream (240mL)
- 1 (8-ounce/226g) block cream cheese, room temperature
- ¾ cup confectioners’ sugar (90g)
- 1½ teaspoons vanilla extract
- 20 Oreos, chopped (230g), plus more for garnish
For Serving
- Whipped cream
Instructions
- Prepare the Crust: Lightly spray a 9-inch pie pan with cooking spray to prevent sticking. In a food processor, pulse the 24 Oreos until they become finely ground, about 30-45 seconds. Transfer the crumbs into a medium bowl and stir in the melted unsalted butter until well combined. Press the crust mixture evenly into the bottom and up the sides of the pie pan. Freeze the crust while preparing the filling, chilling it for at least 30 minutes and up to 3 days.
- Make the Filling: In a large bowl, use a handheld electric mixer on medium-high speed to beat the heavy whipping cream until stiff peaks form, which takes about 2 minutes. In a separate large bowl, beat the cream cheese on medium-high speed until smooth and fluffy, about 2 minutes. Add the confectioners’ sugar and vanilla extract to the cream cheese, mixing until smooth, approximately 1 minute. Gently fold the whipped cream and chopped Oreos into the cream cheese mixture until fully combined.
- Assemble the Pie: Spoon the filling into the prepared and frozen Oreo crust, spreading it into an even layer. Loosely cover the pie and refrigerate for at least 6 hours to allow the filling to set, or up to 2 days for best flavor and texture.
- Serve: When ready to serve, garnish the pie with additional whipped cream and extra Oreo pieces as desired for a beautiful presentation and added texture.
Notes
- For best results, use room temperature cream cheese to achieve a smooth filling.
- Make sure to chill the crust thoroughly before adding the filling to prevent sogginess.
- The pie must be refrigerated for at least 6 hours to ensure it sets properly, so plan ahead.
- You can prepare the crust up to 3 days in advance and store it frozen, then assemble the pie when ready.
- If preferred, substitute whipped cream with a cool whip topping for convenience.
- For a stronger chocolate flavor, consider using double-stuffed Oreos.


