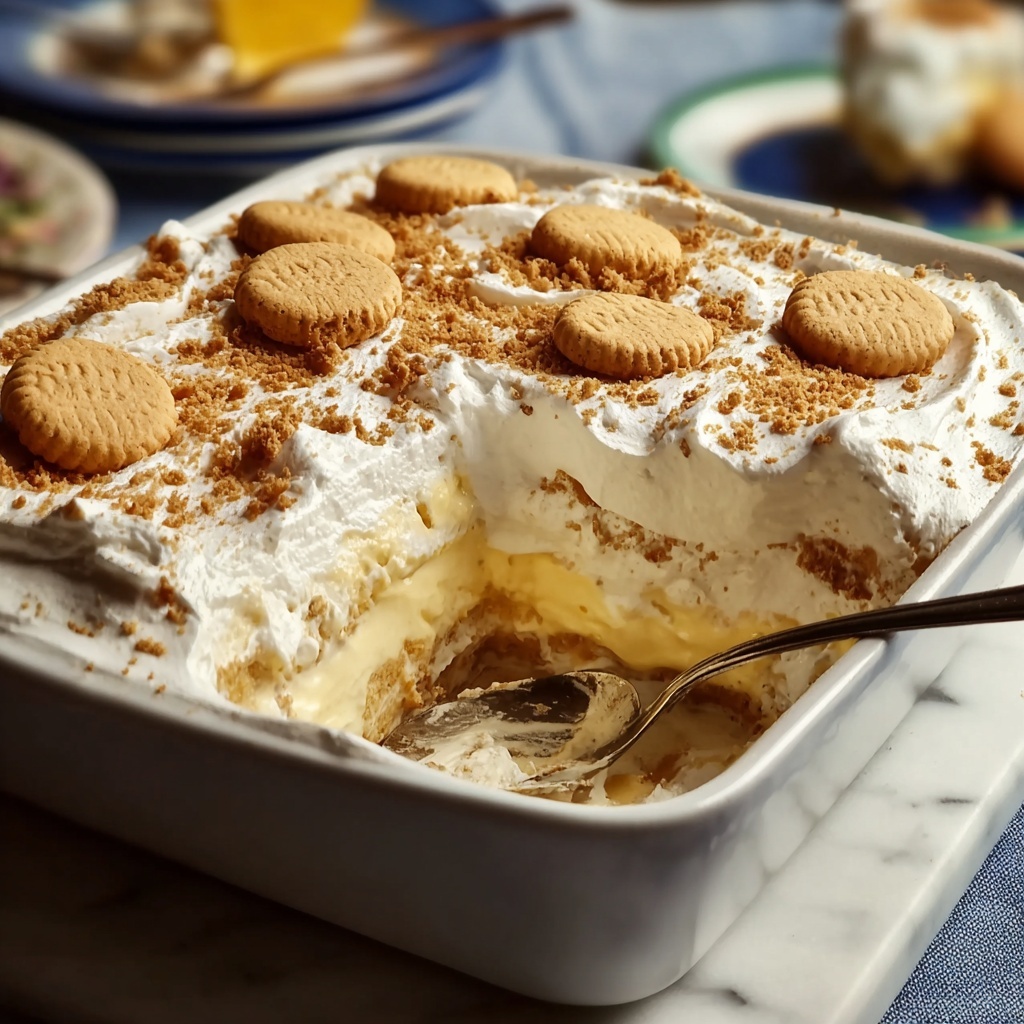
There is something truly comforting and nostalgic about this Old Fashioned Banana Pudding Recipe that brings back memories of cozy family gatherings and warm kitchen conversations. This classic Southern dessert features layers of ripe bananas, creamy vanilla pudding, and crunchy vanilla wafers, all harmonizing perfectly into a luscious treat that melts in your mouth. Whether you serve it for a holiday feast or a simple weekend indulgence, this Old Fashioned Banana Pudding Recipe never fails to delight with its rich texture and timeless charm.
Ingredients You’ll Need
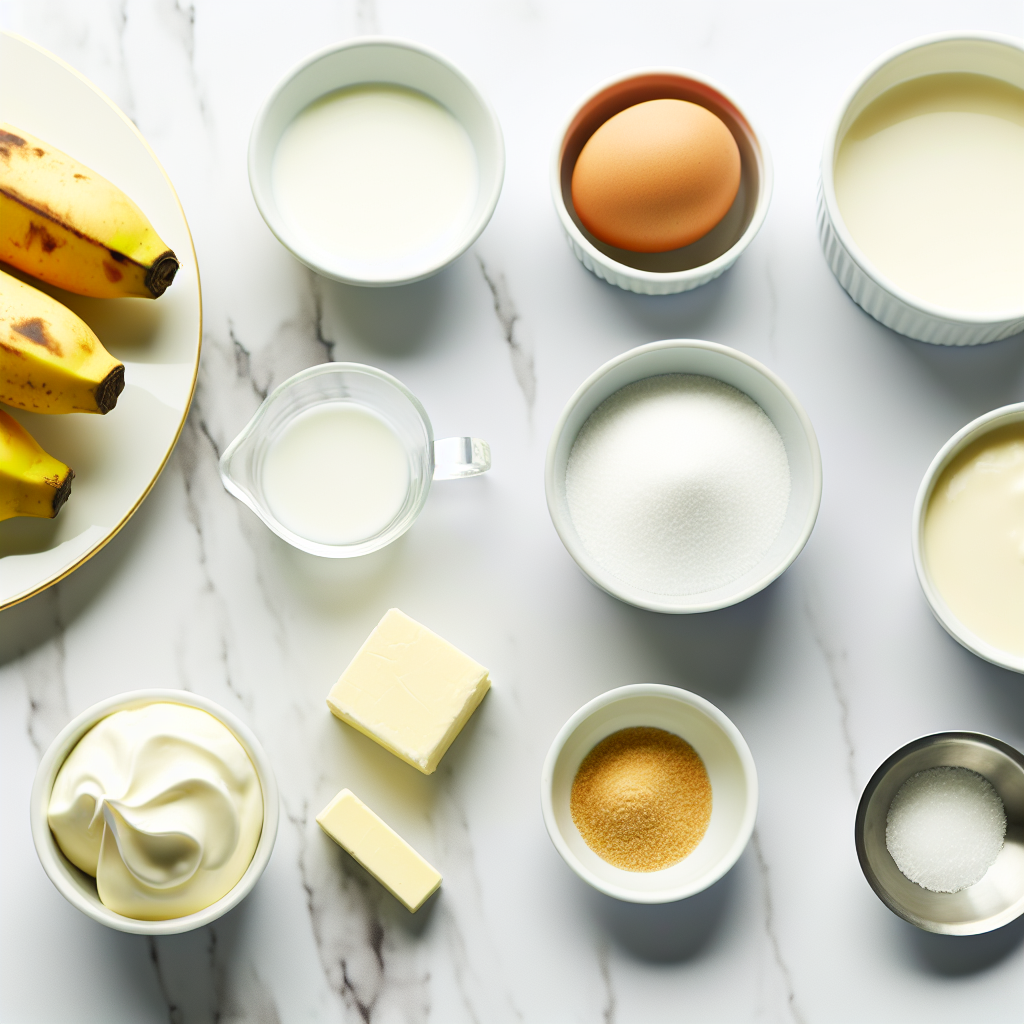
The beauty of this Old Fashioned Banana Pudding Recipe lies in its simplicity. Each ingredient plays a vital role in creating that perfect balance of creaminess, sweetness, and crunch, making the end result irresistible.
- 4 ripe bananas: Choose bananas that are just beginning to brown for the best flavor and sweetness.
- 1 cup (240 ml) whole milk: Using whole milk gives the pudding its rich, creamy foundation that feels indulgent.
- 1 cup (240 ml) heavy cream: Adds a luxuriously smooth texture, elevating the pudding’s decadence.
- 1/2 cup (100 g) granulated sugar: Sweetens the pudding perfectly; brown sugar can be swapped in for a richer depth.
- 1/3 cup (40 g) cornstarch: This is essential for thickening the pudding to that ideal velvety consistency.
- 1 tsp vanilla extract: Pure vanilla extract infuses the pudding with warm, authentic flavor.
- 1/4 tsp salt: Balances the sweetness and heightens the overall flavor profile.
- 1 box (11 oz) vanilla wafers: Adds that perfect classic crunch; graham crackers can offer a fun twist.
- Optional: whipped cream for topping: Adds a light, airy finish if you want an extra touch of indulgence.
How to Make Old Fashioned Banana Pudding Recipe
Step 1: Prepare Your Ingredients and Workspace
Start by gathering all your ingredients and making sure your workspace is clean and ready. Organization at this step makes the whole process flow smoothly and keeps you from scrambling around while the pudding cooks.
Step 2: Combine Dairy and Sugar
In a medium saucepan, mix the whole milk, heavy cream, and sugar over medium heat. Stir gently as the sugar dissolves and the mixture begins to steam—just watch carefully to avoid boiling, which can affect the pudding’s texture.
Step 3: Prepare the Thickening Mixture
In a separate bowl, whisk together the cornstarch, salt, and a splash of the warm milk mixture from the pot until it forms a smooth paste. This step is crucial because it prevents lumps and ensures your pudding will be silky smooth.
Step 4: Thicken the Pudding
Gradually add the cornstarch mixture back into the saucepan, whisking constantly. Continue cooking over medium heat until the pudding thickens and beautifully coats the back of a spoon. Remove from heat and stir in the vanilla extract, giving it that signature warm aroma.
Step 5: Cool and Prepare for Layering
Allow the pudding to cool slightly while you slice the ripe bananas and get the vanilla wafers ready. The pudding should still be warm but not hot, so it layers smoothly without melting the wafers or bananas.
Step 6: Layer the Ingredients
Start by arranging a layer of vanilla wafers at the bottom of your serving dish or individual cups. Next, add a layer of banana slices over the wafers, then spoon a generous layer of the warm pudding on top, making sure to cover the fruit well. Repeat these layers until your dish is full, finishing with a smooth pudding layer on top.
Step 7: Chill and Set
For the best texture and flavor melding, refrigerate your banana pudding for at least four hours. This waiting time allows the wafers to soften just right while still offering a delicate crunch, and the flavors to develop a comforting, unified taste.
How to Serve Old Fashioned Banana Pudding Recipe
Garnishes
A dollop of freshly whipped cream on top can add a lovely lightness that contrasts beautifully with the rich pudding. You might also sprinkle some crushed vanilla wafers or a dash of cinnamon for an inviting, finished look.
Side Dishes
This banana pudding shines on its own but pairs delightfully with classic Southern sides like sweet tea or a crisp green salad to balance the sweetness. For a more indulgent pairing, a scoop of vanilla ice cream never disappoints.
Creative Ways to Present
Try serving this Old Fashioned Banana Pudding Recipe in individual mason jars or clear glasses to showcase its pretty layers. You can also assemble it in small trifle bowls for a festive gathering, making it easy for guests to serve themselves and admire the beautiful, nostalgic layers.
Make Ahead and Storage
Storing Leftovers
Cover leftover banana pudding tightly with plastic wrap or transfer it to an airtight container and refrigerate. It will keep well for up to 3 days, but keep in mind the wafers may become softer over time, which some actually prefer!
Freezing
This recipe is best enjoyed fresh or refrigerated because freezing can alter the texture of the pudding and bananas. If you must freeze, do so before adding the bananas or wafers, and consume within one month for best quality.
Reheating
Since banana pudding is traditionally served chilled, reheating is not recommended. If you prefer it warmer, gently warm a spoonful in the microwave, but avoid heating the entire dish as it can break down the texture and flavor balance.
FAQs
Can I use different types of cookies instead of vanilla wafers?
Absolutely! While vanilla wafers provide that classic flavor and crunch, graham crackers, shortbread cookies, or even ladyfingers can add a unique twist. Just keep in mind how the texture and sweetness might change.
How do I prevent the bananas from browning?
To keep your banana slices looking fresh and bright, toss them lightly with a little lemon juice before layering. The citric acid slows down oxidation and helps maintain their lovely color.
Can I make this recipe vegan or dairy-free?
Yes! Substitute the whole milk and heavy cream with plant-based alternatives like coconut milk or almond milk, and use a cornstarch or agar-based pudding thickener. Vanilla wafers are often dairy-free, but double-check ingredients to be sure.
Is it necessary to refrigerate for 4 hours?
Refrigeration time is key to letting the pudding set properly and the flavors meld. While you can serve it sooner, the texture won’t be as smooth and luscious, and the layers won’t hold together as nicely.
Can I make this Old Fashioned Banana Pudding Recipe ahead for a party?
Definitely! It actually tastes even better after sitting overnight, allowing all the flavors to deepen and the wafers to soften perfectly. Just give it a gentle stir before serving to keep the layers intact.
Final Thoughts
There is a special kind of joy that comes from making and sharing a homemade Old Fashioned Banana Pudding Recipe. It’s a dessert that feels like a warm hug, rich in creamy goodness and nostalgic charm. I hope you give this recipe a try soon and create your own beautiful memories with every delicious bite.
Print
Old Fashioned Banana Pudding Recipe
- Prep Time: 20 minutes
- Cook Time: 15 minutes
- Total Time: 4 hours 35 minutes
- Yield: 6 servings
- Category: Dessert
- Method: Stovetop
- Cuisine: American
Description
A classic dessert featuring creamy homemade banana pudding layered with ripe bananas and crunchy vanilla wafers. This old-fashioned banana pudding recipe combines a smooth, rich custard base with sweet bananas and crisp wafers for a comforting treat perfect for any occasion.
Ingredients
Custard
- 1 cup (240 ml) whole milk
- 1 cup (240 ml) heavy cream
- 1/2 cup (100 g) granulated sugar
- 1/3 cup (40 g) cornstarch
- 1 tsp vanilla extract
- 1/4 tsp salt
Fruits & Layers
- 4 ripe bananas (just beginning to brown for best flavor)
- 1 box (11 oz) vanilla wafers (for classic crunch; graham crackers optional)
Optional
- Whipped cream for topping
Instructions
- Prepare Ingredients: Gather all ingredients and clean your workspace to ensure a smooth cooking process.
- Combine Dairy and Sugar: In a medium saucepan over medium heat, combine whole milk, heavy cream, and sugar.
- Heat the Mixture: Stir gently until the sugar dissolves and the mixture steams, but avoid bringing it to a boil to prevent curdling.
- Mix Cornstarch Slurry: In a separate bowl, whisk together cornstarch, salt, and a small amount of the warm milk mixture until smooth to prevent lumps.
- Thicken Pudding: Gradually add the cornstarch mixture back into the saucepan, whisking continuously to ensure even thickening.
- Finish Custard: Remove the saucepan from heat once the pudding thickens enough to coat the back of a spoon. Stir in the vanilla extract for flavor.
- Prepare Bananas and Wafers: Allow the pudding to cool slightly while slicing the ripe bananas and assembling the wafers.
- Layer Wafers: Place a layer of vanilla wafers at the bottom of a large serving dish or in individual cups.
- Layer Bananas: Arrange sliced bananas evenly over the wafer layer.
- Add Pudding: Spoon a generous layer of warm pudding over the bananas, ensuring they are well coated.
- Repeat Layers: Continue layering wafers, bananas, and pudding until the dish is filled, finishing with a final pudding layer.
- Chill: Smooth out the top layer of pudding and refrigerate the assembled dish for at least four hours to allow flavors to meld and the pudding to set.
Notes
- Use ripe bananas that are just starting to brown for optimal sweetness and texture.
- Do not boil the milk and cream mixture to avoid curdling.
- Whisk cornstarch with a bit of warm milk mixture first to prevent lumps in the pudding.
- Refrigerate for at least four hours to achieve the best texture and flavor melding.
- For a different twist, substitute vanilla wafers with graham crackers.
- Top with whipped cream just before serving for added indulgence.
