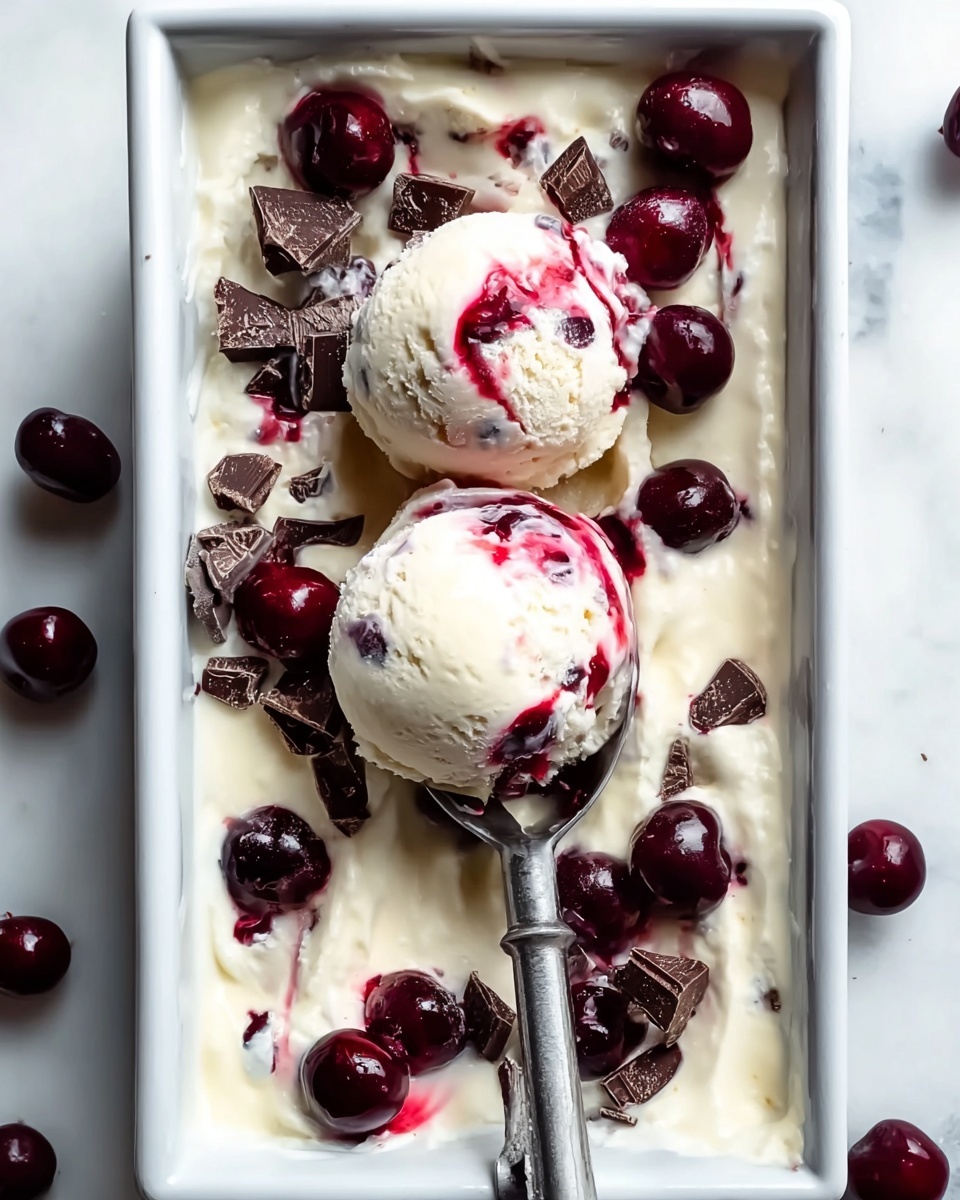
If you love luscious, creamy desserts that feel like a hug in a bowl, you are going to adore this No-Churn Chocolate Cherry Ice Cream Recipe. It combines the rich, velvety indulgence of dark chocolate with the bright, juicy burst of cherries, all swirled into a dreamy homemade ice cream that requires no ice cream maker at all. Easy to whip up and impossible to resist, this recipe is perfect for anyone craving a refreshing yet decadent treat with minimal fuss and maximum flavor.

Ingredients You’ll Need
The beauty of this No-Churn Chocolate Cherry Ice Cream Recipe lies in its simplicity, with a handful of essential ingredients that each bring something special—texture, sweetness, or that irresistible depth of flavor. Every component plays a starring role in making this dessert unforgettable.
- 16 oz carton whipping cream: Provides the creamy, airy base that turns thick and scoopable without churning.
- 10 oz can sweetened condensed milk: Adds natural sweetness and helps create that perfect smooth, rich ice cream texture.
- 1 teaspoon vanilla: Enhances the overall flavor with a warm, inviting note that complements chocolate and cherries beautifully.
- 1 cup cherries, pitted and chopped or quartered: Introduces bursts of juicy, tart freshness that contrast the chocolate perfectly.
- 1 cup dark chocolate, chopped or chunks: Delivers intense cocoa flavor and satisfying melting pockets throughout the ice cream.
How to Make No-Churn Chocolate Cherry Ice Cream Recipe
Step 1: Whip the Cream to Perfection
Start by chilling your mixing bowl and beaters for a few minutes—this helps the whipping cream form stiff peaks faster. Using a hand or stand mixer, whip the cream until it holds stiff peaks. This thick, fluffy texture is the foundation of your no-churn ice cream, giving it that airy richness without needing an ice cream machine.
Step 2: Incorporate Sweetened Condensed Milk and Vanilla
Once the cream is whipped, gradually fold in the sweetened condensed milk and vanilla extract. These two ingredients bring sweetness and creaminess while keeping the mixture smooth and luscious. Mixing gently is key here—you want everything combined without deflating the fluffy cream.
Step 3: Fold in Cherries and Chocolate Chunks
Now comes the fun part—gently folding in the chopped cherries and dark chocolate pieces. Take care to distribute them evenly through the mixture so every scoop is packed with flavor. Feel free to reserve a few chunks and cherries to sprinkle on top for an extra pretty presentation after freezing.
Step 4: Freeze Until Set
Pour your chocolate cherry mixture into a loaf pan or any freezer-safe container, then top with the reserved chocolate and cherries. Cover tightly with plastic wrap or a lid, and freeze for at least 5 to 6 hours. Patience here really pays off as the ice cream firms up to that perfect scoopable consistency.
Step 5: Serve and Enjoy
When you’re ready to indulge, remove from the freezer and let it soften for a few minutes—this makes scooping a breeze. Scoop into bowls or cones for an impressive homemade dessert that tastes as though it took hours of effort but was ready in under 15 minutes of prep.
How to Serve No-Churn Chocolate Cherry Ice Cream Recipe

Garnishes
A simple dusting of cocoa powder or a few extra cherries and chocolate shavings on top can elevate this ice cream from delightful to dazzling. You can also drizzle warm chocolate or cherry syrup for a glossy, irresistible finish.
Side Dishes
This ice cream pairs wonderfully with a light almond biscotti or a crisp waffle cone for some added crunch. Fresh berries or a dollop of whipped cream also make elegant companions that add layers of texture and flavor.
Creative Ways to Present
For a party or special treat, serve scoops inside hollowed-out chocolate cups or layer the ice cream with cherry compote and crushed cookies in a parfait glass. These clever touches make your No-Churn Chocolate Cherry Ice Cream Recipe feel festive and fun.
Make Ahead and Storage
Storing Leftovers
Store your ice cream in an airtight container to prevent ice crystals and preserve that creamy texture. It’s best enjoyed within two weeks, but stored well, it can stay delicious a bit longer.
Freezing
If you want to prep this dessert ahead of time, you can freeze the ice cream mixture for up to one month. Just ensure it’s tightly sealed and avoid frequent thawing and refreezing, which can affect creaminess.
Reheating
There’s no reheating needed with this ice cream—just allow it to soften at room temperature for 5 to 10 minutes before scooping for the best creamy experience without melting.
FAQs
Can I use frozen cherries for this recipe?
Absolutely! Just make sure to thaw and drain them well before folding into the ice cream mixture to avoid excess water altering the texture.
What type of chocolate works best in this recipe?
Dark chocolate with around 60-70% cocoa content is ideal for a rich flavor contrast, but you can also experiment with semi-sweet or even milk chocolate depending on your preference.
Is there a dairy-free option for this No-Churn Chocolate Cherry Ice Cream Recipe?
While traditional whipping cream and condensed milk create the best texture, you could try coconut cream and a dairy-free condensed milk substitute, but results may vary.
How long does it take to whip the cream properly?
Typically, whipping cream to stiff peaks takes around 3 to 5 minutes with an electric mixer on medium-high speed; just keep an eye to avoid over-whipping.
Can I add other mix-ins besides cherries and chocolate?
Definitely! Nuts, cookie crumbles, or even swirls of caramel can add exciting textures and flavors to make this recipe your own.
Final Thoughts
There is something truly magical about making your own ice cream at home, especially when it requires no fancy equipment and comes together so quickly. I can’t recommend this No-Churn Chocolate Cherry Ice Cream Recipe enough—it’s creamy, decadent, and bursting with fresh cherry goodness paired with rich dark chocolate. Give it a try and watch how it wins over everyone at your table, becoming a new favorite you’ll want to make again and again.
Print
No-Churn Chocolate Cherry Ice Cream Recipe
- Prep Time: 15 minutes
- Cook Time: 0 minutes
- Total Time: 6 hours 15 minutes
- Yield: 6 servings
- Category: Dessert
- Method: No-Cook
- Cuisine: American
- Diet: Vegetarian
Description
This No-Churn Chocolate Cherry Ice Cream is a simple, delightful treat combining rich dark chocolate and sweet cherries in a creamy, homemade ice cream without the need for an ice cream maker. Perfect for a quick and easy dessert that requires minimal ingredients and effort but delivers delicious, refreshing flavors.
Ingredients
Ice Cream Base
- 16 oz carton whipping cream
- 10 oz can sweetened condensed milk
- 1 teaspoon vanilla extract
Mix-ins
- 1 cup cherries, pitted and chopped or quartered
- 1 cup dark chocolate, chopped or in chunks
Instructions
- Whip the cream: Using a hand or stand mixer, whip the cold whipping cream until stiff peaks form. This step is crucial to create the light and airy texture of the ice cream.
- Incorporate ingredients: Add the sweetened condensed milk and vanilla extract to the whipped cream. Mix gently but thoroughly until well combined without deflating the whipped cream.
- Add mix-ins: Gently fold in the chopped cherries and dark chocolate pieces. Be careful not to overmix to preserve the fluffiness of the base. Reserve some cherries and chocolate for topping.
- Freeze the ice cream: Pour the mixture into a loaf pan or freezer-safe container. Sprinkle the remaining cherries and chocolate on top for added texture and visual appeal. Cover the pan tightly with plastic wrap or a lid and freeze for 5 to 6 hours until firm.
- Serve: Remove the ice cream from the freezer and allow it to soften for a few minutes at room temperature. Scoop into bowls or cones and enjoy immediately for a creamy, luscious dessert.
Notes
- For best results, chill the whipping cream before whipping to get maximum volume.
- You can substitute dark chocolate with semi-sweet or milk chocolate based on preference.
- Ensure cherries are pitted to avoid any unwanted bites.
- This recipe requires no ice cream machine, making it perfect for a quick homemade frozen treat.
- Store leftover ice cream covered in the freezer and consume within a week for best taste and texture.

