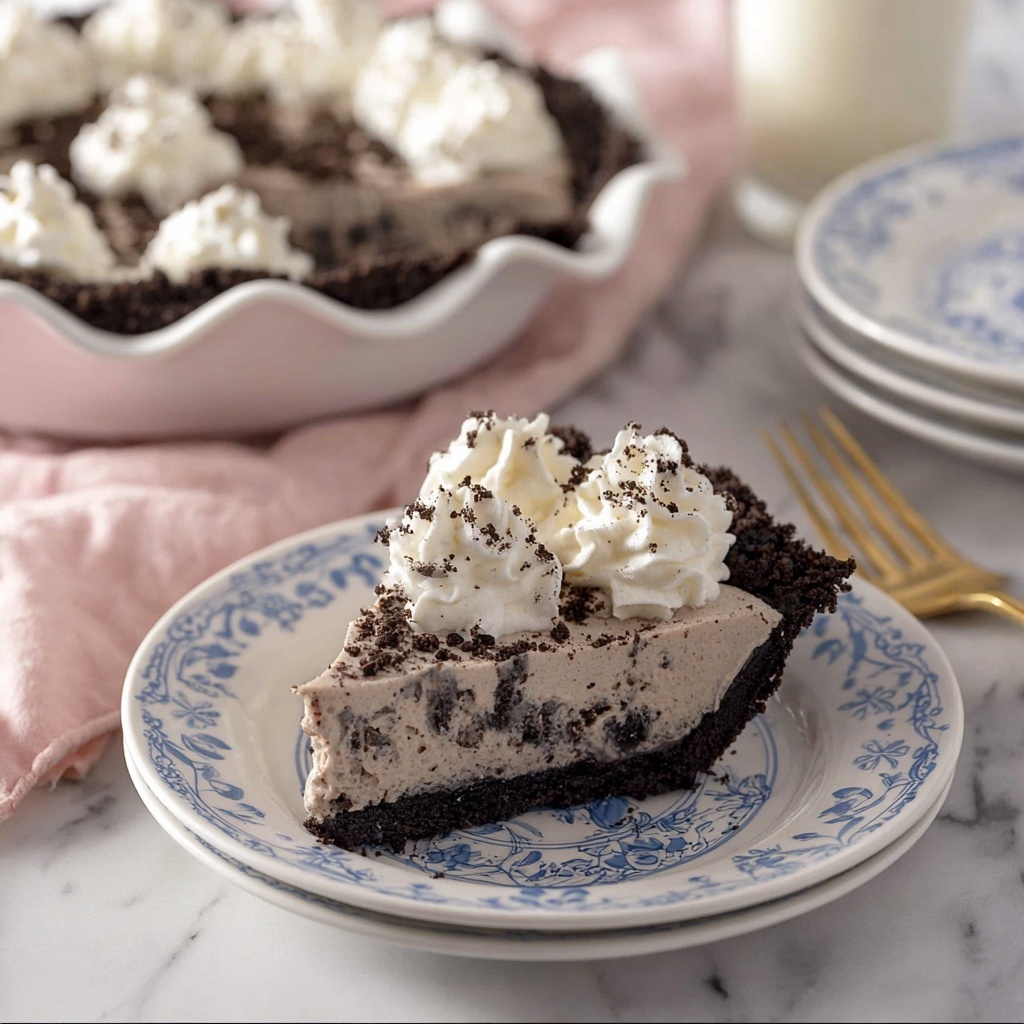
If you have a sweet tooth and adore cookies and cream, this No-Bake Oreo Pie Recipe will quickly become your go-to dessert. It effortlessly combines the rich, creamy texture of a cheesecake filling with the satisfying crunch of Oreo cookies, all nestled in a delicate cookie crust. The beauty of this pie lies not only in its decadent flavor but also in how simple it is to prepare—no oven needed—making it a perfect treat for warm days or anytime you want a fuss-free indulgence that impresses everyone.
Ingredients You’ll Need
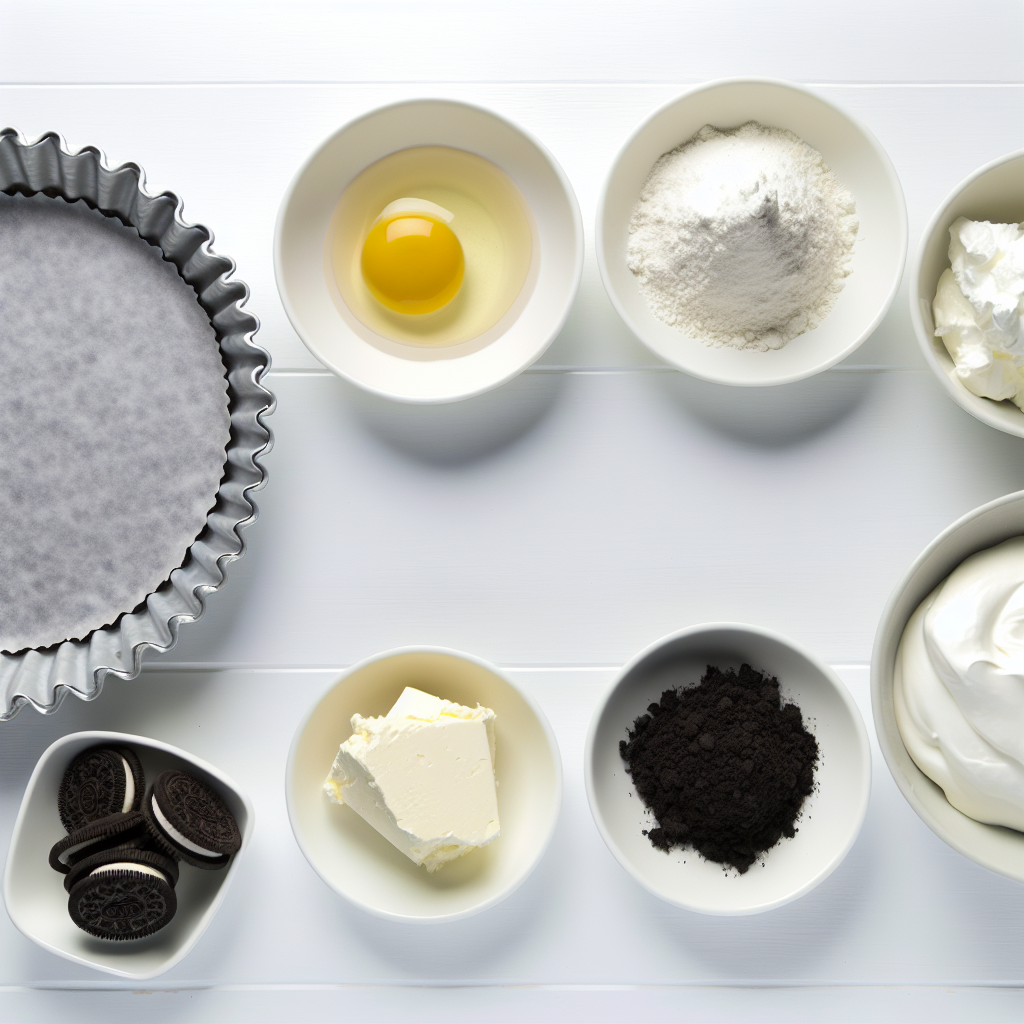
Gathering these ingredients is like collecting the essential puzzle pieces that bring this pie to life. Each one plays a vital role, from creating that luscious creaminess to balancing sweetness and adding just the right amount of crunch and depth of flavor.
- Oreo cookie crust: Whether store-bought or homemade from 24 crushed Oreos and 5 tablespoons melted butter, this crust forms the sturdy, chocolaty base that anchors the pie.
- Cream cheese (8 oz, softened): Provides the rich and smooth texture that gives the pie its cheesecake-like creaminess.
- Powdered sugar (1/2 cup): Sweetens the filling gently without any graininess, blending perfectly into the cream cheese.
- Vanilla extract (1 teaspoon): Adds a warm, aromatic depth that enhances the overall flavor profile.
- Whipped topping (8 oz tub): Lightens the filling with airy fluffiness, keeping each bite soft and melt-in-your-mouth delightful.
- Chopped Oreos (12 cookies): Infuse the filling with delightful bursts of chocolatey crunch in every forkful.
- Extra whipped topping and Oreos: For garnishing, making the presentation as irresistible as the taste.
How to Make No-Bake Oreo Pie Recipe
Step 1: Prepare the Cream Cheese Mixture
Begin by beating the softened cream cheese with powdered sugar and vanilla extract in a large bowl until the texture is silky smooth and creamy. This step ensures your filling will have that luscious, velvety consistency that elevates the entire pie experience.
Step 2: Fold in the Whipped Topping
Gently fold in the whipped topping with a spatula, mixing just until combined. This technique keeps the filling airy and light, balancing the dense cream cheese perfectly—no overworking here!
Step 3: Stir in the Chopped Oreos
Next, fold in the chopped Oreo pieces. These morsels add delightful texture and bursts of chocolate that transform the filling from ordinary to extraordinary. Make sure they’re evenly distributed so every slice has its fair share.
Step 4: Assemble the Pie
Spoon the creamy Oreo filling into your prepared cookie crust. Use a spatula to smooth the top evenly—this makes for a neat, professional-looking finish once chilled.
Step 5: Chill Until Set
Cover your pie and refrigerate for at least 4 hours, or better yet, overnight. This resting time allows the filling to firm up beautifully, resulting in a sliceable, creamy dessert that holds its shape perfectly.
Step 6: Garnish and Serve
Before serving, add a generous swirl of whipped topping on the surface and decorate with whole or crushed Oreos for that extra flair and crunch. Slice, serve chilled, and watch everyone’s eyes light up.
How to Serve No-Bake Oreo Pie Recipe
Garnishes
A simple swirl of extra whipped topping topped with crushed Oreos or even a few whole cookies adds elegance and a cheesecake parlor vibe. For a little extra fun, consider a drizzle of chocolate syrup or a sprinkle of mini chocolate chips to amp up the chocolate factor.
Side Dishes
This pie stands wonderfully on its own, but pairing it with fresh berries like strawberries or raspberries will bring a refreshing contrast to the richness. A scoop of vanilla ice cream alongside makes it an indulgent, crowd-pleasing dessert combo.
Creative Ways to Present
Try serving individual portions in clear dessert cups for a cute, portable treat or layering this filling with crushed Oreos and whipped cream in a trifle bowl for a dramatic, eye-catching centerpiece. You can also create mini versions using a muffin tin lined with cupcake wrappers for parties.
Make Ahead and Storage
Storing Leftovers
Keep your pie covered in the refrigerator to maintain its freshness. Stored properly, it will stay delicious for up to 3 days without losing any of its creamy texture or Oreo crunch.
Freezing
This No-Bake Oreo Pie Recipe freezes beautifully. Just wrap it tightly with plastic wrap and foil, then freeze for up to a month. When ready, thaw it in the fridge overnight. The texture may become a bit more like an ice cream pie, which is a delightful variation on hot days.
Reheating
Since this pie is best enjoyed chilled, reheating is not recommended. If you’re worried about it being too cold, simply let it sit at room temperature for 10 to 15 minutes before serving to soften slightly.
FAQs
Can I use a homemade crust for this pie?
Absolutely! In fact, using 24 crushed Oreos mixed with 5 tablespoons of melted butter is a fantastic way to craft a buttery and flavorful homemade crust that perfectly complements the filling.
Is there a non-dairy version of this recipe?
You can substitute non-dairy cream cheese and whipped topping alternatives to make it vegan-friendly. Just be sure to check that these products have similar textures to maintain the pie’s creamy consistency.
How long should I chill the pie before serving?
Chilling for at least 4 hours is essential for the filling to set properly. For best results and easier slicing, chilling overnight is ideal.
Can I add other mix-ins besides Oreos?
Definitely! Feel free to experiment with chocolate chips, crushed candies, or even nuts to add your own twist while keeping the core Oreo flavor front and center.
Does this pie freeze well if I want to save leftovers?
Yes, it freezes wonderfully. Just ensure you wrap it tightly and thaw it slowly in the refrigerator to retain that creamy texture with a delicious, slightly firmer bite.
Final Thoughts
This No-Bake Oreo Pie Recipe is truly a little slice of heaven that’s as easy as it is delicious. Whether you’re a seasoned baker or just want to whip up a fuss-free dessert that wows, this pie delivers on every front. I can’t wait for you to try it and add it to your dessert rotation—it’s the perfect sweet treat to share with friends and family any time of the year.
Print
No-Bake Oreo Pie Recipe
- Prep Time: 15 minutes
- Cook Time: 0 minutes
- Total Time: 4 hours 15 minutes
- Yield: 8 servings
- Category: Dessert
- Method: No-Cook
- Cuisine: American
- Diet: Vegetarian
Description
This No-Bake Oreo Pie is a creamy, decadent dessert featuring a rich Oreo cookie crust filled with a smooth blend of cream cheese, powdered sugar, vanilla, whipped topping, and chopped Oreos. Perfectly chilled and topped with extra whipped topping and Oreo garnish, it is an effortless treat ideal for parties or a sweet indulgence any day.
Ingredients
Crust
- 1 pre-made Oreo cookie crust (or homemade using 24 crushed Oreos and 5 tbsp melted butter)
Filling
- 1 (8 oz) package cream cheese, softened
- 1/2 cup powdered sugar
- 1 tsp vanilla extract
- 1 (8 oz) tub whipped topping (such as Cool Whip)
- 12 Oreos, chopped
Garnish
- Extra whipped topping
- Whole or crushed Oreos
Instructions
- Prepare the Cream Cheese Mixture: In a large bowl, beat the softened cream cheese with powdered sugar and vanilla extract until smooth and creamy, ensuring no lumps remain for the best texture.
- Fold in Whipped Topping: Gently fold the whipped topping into the cream cheese mixture until fully combined, maintaining the light and airy consistency of the whipped topping.
- Add Chopped Oreos: Stir in the chopped Oreos carefully so they are evenly distributed throughout the filling.
- Assemble the Pie: Spoon the Oreo cream cheese mixture into the Oreo cookie crust and smooth the top evenly with a spatula.
- Chill the Pie: Cover the pie and refrigerate for at least 4 hours or overnight to allow the filling to set firmly.
- Garnish and Serve: Before serving, spread additional whipped topping on the pie and garnish with whole or crushed Oreos. Slice the pie and serve chilled for a refreshing dessert experience.
Notes
- For a richer texture, use homemade whipped cream instead of store-bought whipped topping.
- You can freeze the pie for a firmer, ice cream-like dessert experience.
- Ensure the cream cheese is softened to avoid lumps in the filling.
- Refrigeration is necessary to achieve proper set and texture.


