
If you are craving a hearty meal that feels like the warmest hug after a long day, the Kielbasa and Pierogi Bake: Discover the Ultimate Comfort Dish Recipe is your new best friend. This dish combines the smoky, savory goodness of kielbasa sausage with tender, pillowy pierogi, all smothered in tangy sour cream and melted cheddar cheese. It’s an irresistible medley of textures and flavors that comes together easily, making it perfect for a satisfying family dinner or a cozy night in. Once you try it, you’ll understand why it’s called the ultimate comfort dish.
Ingredients You’ll Need
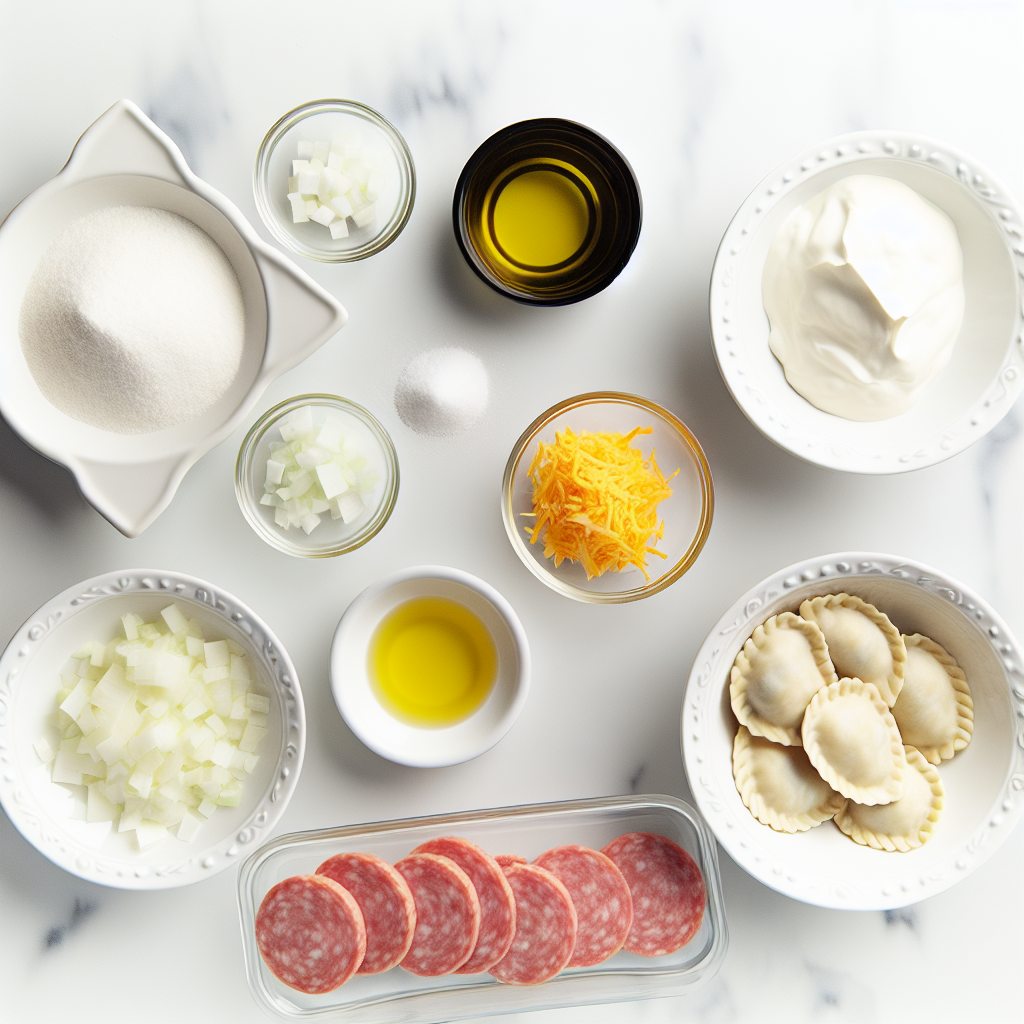
The beauty of this recipe is in its simplicity and how each ingredient plays a crucial role. Every item is accessible yet impactful, contributing layers of flavor, richness, and texture that make the bake utterly delicious.
- 1 pound kielbasa, sliced: Provides a smoky, meaty base with a robust flavor and satisfying chew.
- 1 package frozen pierogi (about 16 ounces): Offers soft, doughy pockets that absorb flavors and give the dish its comforting heart.
- 1 onion, chopped: Adds a mild sweetness and depth when sautéed.
- 2 cups shredded cheddar cheese: Creates a golden, melty topping that’s rich and sharp.
- 1 cup sour cream: Brings creaminess and a slight tang that balances the sausage’s richness.
- 1 tablespoon olive oil: Essential for sautéing and infusing a subtle fruity richness.
- Salt and pepper to taste: Perfectly seasons the entire dish to bring out each ingredient’s best qualities.
How to Make Kielbasa and Pierogi Bake: Discover the Ultimate Comfort Dish Recipe
Step 1: Preheat Your Oven
Start by setting your oven to 375°F (190°C). Preheating ensures that when your delicious bake goes in, it will cook evenly and develop that beautiful golden top we’re all eager to see.
Step 2: Sauté the Onion
Warm the olive oil over medium heat in a skillet, then add the chopped onion. Cook it until it turns translucent and soft, releasing its natural sweetness—this step adds a subtle, savory hint to the dish that perfectly complements the kielbasa.
Step 3: Brown the Kielbasa
Add the sliced kielbasa to your skillet and cook it until it’s nicely browned. This fast sear builds flavor through caramelization, creating a slightly crisp edge that contrasts so well with the tender pierogi.
Step 4: Layer the Pierogi and Kielbasa Mixture
Grab a large baking dish and start with a layer of frozen pierogi. You don’t need to thaw them first, which makes this recipe super convenient. On top of the pierogi, evenly spread the kielbasa and sautéed onion mixture, ensuring every bite has a taste of both.
Step 5: Add Sour Cream and Cheese
Spread the sour cream generously over your layers, encouraging the tangy creaminess to seep down as it bakes. Then, sprinkle the shredded cheddar cheese over the top—this cheese melts into a bubbly, golden blanket that brings ultimate comfort in every forkful.
Step 6: Season Generously
Sprinkle salt and freshly ground black pepper to taste. This small but crucial step rounds out the flavors and lifts the dish from good to extraordinary.
Step 7: Bake to Perfection
Place your dish in the oven and bake for 30 to 35 minutes. You’re looking for the cheese to become bubbly and golden brown, signaling that your Kielbasa and Pierogi Bake: Discover the Ultimate Comfort Dish Recipe is ready to be devoured.
How to Serve Kielbasa and Pierogi Bake: Discover the Ultimate Comfort Dish Recipe
Garnishes
Fresh herbs like chopped parsley or chives add a bright contrast to the rich flavors and melted cheese. A dollop of extra sour cream on top can add creaminess and tang just before serving, lifting the dish further.
Side Dishes
This dish is quite hearty on its own, but a crisp green salad or steamed veggies balance the richness perfectly. A bowl of sauerkraut or pickled cucumbers also adds that delightful sharpness that pairs beautifully with kielbasa.
Creative Ways to Present
Serve the bake family-style in the casserole dish for a cozy, communal vibe or plate it individually with a sprinkle of paprika or smoked paprika for a visual and flavor punch. For a fun twist, try layering the bake in individual ramekins for personal comfort servings.
Make Ahead and Storage
Storing Leftovers
You can store any leftovers tightly covered in the refrigerator for up to 3 days. The flavors often deepen overnight, making the second meal equally delicious.
Freezing
This bake freezes beautifully! Transfer cooled leftovers into an airtight container or freezer bag and freeze for up to 2 months. Thaw overnight in the refrigerator before reheating.
Reheating
Reheat in the oven at 350°F (175°C) until warmed through and bubbly, about 15-20 minutes, or microwave individual portions for a quicker option. To keep the cheese melty, cover with foil if reheating in the oven for longer periods.
FAQs
Can I use fresh pierogi instead of frozen?
Absolutely! Fresh pierogi work great and might even reduce baking time a bit, but frozen pierogi provide convenience without sacrificing flavor or texture.
What kind of kielbasa is best for this recipe?
Any smoked kielbasa will work wonderfully, but choose one with good quality and a robust flavor to stand up to the rich cheese and sour cream.
Can I substitute the cheddar cheese?
Yes! Sharp cheddar is classic, but feel free to try mozzarella for creaminess or a smoky gouda for an extra flavor twist.
Is this dish gluten-free?
Traditional pierogi often contain gluten, so look for gluten-free pierogi options if you need to keep the dish gluten-free.
Can I add vegetables to this bake?
Definitely! Sautéed mushrooms, bell peppers, or spinach would blend nicely and add some color, nutrients, and freshness.
Final Thoughts
There is something truly special about the Kielbasa and Pierogi Bake: Discover the Ultimate Comfort Dish Recipe. It combines simplicity with flavors that feel indulgent yet welcoming. It’s a dish you’ll come back to again and again, whether for family dinners or a no-fuss meal that hits the spot perfectly. I can’t wait for you to try it and make it your own cozy classic!
Print
Kielbasa and Pierogi Bake: Discover the Ultimate Comfort Dish Recipe
- Prep Time: 15 minutes
- Cook Time: 35 minutes
- Total Time: 50 minutes
- Yield: 4 to 4 servings
- Category: Main Course
- Method: Baking
- Cuisine: Eastern European
Description
This Kielbasa and Pierogi Bake is a hearty, comforting dish perfect for a satisfying meal. Featuring tender pierogi layered with savory browned kielbasa and sautéed onions, topped with creamy sour cream and melted cheddar cheese, this bake combines bold flavors and simple ingredients for an easy yet delicious dinner.
Ingredients
Main Ingredients
- 1 pound kielbasa, sliced
- 1 package frozen pierogi (about 16 ounces)
- 1 onion, chopped
- 2 cups shredded cheddar cheese
- 1 cup sour cream
- 1 tablespoon olive oil
- Salt and pepper to taste
Instructions
- Preheat Oven: Preheat your oven to 375°F (190°C) to prepare for baking the dish.
- Sauté Onions: Heat olive oil in a skillet over medium heat and sauté the chopped onion until it becomes translucent, releasing its sweetness and aroma.
- Brown Kielbasa: Add the sliced kielbasa to the skillet with the onions and cook until browned, enhancing its flavor and texture.
- Layer Ingredients: In a large baking dish, arrange a layer of frozen pierogi first, then spread the kielbasa and onion mixture evenly over the top.
- Add Toppings: Spread sour cream evenly over the kielbasa and pierogi layer, then sprinkle the shredded cheddar cheese on top.
- Season: Sprinkle salt and pepper over the dish to taste, ensuring balanced seasoning.
- Bake: Place the baking dish in the preheated oven and bake for 30 to 35 minutes, or until the cheese is bubbly and golden brown, signaling that the bake is ready to serve.
Notes
- You can substitute sour cream with Greek yogurt for a tangier flavor and added protein.
- Try adding sautéed bell peppers or mushrooms along with the onions for extra veggies.
- Use sharp cheddar for a stronger cheese taste or a mild cheddar for subtlety.
- Let the bake rest for 5 minutes after baking to set before serving.
- For a crispier top, broil the dish for 2-3 minutes at the end, watching closely to prevent burning.


