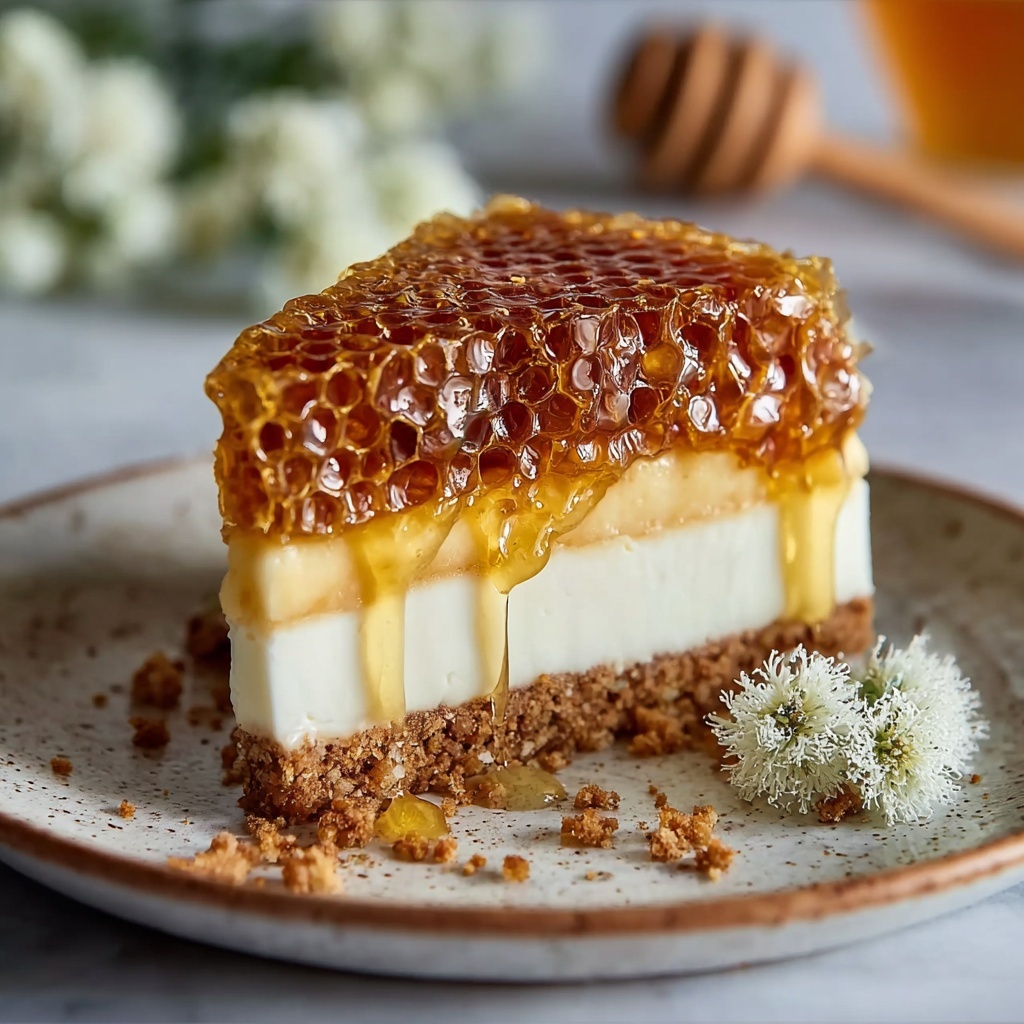
If you are looking for a show-stopping dessert that combines creamy richness with a wonderfully crunchy surprise, the Honeycomb Delight Cheesecake Recipe is an absolute must-try. This cheesecake balances a buttery biscuit base with a beautifully smooth cream cheese filling, gently whipped cream for lightness, and a luscious honey drizzle that shines with natural sweetness. The crowning glory is that iconic piece of honeycomb on top, adding texture, visual appeal, and a burst of pure, golden delight. Whether you’re making it for a special occasion or just because you want to treat yourself, this recipe is a guaranteed crowd-pleaser that feels fancy but is delightfully simple to prepare.
Ingredients You’ll Need
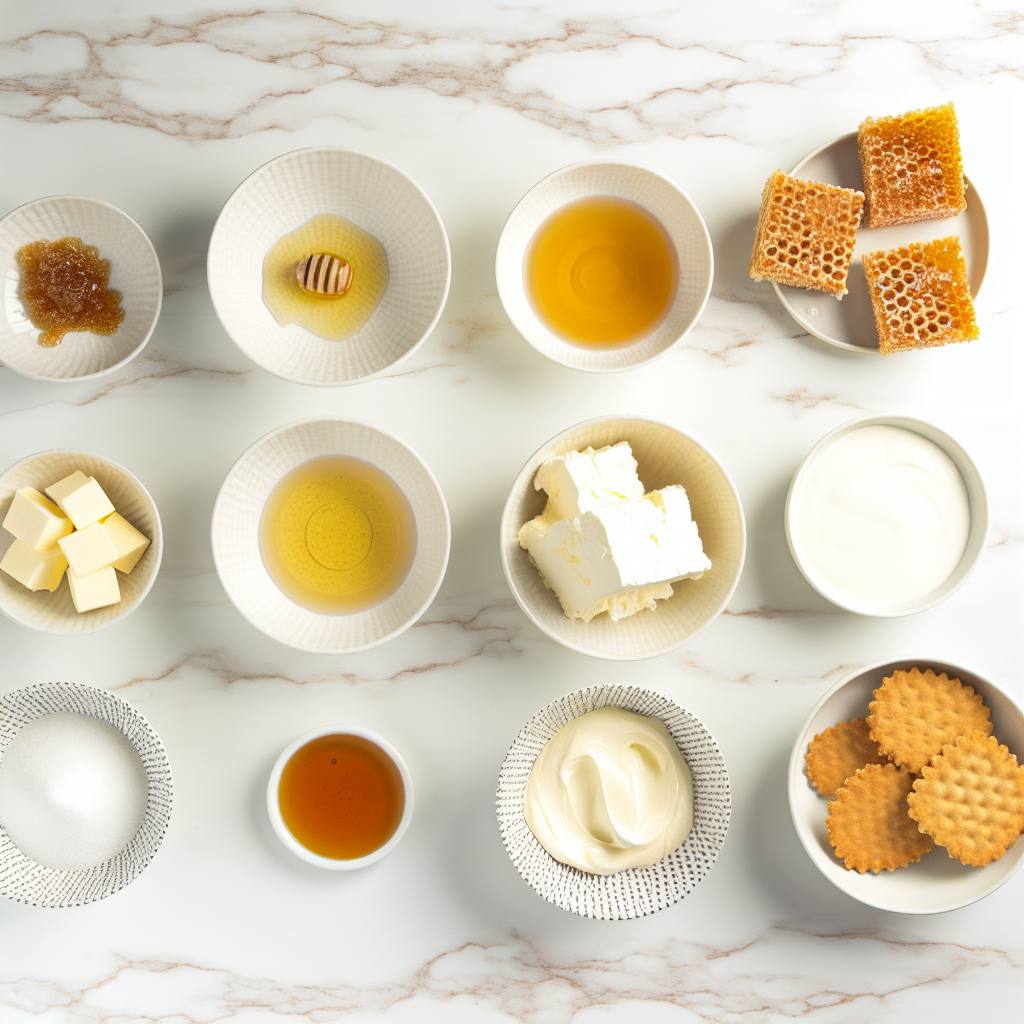
The beauty of the Honeycomb Delight Cheesecake Recipe lies in its straightforward ingredients, each playing an essential role in achieving the perfect balance of flavor, texture, and visual appeal. From the crunchy biscuit base to the creamy filling and the sweet honey topping, these ingredients are easily found but pack plenty of character.
- 200 g digestive biscuits: Provides a lightly sweet, crumbly base that adds crunch and structure.
- 100 g melted butter: Binds the biscuit crumbs together and adds rich flavor to the crust.
- 500 g cream cheese: The creamy, tangy heart of the cheesecake for that smooth, indulgent texture.
- 200 g sugar: Sweetens the cheesecake perfectly without overpowering other flavors.
- 250 ml heavy cream: Whipped to softness, it brings lightness and silky smoothness to the filling.
- 1 teaspoon vanilla extract: Adds warmth and enhances the overall flavor.
- 2 tablespoons honey: Gives a subtle floral sweetness inside the cheesecake and for drizzling on top.
- 1 piece of honeycomb for decoration: Adds texture, visual appeal, and a signature honey crunch to finish the dessert elegantly.
How to Make Honeycomb Delight Cheesecake Recipe
Step 1: Prepare the biscuit base
Start by mixing your crushed digestive biscuits with the melted butter until everything is evenly coated. Press this fragrant mixture firmly into the bottom of a springform pan to form a smooth, even base. This foundation is important because it will give your cheesecake a lovely crunch and hold everything together. Pop the pan into the refrigerator to chill while you prepare the filling.
Step 2: Make the creamy filling
Using a mixing bowl, beat the cream cheese together with sugar and vanilla extract until the mixture becomes smooth and luxuriously creamy. This step is key for ensuring no lumps—just a silky texture that’s sweet and flavorful. The vanilla is subtle but critical, enhancing the richness of the cream cheese without taking over.
Step 3: Whip and fold in the cream
In a separate bowl, whip your heavy cream until it forms stiff peaks. Gently fold this whipped cream into your cream cheese mixture with a spatula, making sure to keep the airiness intact. This makes the cheesecake filling wonderfully light and fluffy, giving that perfect melt-in-your-mouth experience.
Step 4: Assemble the cheesecake
Pour the creamy filling over the chilled biscuit base. Use a spatula to smooth out the surface so it’s even and inviting. This is the moment when your cheesecake really starts to take shape and show off its gorgeous layers.
Step 5: Chill to set
Refrigerate your cheesecake for at least four hours or, better yet, overnight. This chilling time allows the flavors to meld beautifully and the filling to set completely so you get perfect slices that hold firm but remain creamy.
Step 6: Add the honey and honeycomb finishing touches
Just before serving, drizzle the top generously with fresh honey. Then carefully place a stunning piece of honeycomb on top as a decorative and delicious crown. This final touch is what transforms your cheesecake into a true Honeycomb Delight Cheesecake Recipe masterpiece.
How to Serve Honeycomb Delight Cheesecake Recipe
Garnishes
Beyond the striking honeycomb centerpiece, consider adding a few fresh berries like raspberries or blueberries for a pop of color and tart contrast. A light dusting of powdered sugar or a few mint leaves can uplift the presentation and add an inviting freshness.
Side Dishes
This cheesecake pairs wonderfully with a simple cup of freshly brewed coffee or a delicate herbal tea that balances its sweetness. If you want something extra, a bowl of vanilla ice cream or a tangy raspberry coulis complements the honey and cream flavors beautifully.
Creative Ways to Present
Serve the cheesecake on a rustic wooden board or a sleek glass platter to show off its layers. For a modern twist, cut smaller, individual portions into charming mini jars or clear dessert cups. You can also scatter small honeycomb pieces or edible gold flakes on top to wow your guests.
Make Ahead and Storage
Storing Leftovers
Any leftover Honeycomb Delight Cheesecake Recipe can be stored tightly covered in the refrigerator for up to 3 days. Make sure to keep it well sealed so it doesn’t absorb any fridge odors and stays fresh and creamy.
Freezing
If you want to keep your cheesecake longer, it freezes beautifully. Wrap it tightly with plastic wrap and place it in an airtight container before freezing. When you want to enjoy it, thaw overnight in the fridge. Note that the honeycomb decoration should be added fresh after thawing for the best texture.
Reheating
Cheesecake is best enjoyed cold, so avoid reheating. Let the chilled slices sit at room temperature for 10–15 minutes before serving to bring out the flavors and soften the texture gently.
FAQs
Can I use a different biscuit for the base?
Absolutely! While digestive biscuits are classic, you can substitute graham crackers or even crushed cookies like shortbread. Just keep the buttery, crunchy texture in mind to maintain that perfect cheesecake base.
Is this cheesecake baked or no-bake?
This Honeycomb Delight Cheesecake Recipe is a no-bake cheesecake, relying on chilling to set the filling rather than baking. This keeps the texture light and creamy, and the preparation simple.
Can I make this recipe vegan or dairy-free?
Yes, with some adjustments. Use dairy-free cream cheese and whipping cream alternatives, and replace the butter with a plant-based version. Keep in mind that texture and flavor might slightly differ but the honeycomb inspiration stays intact.
How do I keep the honeycomb from getting sticky or soggy?
Always add the honeycomb decoration just before serving. This keeps it delightfully crunchy and visually impressive, as longer contact with moisture can soften it.
What type of honey is best for this cheesecake?
A good-quality, mild-flavored honey works best here—think clover or wildflower honey. These varieties complement the cheesecake without overwhelming the other flavors.
Final Thoughts
There’s something truly magical about the Honeycomb Delight Cheesecake Recipe that makes it a standout dessert to whip up anytime you want to impress or simply indulge yourself. The perfect combo of creamy, crunchy, and sweet will have everyone asking for more. So go ahead and treat yourself—this cheesecake is a deliciously simple way to bring a bit of joy and elegance to your table.
Print
Honeycomb Delight Cheesecake Recipe
- Prep Time: 45 minutes
- Cook Time: 55 minutes
- Total Time: 5 hours 40 minutes
- Yield: 8 servings
- Category: No-Cook
- Method: No-Cook
- Cuisine: British
Description
Honeycomb Delight Cheesecake is a luscious no-bake dessert featuring a crunchy digestive biscuit base topped with a smooth and creamy mixture of cream cheese, sugar, and whipped heavy cream. Finished with a drizzle of honey and a decorative piece of honeycomb, this cheesecake is perfect for a sweet treat that requires minimal cooking. Additionally, a honey-infused tart with a buttery crust and a honey-lemon egg filling offers a delightful baked option, boasting a perfect balance of sweetness and tanginess.
Ingredients
For Honeycomb Delight Cheesecake
- 200 g digestive biscuits, crushed
- 100 g melted butter
- 500 g cream cheese
- 200 g sugar
- 250 ml heavy cream
- 1 teaspoon vanilla extract
- 2 tablespoons honey
- 1 piece of honeycomb for decoration
For Honey Tart
- 1 1/4 cups all-purpose flour
- 1/2 cup unsalted butter (cold, diced)
- 1/4 cup granulated sugar
- 1/2 cup quality honey
- 3 large eggs
- 1/2 tsp sea salt
- 1 tbsp lemon juice
- Ice water (quantity to form dough, approx. 2-3 tbsp)
Instructions
- Prepare Cheesecake Base: Mix the crushed digestive biscuits with melted butter until well combined. Press this mixture firmly into the bottom of a springform pan to create an even base. Place the pan in the refrigerator to chill and set.
- Make Cheesecake Filling: In a mixing bowl, beat the cream cheese with sugar and vanilla extract until the mixture is smooth and creamy without lumps.
- Whip Cream and Fold: Whip the heavy cream until it forms firm peaks. Gently fold the whipped cream into the cream cheese mixture, ensuring it remains airy and light without deflating.
- Assemble and Chill Cheesecake: Pour the cream cheese mixture over the biscuit base in the springform pan. Smooth the top with a spatula for an even surface. Refrigerate for at least 4 hours or overnight to allow the cheesecake to set properly.
- Decorate Cheesecake: Before serving, drizzle honey evenly over the cheesecake and place a piece of honeycomb on top as an attractive garnish.
- Preheat Oven for Tart: Preheat your oven to 350°F (175°C).
- Make Tart Dough: In a bowl, combine flour and granulated sugar. Cut in the cold, diced butter using a pastry cutter or fingers until the mixture resembles coarse crumbs. Gradually add ice water, one tablespoon at a time, mixing gently until the dough comes together.
- Chill and Roll Dough: Wrap the dough in plastic wrap and chill in the refrigerator for at least 30 minutes. Once chilled, roll out the dough on a lightly floured surface to fit a 9-inch pie dish evenly.
- Pre-bake Tart Crust: Transfer the rolled dough into the pie dish. Prick the base all over with a fork to prevent bubbling. Line the crust with parchment paper and fill with baking weights or dried beans. Bake in the preheated oven for 15 minutes, then remove the weights and parchment paper. Bake for an additional 5 minutes until lightly golden.
- Prepare Tart Filling: While the crust cools, whisk together the honey, eggs, lemon juice, and sea salt in a bowl until smooth and well combined.
- Bake Tart: Pour the filling mixture into the cooled tart crust. Bake in the oven for 35 to 40 minutes until the filling is set but still slightly jiggly in the center.
- Cool and Serve Tart: Allow the tart to cool completely on a wire rack before slicing and serving.
Notes
- The cheesecake requires at least 4 hours of chilling to set properly, but overnight refrigeration yields the best texture.
- Use quality honey for the best flavor impact in both the cheesecake drizzle and the tart filling.
- When whipping cream, avoid overbeating to prevent turning it into butter.
- The tart crust can be made ahead and frozen for convenience.
- Ensure the tart filling is slightly jiggly when removing from the oven to prevent overbaking and cracking.


