If you’ve ever wondered how to capture the sweet, chewy goodness of store-bought dried fruit right in your own kitchen, this Homemade Raisins Recipe is an absolute game changer. Using just simple grapes and a bit of white vinegar to refresh and clean, you’ll be rewarded with naturally sweet, tender raisins that elevate everything from your morning oatmeal to afternoon snacks. It’s surprisingly easy to make, wonderfully flavorful, and a fun project that fills your home with the most inviting aroma.
Ingredients You’ll Need
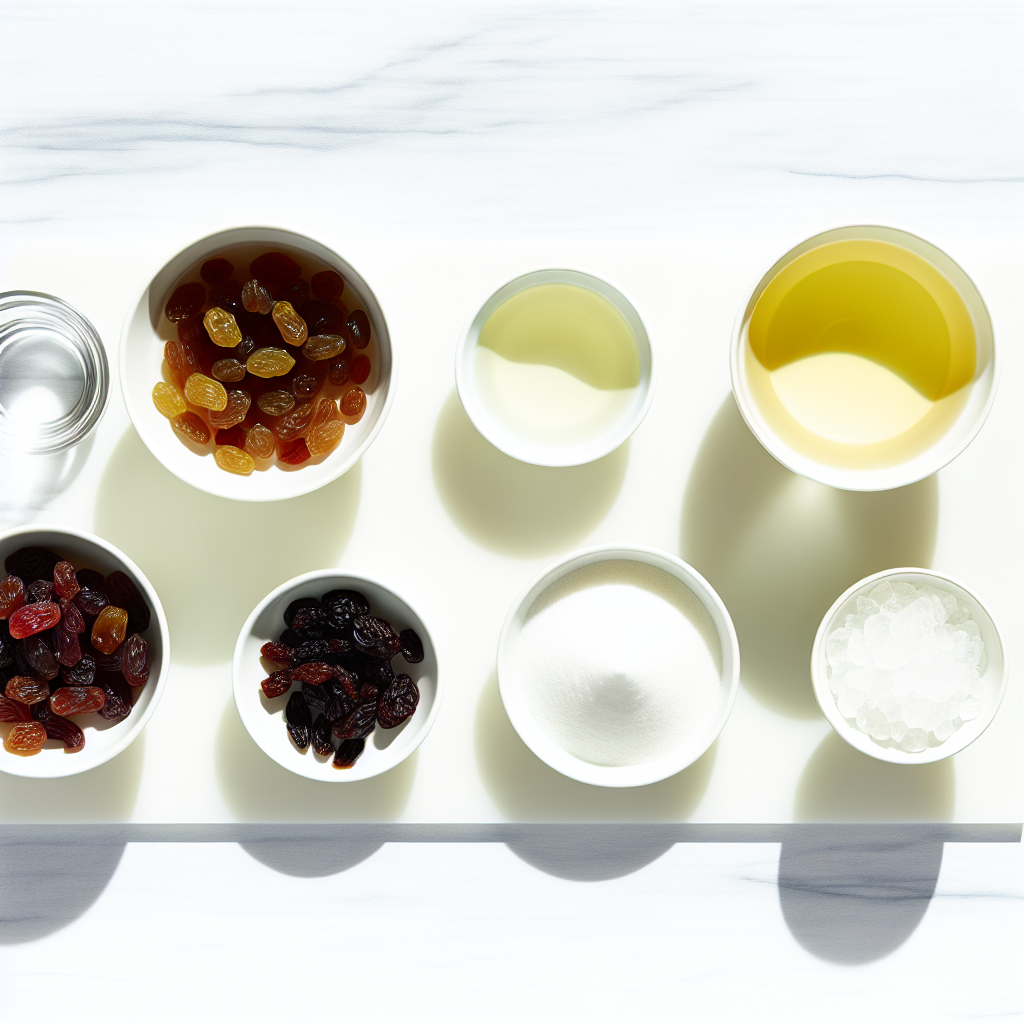
The beauty of this Homemade Raisins Recipe lies in its simplicity. Each ingredient plays a critical role—from cleansing the grapes to intensifying their natural sweetness and softness through drying.
- 1 pound seedless grapes (any color): Choose firm, plump grapes for the best chewy texture after drying.
- 2 tablespoons white vinegar: Acts as a gentle wash to remove any residues, ensuring your raisins are clean and fresh.
- Water and ice: Essential for an ice bath to stop cooking and preserve the grapes’ vibrant flavors and color.
- Parchment paper: Prevents sticking and helps your raisins dry evenly during the low-temperature oven process.
How to Make Homemade Raisins Recipe
Step 1: Preparing the Grapes
Start by preheating your oven to a low 190°F, the perfect temperature for gently drying the grapes without cooking them too fast. Next, remove the grapes from their stems and get ready to cleanse them thoroughly.
Step 2: Cleaning with Vinegar and Ice Bath
Mix the white vinegar with cold water and some ice cubes in a large bowl to create a refreshing bath. This step is crucial for washing away any dirt and residues, helping your homemade raisins taste clean and crisp. It also prepares the grapes for blanching, which helps loosen their skins.
Step 3: Blanching the Grapes
Bring a large pot of water to a rolling boil and add the grapes for a quick 30 seconds. This short blanching process softens the skins just enough to speed up drying while locking in the juicy flavor. After boiling, immediately transfer the grapes to the vinegar ice bath to halt the cooking and set their vivid color.
Step 4: Drying the Grapes in the Oven
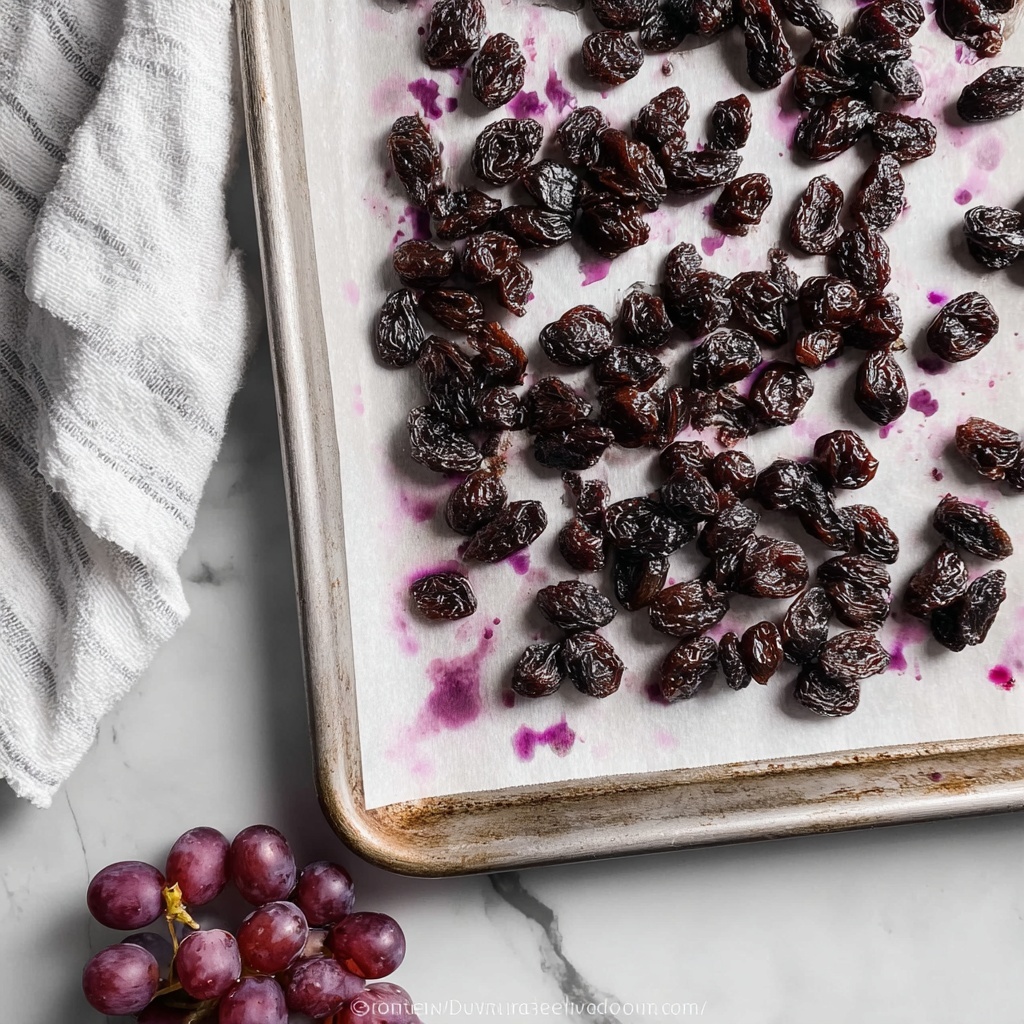
Drain the grapes well and gently dab them dry with a clean towel. You can choose to leave them whole or slice them in half to speed up drying; both ways work beautifully, but whole grapes retain more juiciness. Arrange the grapes in a single layer on a parchment-lined baking sheet and slide them into the oven. Let them dry for 12 to 18 hours, stirring occasionally to ensure even drying and prevent clumping.
Step 5: Final Cooling and Storage
Once your delicious homemade raisins have shriveled and taken on that classic chewy texture, let them cool before transferring them into an airtight container. Keep them refrigerated, where they will stay fresh and flavorful for up to two weeks, ready to snack on anytime.
How to Serve Homemade Raisins Recipe
Garnishes
Sprinkle your homemade raisins over salads or yogurt for a pop of natural sweetness and chewy texture. They also make fantastic garnishes on cheese platters, adding a hint of fruity contrast that brightens up every bite.
Side Dishes
Tuck these raisins into side dishes like couscous, pilafs, or roasted vegetables where their sweet chewiness complements savory flavors perfectly. They add depth to dishes like carrot salad or wild rice blends, transforming simple sides into something special.
Creative Ways to Present
Why not elevate your snack game by pairing your homemade raisins with nuts, dark chocolate, or coconut flakes for a trail mix? You can also infuse them into baked goods like muffins or bread, or rehydrate them slightly for use in sauces and chutneys, highlighting the versatility of this Homemade Raisins Recipe.
Make Ahead and Storage
Storing Leftovers
If you find yourself with extra homemade raisins, store them in an airtight container in the refrigerator. This helps maintain their moisture and chewiness while preventing them from drying out or sticking together over time.
Freezing
For longer storage, you can freeze your homemade raisins. Spread them out on a tray first to avoid clumping before transferring to a freezer-safe bag or container. When you want to enjoy them, simply thaw at room temperature or in the refrigerator.
Reheating
If your raisins become a bit too firm after storage, you can gently warm them in a low oven or microwave with a damp paper towel to restore softness, making them just as delightful as when freshly made in your Homemade Raisins Recipe.
FAQs
Can I use any type of grape for this recipe?
Absolutely! You can use any seedless grape variety, whether red, green, or black. Each type brings its own unique sweetness and color, so feel free to experiment and find your favorite.
Why do we blanch the grapes before drying?
Blanching softens the grape skins slightly, which helps speed up the drying process and also prevents the grapes from shriveling unevenly. It’s a small step that greatly improves your final homemade raisins.
Is the white vinegar necessary?
Using white vinegar is recommended because it cleans the grapes effectively by removing impurities and bacteria, ensuring your raisins are safe and fresh. It also helps retain the grapes’ natural flavors.
How long does it take to make homemade raisins?
While the active prep and blanching take just a few minutes, the drying process requires patience, typically between 12 to 18 hours in a low oven to achieve that perfect chewiness.
Can I dry grapes outdoors instead of using the oven?
Yes, sun drying is a traditional method, but it takes longer and depends on ideal weather conditions. Using an oven offers a controlled, faster way to make consistent, delicious homemade raisins anytime.
Final Thoughts
This Homemade Raisins Recipe is a wonderful way to turn simple grapes into a delightful snack packed with natural sweetness and chewy texture. It invites you to engage with your food in a hands-on, rewarding way that tastes better than anything store-bought. I can’t wait for you to try this at home and discover just how satisfying making your own raisins can be!
Print
Homemade Raisins Recipe
- Prep Time: 15 minutes
- Cook Time: 12 hours 0 minutes
- Total Time: 12 hours 15 minutes
- Yield: 4 servings
- Category: Snack
- Method: Baking
- Cuisine: American
- Diet: Vegetarian
Description
This simple homemade raisins recipe transforms fresh seedless grapes into naturally sweet, chewy dried fruit using a low-temperature oven drying method. With just a few ingredients and some patience, you can enjoy fresh, preservative-free raisins perfect for snacking or adding to recipes.
Ingredients
Ingredients
- 1 pound seedless grapes (any color)
- 2 tablespoons white vinegar
- Cold water (for ice bath)
Instructions
- Preheat Oven: Set your oven to a low temperature of 190°F to prepare for the slow drying process.
- Prepare Vinegar Ice Bath: Remove grapes from their stems. In a large bowl, mix the white vinegar with water and add ice cubes to create a cold bath.
- Blanch Grapes: Bring a large pot of water to a rolling boil. Briefly boil the grapes for 30 seconds, then drain immediately to help clean and slightly soften the skin.
- Cool Grapes: Transfer the boiled grapes into the prepared vinegar ice bath for 2 minutes to stop the cooking process and help set the skins.
- Dry and Slice Grapes: Drain the grapes well and gently dab them dry with a clean towel. Optionally, cut grapes in half to speed up drying, though leaving them whole is also fine. Place grapes evenly in a single layer on a parchment-lined baking sheet.
- Dry Grapes in Oven: Place the baking sheet in the oven and let the grapes dry for 12 to 18 hours, stirring occasionally every few hours to ensure even drying and prevent sticking.
- Store Raisins: Once dried and shriveled into raisins, allow them to cool completely. Store in an airtight container in the refrigerator for up to 2 weeks.
Notes
- Cutting grapes in half speeds up drying time but whole grapes produce larger, chewier raisins.
- Maintaining a low oven temperature is critical to gently dry grapes without cooking or burning them.
- Stirring the grapes every few hours encourages uniform drying and prevents grapes from sticking together.
- Store homemade raisins in the fridge to maintain freshness and extend shelf life.
- Use seedless grapes for easier drying and eating.

