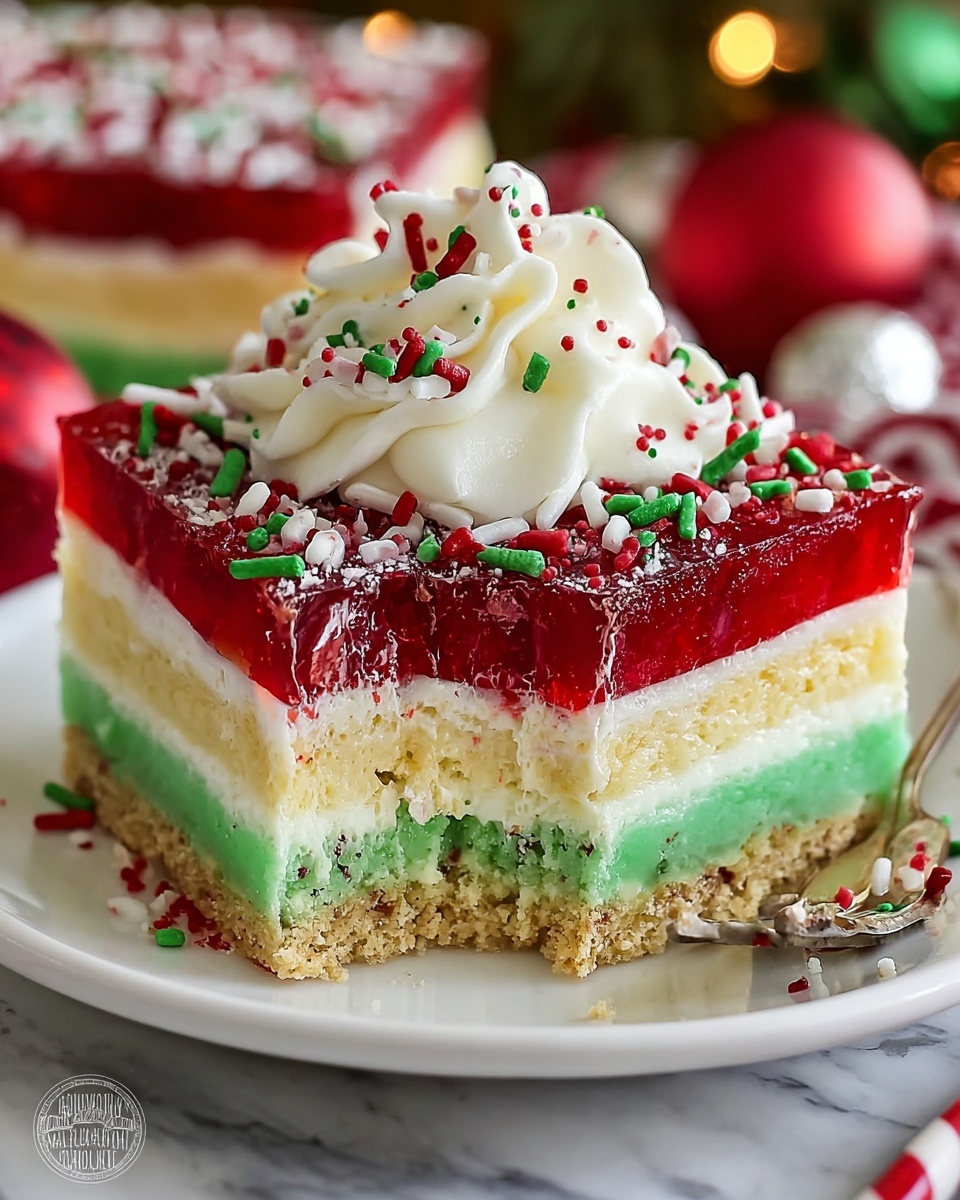
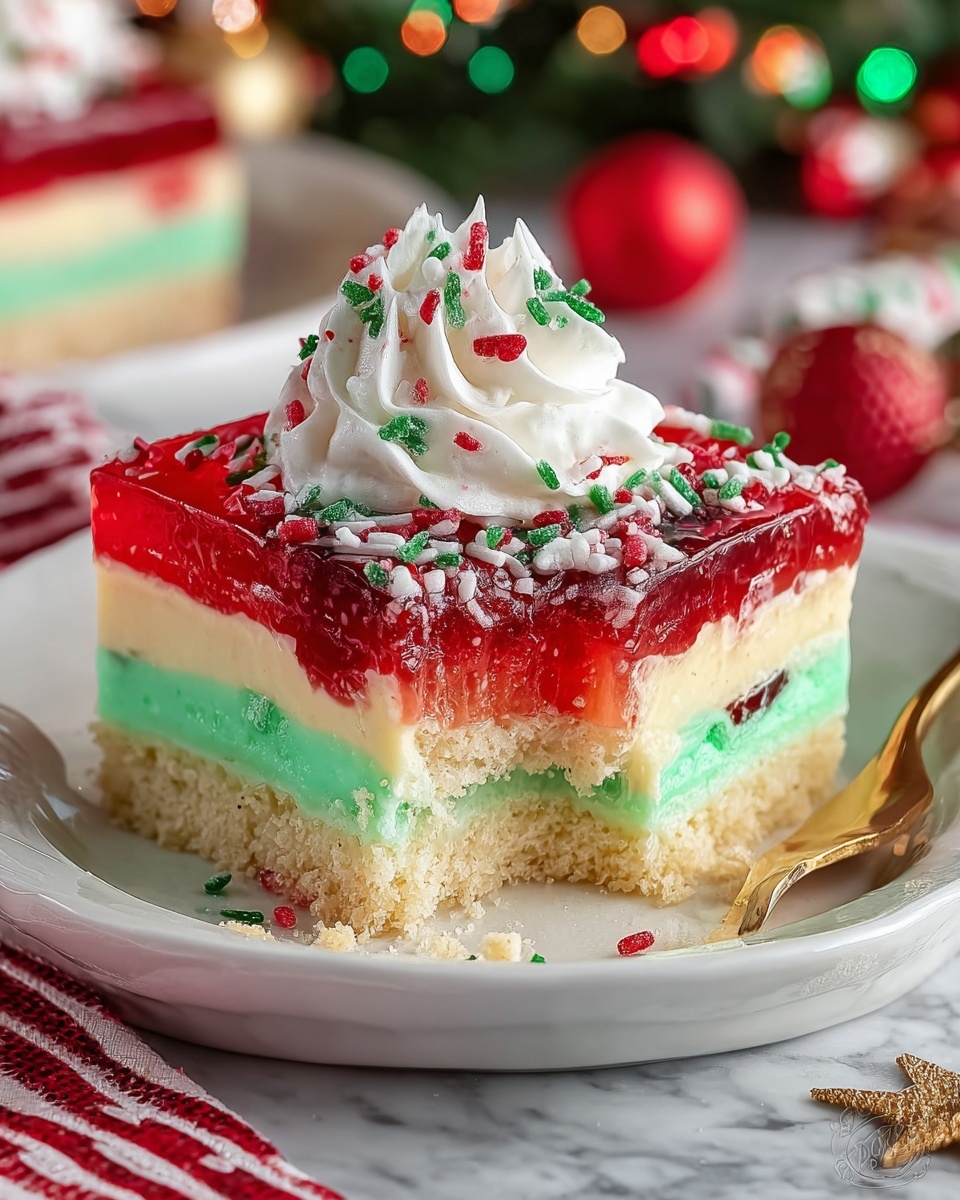
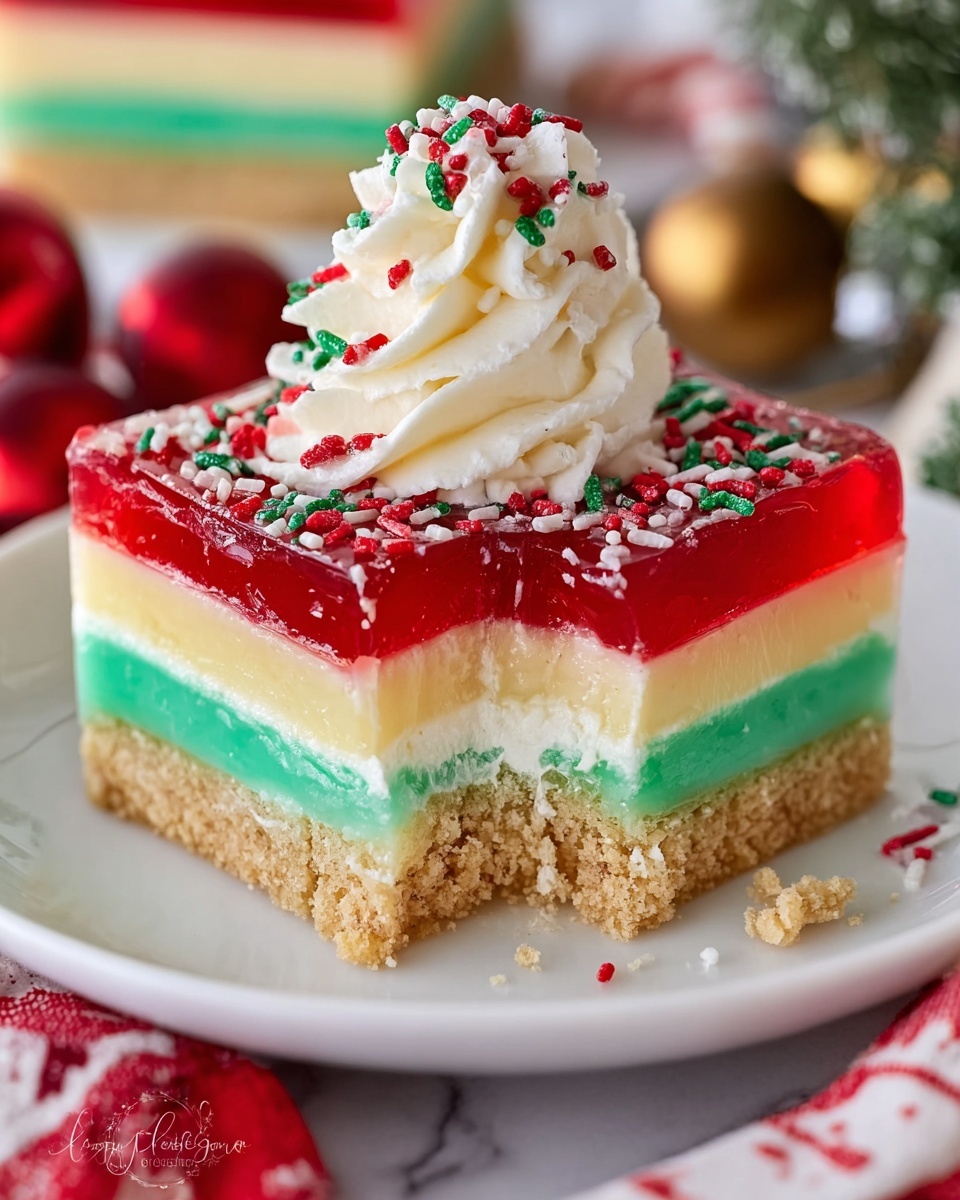
There is something truly magical about transforming a simple cake into a festive centerpiece, which is exactly why I adore this Holiday-Inspired Poke Cake Recipe. It brings a burst of vibrant holiday colors and delicious flavors all in one bite, making it the perfect dessert for any celebration. With its moist white cake base, pockets of jiggly red and green gelatin, and a cloud-like whipped topping adorned with festive sprinkles or crushed candy canes, this cake is not just a treat for the taste buds but also a feast for the eyes. Whether you’re hosting a party or looking to surprise your loved ones with something joyful and sweet, this Holiday-Inspired Poke Cake Recipe is guaranteed to brighten any holiday table.
Ingredients You’ll Need
Gathering simple, everyday ingredients is the first step to making this joyful cake come alive. Each component plays a crucial role, from the fluffy white cake providing a soft texture, to the colorful gelatin injecting bursts of flavor and cheer, topped with creamy whipped topping that balances every bite.
- 1 box white cake mix: The foundation of our cake, quick and easy to prepare while ensuring a tender crumb.
- 1 teaspoon vanilla extract (optional): Adds a subtle warmth and depth to the cake’s flavor.
- 1 (3 oz) box red gelatin (e.g., cherry or strawberry): Brings bright holiday color and a sweet, fruity burst.
- 1 (3 oz) box green gelatin (e.g., lime): Complements the red gelatin with a zesty, refreshing contrast.
- 2 cups boiling water (1 cup per gelatin flavor): Needed to dissolve the gelatin perfectly for soaking into the cake.
- 1 (8 oz) container whipped topping (e.g., Cool Whip), thawed: Provides a light, creamy finish that ties all the flavors together.
- Holiday sprinkles, crushed candy canes, or other festive decorations: For that final enchanting touch that makes the cake truly special.
How to Make Holiday-Inspired Poke Cake Recipe
Step 1: Bake the Cake
Let’s get started by preheating your oven to 350°F (175°C) and greasing a 9×13-inch baking dish. This will ensure the cake bakes evenly and releases easily when done. Preparing this simple white cake mix as instructed (with a splash of vanilla if you like) is quick, and it’s the perfect canvas for all the fun colors and flavors ahead.
Step 2: Cool Completely Before Poking
After baking your cake for about 25 to 30 minutes, use a toothpick to check doneness. Once out of the oven, let it cool completely. This resting time is crucial because a warm cake could cause the gelatin to melt or not set properly when poured in, so patience here rewards you with perfect results.
Step 3: Create the Poke Pattern
Grab the handle of a wooden spoon or a skewer and poke holes about an inch apart all over the cake. This simple step allows the gelatin to seep deep into the cake, creating those delightful color pockets that are the star of this Holiday-Inspired Poke Cake Recipe.
Step 4: Prepare the Gelatin Fillings
While the cake cools, dissolve each box of red and green gelatin in a cup of boiling water separately. Make sure to stir well until fully dissolved to avoid any graininess. The bright red and green colors paired with their sweet and tangy flavors will bring this cake to life.
Step 5: Fill the Poked Holes
Carefully spoon or pour the red gelatin into half of the holes and the green gelatin into the other half. This alternating pattern turns your cake into a festive mosaic, truly capturing the spirit of the holidays.
Step 6: Chill to Set
Cover your masterpiece with plastic wrap and refrigerate for at least 2 hours. This step is essential as it allows the gelatin to set within the cake, locking in the colorful flavors and creating a refreshing, jiggly texture that’s so much fun to bite into.
Step 7: Add Whipped Topping and Decorations
Once your cake is chilled and set, spread the whipped topping evenly over the top. This layer adds a light, creamy texture that balances the gelatin’s slight chewiness and the cake’s softness. Finally, dress it up with your favorite holiday sprinkles or crushed candy canes to make your dessert look as festive as it tastes.
Step 8: Serve and Enjoy
Slice your Holiday-Inspired Poke Cake Recipe into generous squares and serve chilled. Each piece promises a dance of moist cake, tangy gelatin, and fluffy topping that perfectly celebrates any holiday occasion.
How to Serve Holiday-Inspired Poke Cake Recipe
Garnishes
The beauty of this recipe lies in its charming presentation, and garnishes are key to elevating it. Crushed candy canes add a refreshing peppermint crunch, while holiday sprinkles bring playful colors and a slight sugary texture, creating a festive flair that’s hard to resist.
Side Dishes
This cake pairs wonderfully with simple sides like vanilla ice cream or fresh fruit salad to complement its texture and flavors. For a warm contrast, serve it alongside a cup of hot cocoa or coffee, making your holiday gathering all the cozier.
Creative Ways to Present
Want to impress your guests even more? Try presenting the cake as a trifle in a clear glass bowl layering pieces of the poke cake with whipped topping and fresh berries. Or serve it as mini individual portions in festive cupcake liners topped with garnishes for an adorable touch.
Make Ahead and Storage
Storing Leftovers
Leftover pieces of this Holiday-Inspired Poke Cake Recipe keep well in an airtight container in the refrigerator for up to 3 days. Keeping it chilled preserves the gelatin’s texture and the whipped topping’s freshness, so every bite is as delightful as the first.
Freezing
While freezing poke cake is possible, the gelatin texture may change slightly after thawing. If you want to freeze, wrap individual slices tightly in plastic wrap and foil to avoid freezer burn, and consume within a month for best quality.
Reheating
This cake is best enjoyed cold, so reheating isn’t recommended. The gelatin filling and whipped topping lose their textures when warmed. Instead, let it thaw in the refrigerator and serve chilled to maintain that festive, refreshing delight the recipe guarantees.
FAQs
Can I use different cake flavors for this Holiday-Inspired Poke Cake Recipe?
Absolutely! While white cake is traditional and lets the gelatin colors shine, you can try yellow or even a light-flavored cake like almond. Just keep in mind the gelatin colors might not pop as vividly on darker cakes.
What if I don’t have holiday sprinkles or candy canes for decoration?
Don’t worry! You can use chopped nuts, shredded coconut dyed with food coloring, or even edible glitter to add festive cheer. Fresh cranberries or pomegranate seeds work beautifully too.
Can I make the gelatin filling without boiling water?
Boiling water is essential to fully dissolve the gelatin powder. Using less hot water or cold water will cause the gelatin not to set properly, so make sure to follow this step closely for perfect results.
How far in advance can I prepare this poke cake?
You can bake and poke the cake a day ahead, refrigerate it overnight after adding the gelatin, and then add the whipped topping just before serving. This makes your holiday prep smoothing and stress-free.
Is this recipe suitable for kids to help with?
Definitely! Kids will love poking holes in the cake and choosing where to pour the colorful gelatin. Just make sure an adult handles the boiling water part to keep things safe.
Final Thoughts
This Holiday-Inspired Poke Cake Recipe is one of my favorite ways to bring warmth, color, and festive flavor to the holiday table with minimal effort and maximum joy. It’s a delightful combination of playful textures and cheerful colors that invite smiles with every bite. I truly encourage you to give this recipe a try and watch it become a beloved holiday tradition in your home!
Print
Holiday-Inspired Poke Cake Recipe
- Prep Time: 2 hours 20 minutes
- Cook Time: 30 minutes
- Total Time: 2 hours 50 minutes
- Yield: 12 servings
- Category: Dessert
- Method: Baking
- Cuisine: American
Description
This Holiday-Inspired Poke Cake is a festive and colorful dessert perfect for celebrating special occasions. A moist white cake is baked and then poked with holes, which are filled with vibrant red and green gelatin to create a fun, eye-catching pattern inside. After chilling to set the gelatin, the cake is topped with creamy whipped topping and adorned with holiday sprinkles or crushed candy canes, delivering a sweet, festive treat that’s delightful in both taste and presentation.
Ingredients
Cake
- 1 box white cake mix (plus ingredients listed on the box, usually eggs, oil, and water)
- 1 teaspoon vanilla extract (optional)
Gelatin Filling
- 1 (3 oz) box red gelatin (e.g., cherry or strawberry)
- 1 (3 oz) box green gelatin (e.g., lime)
- 2 cups boiling water (1 cup per gelatin flavor)
Topping and Garnish
- 1 (8 oz) container whipped topping (e.g., Cool Whip), thawed
- Holiday sprinkles, crushed candy canes, or other festive decorations
Instructions
- Bake the Cake: Preheat your oven to 350°F (175°C) and grease a 9×13-inch baking dish to prevent sticking.
- Prepare the Cake Batter: Follow the package instructions on the white cake mix to prepare the batter, adding vanilla extract if you desire extra flavor.
- Bake the Cake: Pour the batter into the prepared pan and bake for 25-30 minutes, or until a toothpick inserted into the center comes out clean. Remove from oven and cool completely.
- Poke the Cake: Once cooled, use the handle of a wooden spoon or a skewer to poke holes about 1 inch apart all over the surface of the cake.
- Prepare the Gelatin: Dissolve each gelatin box separately in 1 cup of boiling water. Stir until completely dissolved.
- Fill the Holes with Gelatin: Carefully pour half of the red gelatin into half of the holes and the green gelatin into the remaining holes, creating a festive pattern inside the cake.
- Chill the Cake: Cover the cake and refrigerate for at least 2 hours to allow the gelatin to fully set inside the cake holes.
- Add the Topping: After chilling, spread the whipped topping evenly over the surface of the cake.
- Decorate: Sprinkle holiday sprinkles, crushed candy canes, or other festive decorations on top to make it extra special.
- Serve: Slice and serve the cake chilled to enjoy its moist, colorful, and refreshing flavors.
Notes
- You can substitute other gelatin flavors/colors to match different holidays or themes.
- Make sure the cake is completely cool before poking holes to prevent cracking.
- Chilling time is essential to ensure the gelatin sets properly inside the cake.
- This cake is best served chilled and within 2-3 days for freshness.
- For a lighter version, use sugar-free gelatin and whipped topping.


