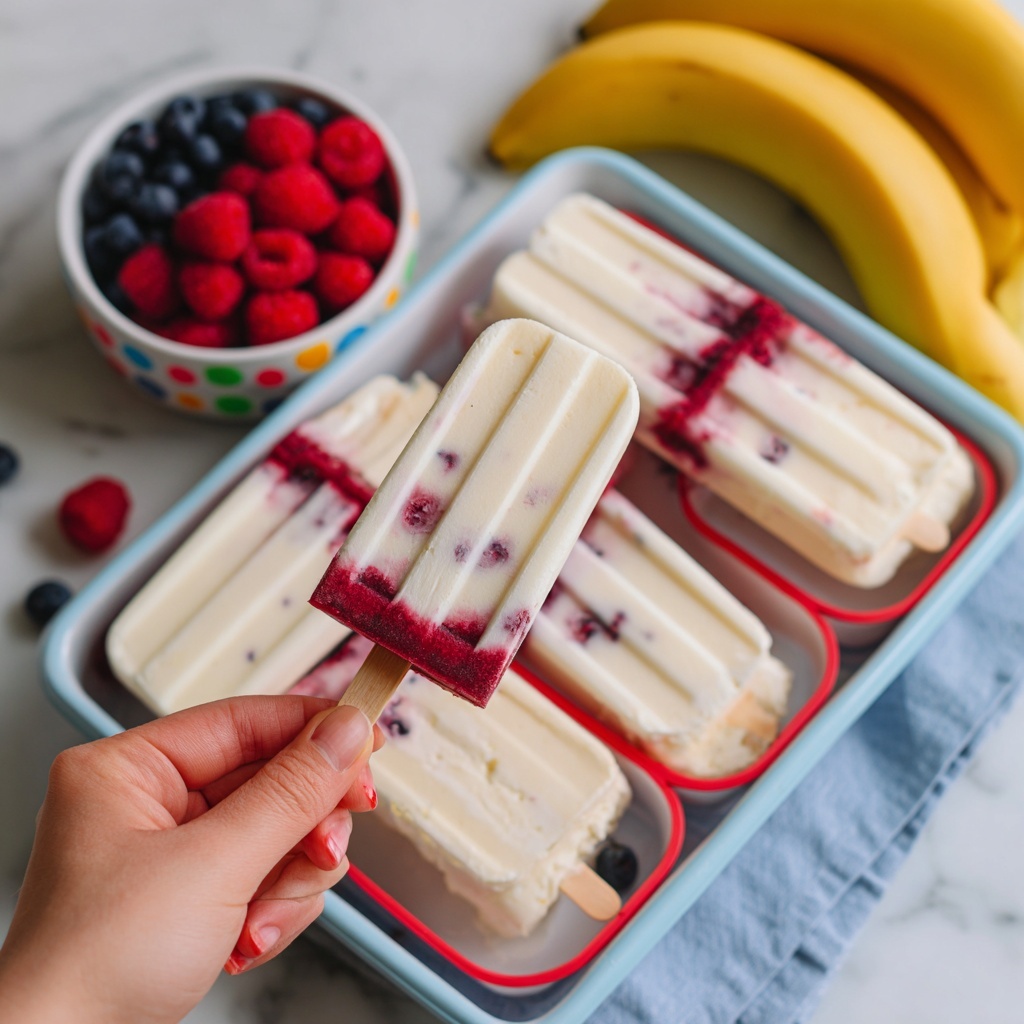
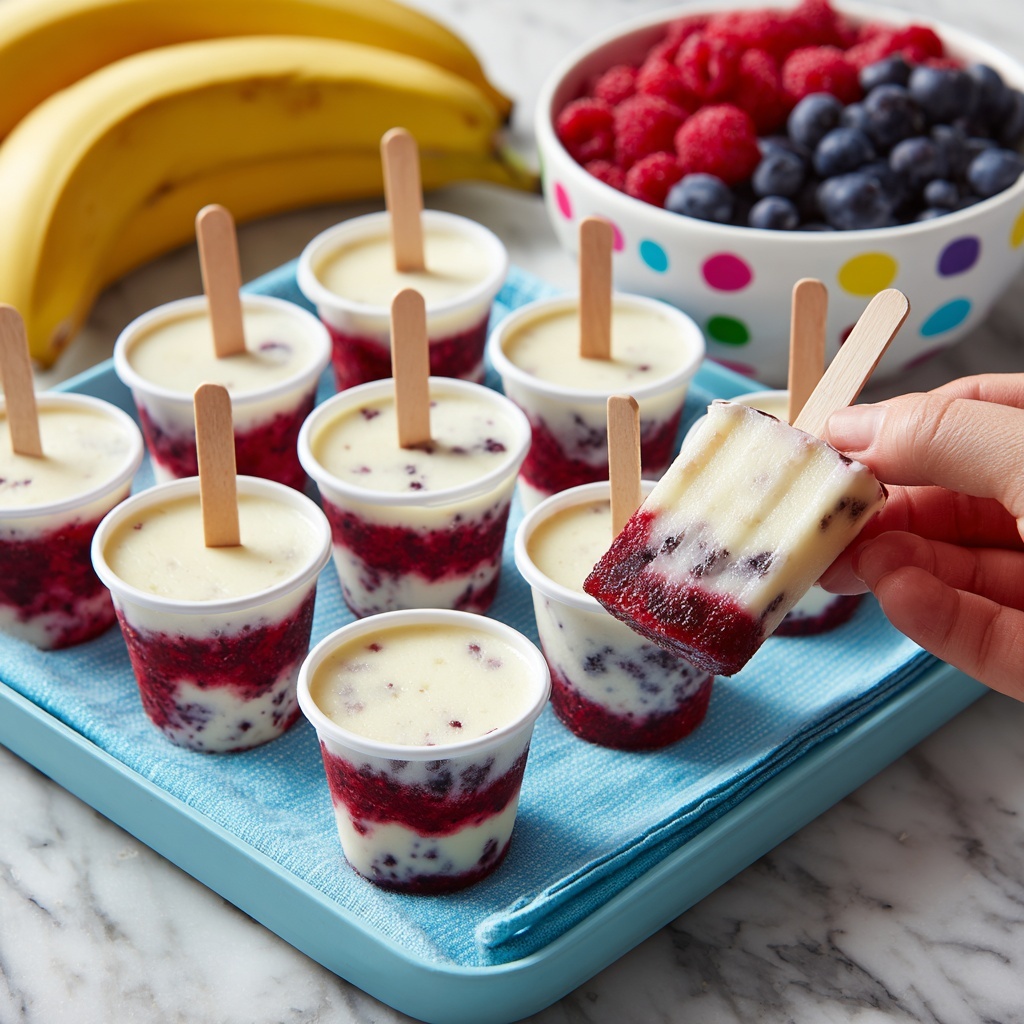
If you’re looking for a delightful way to cool down while enjoying something healthy and tasty, look no further than Frozen Yogurt Pops: The Ultimate Guide to Homemade Treats Recipe. These pops are creamy, fruity, and naturally sweetened, making them a perfect snack for all ages. With just a few simple ingredients and some basic steps, you’ll have a batch of refreshing frozen treats that feel indulgent but are actually quite wholesome. From the velvety Greek yogurt base to the vibrant bursts of fresh fruit, every bite is a celebration of flavor and texture you’ll want to revisit all summer long.
Ingredients You’ll Need
Getting ready to make frozen yogurt pops is easy and satisfying because the ingredients are straightforward yet essential. Each item plays a key role in balancing creaminess, sweetness, and freshness to achieve that perfect frozen treat consistency and flavor.
- 4 cups plain Greek yogurt: Provides the creamy, tangy base that’s packed with protein and gives the pops their smooth texture.
- 1 cup fresh or frozen fruit: Adds natural sweetness, flavor, and gorgeous color — berries, mango, or peaches work wonderfully.
- ½ cup honey or maple syrup: A natural sweetener that enhances flavor without overpowering the yogurt’s tang.
- 1 teaspoon vanilla extract (optional): Adds a subtle warmth and depth of flavor.
- ¼ cup milk or yogurt: Helps thin the mixture if it’s too thick, ensuring the pops freeze nicely and are easy to bite into.
- Pinch of salt: Balances out the sweetness and intensifies all the flavors.
- Optional toppings: Granola, chocolate chips, shredded coconut, or chopped nuts bring extra texture and fun toppings right on the pops.
How to Make Frozen Yogurt Pops: The Ultimate Guide to Homemade Treats Recipe
Step 1: Prepare the Fruit
Start by washing and chopping any fresh fruit into bite-sized pieces. If you’re using frozen fruit, there’s no need to thaw it first; it can go straight into the mix. For a smoother texture, take half of your fruit and puree it — this is optional but adds a beautiful swirl to your pops. Then, combine all the pieces and puree together so every spoonful has a perfect balance of creamy and fruity.
Step 2: Make the Yogurt Mixture
In a large bowl, mix the Greek yogurt with honey (or maple syrup) and vanilla extract if you’re using it. Whisk until everything blends into a creamy, smooth mixture. This is where your frozen yogurt base really comes alive, with a sweet and tangy personality that’s ready to embrace the fruit.
Step 3: Adjust Sweetness
Give your yogurt mixture a taste and add more honey or maple syrup if you like it sweeter. Remember, since it’s freezing, the sweetness can mellow out a bit, so go ahead and make it a touch sweeter than you initially want.
Step 4: Thin the Mixture if Needed
If the mixture feels too thick to pour smoothly into your molds, stir in a little milk or additional yogurt, one tablespoon at a time. The goal is a pourable but still creamy texture that will freeze evenly without getting icy.
Step 5: Add a Pinch of Salt
This small but mighty addition enhances all the flavors and makes sure your frozen treats don’t taste flat once frozen. Salt is a flavor enhancer, so trust the pinch!
Step 6: Combine Fruit and Yogurt
Gently fold your prepared fruit pieces or purée into the yogurt mixture. Be careful not to overmix if you want a pretty marbled effect. The fruit should be evenly distributed but still provide bursts of texture.
Step 7: Fill Popsicle Molds
Carefully pour the mixture into your popsicle molds, leaving a little bit of space at the top to allow for expansion as they freeze. This step is where your vibrant frozen yogurt treats start to take shape.
Step 8: Add Toppings (Optional)
If you want to take your pops up a notch, sprinkle some granola, chocolate chips, shaved coconut, or chopped nuts on top. They’ll stick to the top while freezing and add an irresistible crunch.
Step 9: Insert Popsicle Sticks
Pop the sticks into the center of each mold. Make sure they’re sturdy and straight so you can easily hold your pops once frozen.
Step 10: Freeze
Set the molds in the freezer for at least 4-6 hours, but preferably overnight. This ensures your Frozen Yogurt Pops: The Ultimate Guide to Homemade Treats Recipe get fully firm and ready for snacking.
Step 11: Remove from Molds
To take your pops out, run the molds briefly under warm water to loosen them. Gently pull on the sticks and watch your beautiful frozen creations slide out perfectly intact.
Step 12: Enjoy
Serve immediately for a refreshing treat or pop them back into the freezer for later indulgence. These frozen yogurt pops are ready whenever you crave a healthy, cooling delight.
How to Serve Frozen Yogurt Pops: The Ultimate Guide to Homemade Treats Recipe

Garnishes
Adding a little garnish can make your frozen yogurt pops feel extra special. Fresh mint leaves, a sprinkle of cinnamon, or a drizzle of chocolate sauce can elevate presentation and flavor. These touches make the treats perfect for summer parties or simple everyday joy.
Side Dishes
Frozen yogurt pops pair wonderfully with light sides like fresh fruit salad, crunchy nuts, or a small scoop of sorbet. These sides complement the creamy texture and add variety to your snack or dessert plate.
Creative Ways to Present
Think beyond traditional molds! You can use silicone molds in fun shapes, small cups with wooden sticks, or even muffin tins lined with parchment paper. Layering different fruit purees and yogurt mixtures also creates pretty swirls and layers that are almost too pretty to eat.
Make Ahead and Storage
Storing Leftovers
If you have any frozen yogurt pops leftover, keep them in an airtight container or a zip-top freezer bag to maintain freshness and prevent freezer burn. They hold up well for up to 2 weeks, so you can enjoy your homemade treat anytime.
Freezing
After assembling your pops, freezing them overnight is essential for the best texture. This recipe freezes smoothly without becoming icy because of the creamy yogurt base and balanced thickness.
Reheating
Frozen yogurt pops are best enjoyed straight from the freezer, so reheating isn’t recommended. If they become too hard, simply let them rest at room temperature for a few minutes to soften slightly before serving.
FAQs
Can I use flavored yogurt instead of plain Greek yogurt?
Absolutely! Flavored yogurt can add an extra punch of sweetness and flavor, but be mindful of the overall sweetness in your recipe and adjust the honey or maple syrup accordingly.
What fruits work best in Frozen Yogurt Pops?
Berries like strawberries, blueberries, raspberries, and blackberries work beautifully, as do mango, peaches, and pineapple. Feel free to mix and match for exciting flavor combos!
Can I make these dairy-free?
Yes, substitute Greek yogurt with coconut yogurt or almond milk yogurt alternatives and use a plant-based milk to thin if needed. The texture may vary slightly but will still be delicious.
How do I prevent ice crystals from forming?
Adding a bit of sweetener and a pinch of salt helps reduce ice crystals. Also, make sure your mixture is smooth and not overly watery before freezing.
Can I add mix-ins like nuts or chocolate chips?
Definitely! Adding crunchy or sweet mix-ins to the pops before freezing adds amazing texture and flavor. Just sprinkle them on top or fold them into the mixture gently.
Final Thoughts
There’s nothing quite as satisfying as biting into a cold, creamy Frozen Yogurt Pops: The Ultimate Guide to Homemade Treats Recipe on a warm day. Easy to make, customizable, and packed with wholesome ingredients, these homemade pops will quickly become a favorite snack for your family and friends. Give this recipe a try and watch how these simple ingredients transform into cheerful, refreshing treats that keep you coming back for more!
Print
Frozen Yogurt Pops: The Ultimate Guide to Homemade Treats Recipe
- Prep Time: 15 minutes
- Cook Time: 0 minutes
- Total Time: 4 hours 15 minutes
- Yield: 8 servings
- Category: Dessert
- Method: Freezing
- Cuisine: American
- Diet: Low Fat
Description
This Frozen Yogurt Pops recipe offers a refreshing and healthy homemade treat perfect for warm days. Made with creamy Greek yogurt, fresh or frozen fruits, and natural sweeteners like honey or maple syrup, these popsicles are easy to prepare and customizable with optional toppings such as granola or chocolate chips. Ideal for a nutritious snack or dessert, they require minimal preparation time and simply freeze until solid for a deliciously cool experience.
Ingredients
Yogurt Mixture
- 4 cups plain Greek yogurt (full-fat or non-fat)
- ½ cup honey or maple syrup (adjust to taste)
- 1 teaspoon vanilla extract (optional)
- ¼ cup milk or yogurt (if needed, to thin the mixture)
- Pinch of salt
Fruit
- 1 cup fresh or frozen fruit (berries, mango, peaches, etc.)
Optional Toppings
- Granola
- Chocolate chips
- Shredded coconut
- Chopped nuts
Instructions
- Prepare the Fruit: Wash and chop fresh fruit into small pieces. If using frozen fruit, use it directly from frozen. Puree half of the fruit for a smoother texture if desired, then combine all prepared fruit in a bowl.
- Make the Yogurt Mixture: In a large bowl, combine Greek yogurt, honey or maple syrup, and vanilla extract if using. Mix thoroughly until smooth.
- Adjust Sweetness: Taste the mixture and add more honey or maple syrup as needed to achieve your preferred sweetness level.
- Thin the Mixture (if needed): If the mixture is too thick to pour, add milk or additional yogurt one tablespoon at a time until it reaches a pourable consistency.
- Add Salt: Add a pinch of salt to enhance the flavors and balance the sweetness.
- Combine Fruit and Yogurt: Gently fold the prepared fruit into the yogurt mixture until the fruit is evenly distributed throughout.
- Fill Popsicle Molds: Carefully pour the combined yogurt and fruit mixture into popsicle molds, leaving a little space at the top to allow for expansion during freezing.
- Add Toppings (optional): Sprinkle toppings such as granola, chocolate chips, shredded coconut, or chopped nuts over the filled molds for added texture and flavor.
- Insert Popsicle Sticks: Place popsicle sticks firmly into the center of each filled mold.
- Freeze: Place the molds in the freezer and freeze for at least 4-6 hours, or preferably overnight, until they are completely solid.
- Remove from Molds: To remove the popsicles, briefly run the molds under warm water for a few seconds to loosen them, then gently pull on the sticks to release the pops.
- Enjoy: Serve the frozen yogurt pops immediately or store them in the freezer for later enjoyment.
Notes
- Use full-fat Greek yogurt for creamier popsicles or non-fat for a lighter option.
- Adjust sweetness according to fruit sweetness and personal preference.
- Pureeing some fruit results in a smoother texture, while whole fruit pieces add more bite.
- Optional toppings add crunch and additional flavor but can be omitted for a simpler treat.
- Ensure molds are properly sealed to prevent freezer odors from affecting the pops.
- Allow the popsicles to sit at room temperature for a few minutes before removing from molds for easier release.

