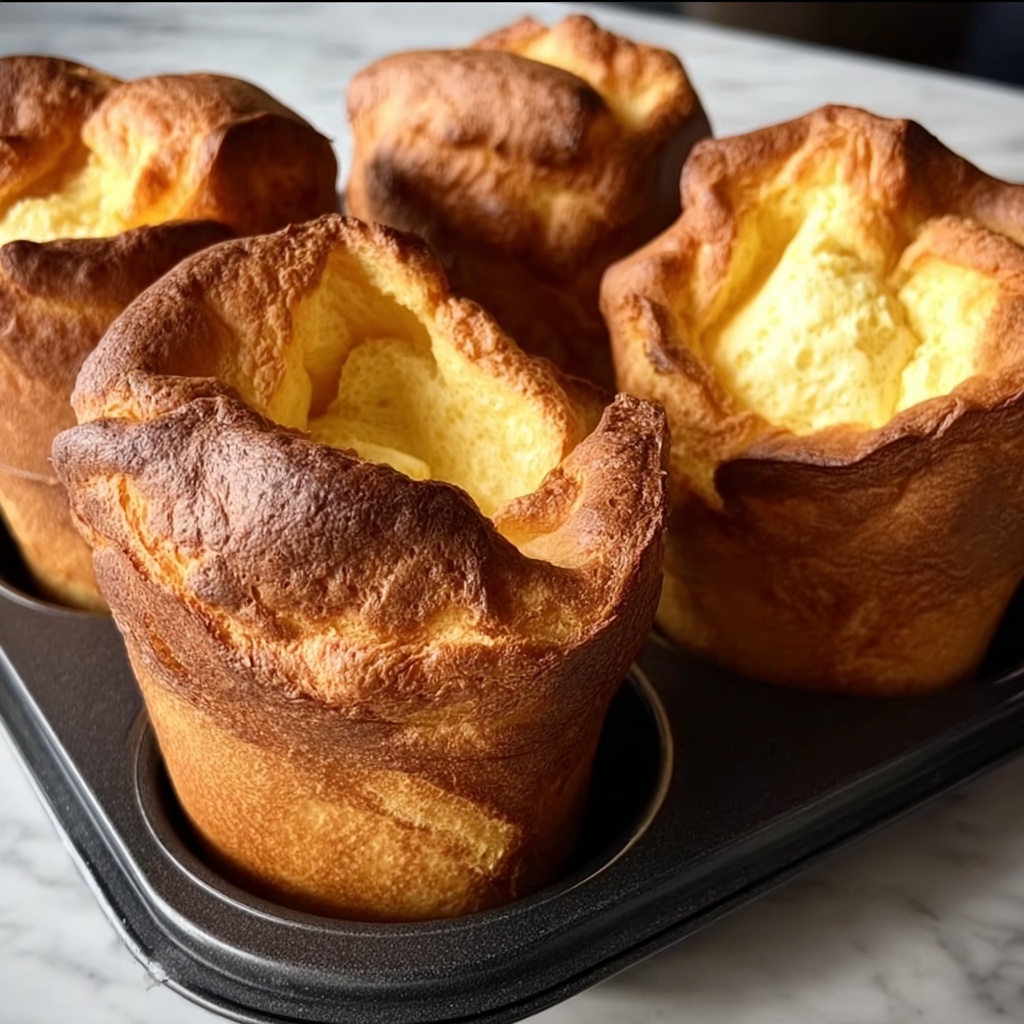
If you’ve ever wanted to master a light, airy treat that’s perfect for breakfast, brunch, or even a delightful snack, look no further than this Easy Popovers in a Muffin Tin Recipe. These popovers are golden, crispy on the outside, and gloriously hollow on the inside, making them the perfect vehicle for everything from sweet jams to savory spreads. What’s truly wonderful about this recipe is how simple the ingredients are, yet how impressive the results feel—baking these in a muffin tin gives them a charming shape that’s easier to handle without sacrificing any of that classic popover charm.
Ingredients You’ll Need
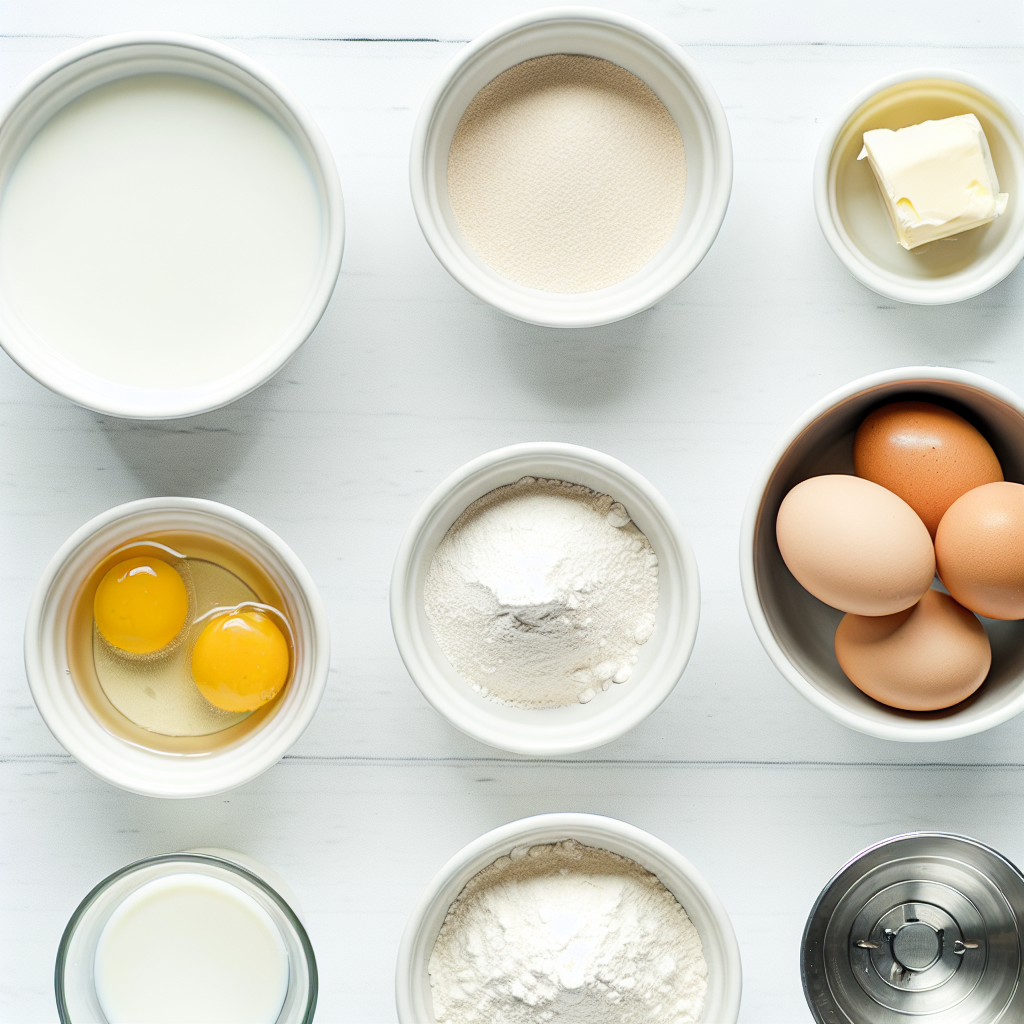
The beauty of this recipe lies in its minimalist approach — just a few essential ingredients come together to create popovers that are crispy, fluffy, and perfectly golden. Each component plays a key role, from the eggs fluffing up the batter to the melted butter adding richness and flavor.
- 3 large eggs: Fresh eggs lend structure and help create that signature airy puff.
- 1 cup whole milk (warm): Warm milk makes for a smooth batter and tender crumb.
- 1 cup all-purpose flour: The foundation of the batter, providing structure and balance.
- 1/2 teaspoon salt: Just enough to enhance flavors without overpowering.
- 2 tablespoons unsalted butter (melted): Adds a subtle richness and golden color.
- Nonstick spray or additional melted butter for greasing: Ensures those popovers release effortlessly from the muffin tin.
How to Make Easy Popovers in a Muffin Tin Recipe
Step 1: Preheat Your Oven and Prepare the Muffin Tin
Start by heating your oven all the way up to 450°F (230°C) and place the empty muffin tin inside while it heats. This ensures the tin is wonderfully hot, which is the secret to popovers’ dramatic puff and crisp edges.
Step 2: Whisk Eggs and Warm Milk
Grab a mixing bowl and vigorously whisk together the eggs and warm milk until the mixture becomes frothy and combined. This aeration helps create the light texture popovers are famous for.
Step 3: Add Flour and Salt Gradually
Slowly incorporate the all-purpose flour and salt into your egg and milk mixture, whisking continuously to avoid lumps. A smooth, silky batter is the goal here—it’ll ensure your popovers puff evenly and have no stubborn clumps.
Step 4: Stir in the Melted Butter
Next, gently fold in the melted butter. This not only enhances the flavor with a subtle buttery note but also contributes to the golden, crisp exterior of each popover.
Step 5: Grease the Hot Muffin Tin
Carefully take that preheated muffin tin out of the oven—be cautious, as it will be very hot! Generously grease each cup with nonstick spray or melted butter to prevent sticking and help the popovers develop that beautifully crisp crust.
Step 6: Fill Each Muffin Cup Halfway
Pour your batter evenly into the cups, filling each only halfway. Overfilling can cause spillage and uneven rising, so this step is important for the perfect popover shape.
Step 7: Bake at 450°F, Then Reduce Heat
Bake the popovers at 450°F for 15 minutes to give them that initial burst of heat that causes them to puff splendidly. After 15 minutes, lower the oven temperature to 350°F and bake for an additional 15–20 minutes until they are golden brown and fully puffed up.
Step 8: Rest and Serve
Once out of the oven, let the popovers rest in the pan for about a minute. This brief pause helps settle their airy interiors. Then carefully transfer them to a wire rack. Serve immediately to enjoy their crispness at its best.
How to Serve Easy Popovers in a Muffin Tin Recipe
Garnishes
Popovers are incredibly versatile when it comes to garnishes. A simple dusting of powdered sugar can make for a delicate sweetness, or you might want to slice them open and fill with whipped cream and fresh berries for an elegant treat. For savory lovers, a bit of herb butter or a spoonful of smoked salmon with crème fraîche elevates these golden beauties to impressive heights.
Side Dishes
Serving your Easy Popovers in a Muffin Tin Recipe alongside a fresh salad or hearty soup transforms them into a satisfying meal. They pair wonderfully with light greens tossed in a lemon vinaigrette or a bowl of creamy tomato soup—the perfect combo of textures and flavors.
Creative Ways to Present
For an eye-catching presentation, arrange popovers in a circle on a pretty platter and place small bowls of various spreads in the center. Think honey, jam, clotted cream, or even a savory cheese dip. You can also turn them into mini sandwiches by slicing popovers horizontally and layering with deli meats, cheeses, and crisp greens for a fun, handheld appetizer.
Make Ahead and Storage
Storing Leftovers
If you have leftovers (and you might, though they’re pretty irresistible fresh!), store popovers in an airtight container at room temperature for up to two days. This keeps them from getting soggy and helps maintain some of their delicate structure.
Freezing
Popovers freeze well if you want to keep them longer. Let them cool completely, then place them in a freezer-safe bag or container. They can be frozen for up to two months. When you’re ready to enjoy, thaw them at room temperature for a bit before reheating.
Reheating
The best way to reheat popovers is in an oven or toaster oven set to 350°F for about 5–7 minutes. This method crisps up the exterior again while warming the interior, bringing back much of their fresh-baked charm.
FAQs
Can I use milk alternatives in this Easy Popovers in a Muffin Tin Recipe?
Yes, you can try using almond milk or oat milk, though whole milk provides the best richness and helps the popovers rise perfectly. Just make sure the alternative milk is warm to achieve a smooth batter.
Why don’t my popovers rise as much as expected?
Preheating the muffin tin is crucial to that amazing puff, so make sure it’s very hot before pouring in the batter. Also, avoid opening the oven door during the first 20 minutes to keep the temperature steady.
Can I add flavors or mix-ins to the batter?
Absolutely! You can fold in herbs, cheese, or spices for savory popovers, or try a touch of vanilla or cinnamon for sweet versions. Just don’t overload the batter, as that might affect the popover’s ability to rise.
Is it important to let the batter rest before baking?
Unlike some recipes, popover batter doesn’t need to rest. It’s best to mix and bake right away to retain maximum airiness and ensure a good rise.
Can I make this recipe gluten-free?
Yes, you can substitute all-purpose flour with a gluten-free flour blend that’s suitable for baking. Results may vary slightly, but many people enjoy a successful popover variation using gluten-free options.
Final Thoughts
There’s something truly magical about warm, crisp popovers fresh from the oven, and this Easy Popovers in a Muffin Tin Recipe makes it wonderfully accessible for any home cook. Whether you’re serving breakfast, entertaining friends, or just craving a delicious snack, these popovers deliver big flavor with minimal fuss. Give this recipe a go—you might just find your new favorite homemade treat!
Print
Easy Popovers in a Muffin Tin Recipe
- Prep Time: 10 minutes
- Cook Time: 35 minutes
- Total Time: 45 minutes
- Yield: 6 popovers
- Category: Breakfast
- Method: Baking
- Cuisine: American
Description
This Easy Popovers recipe uses a muffin tin and simple ingredients to create light, airy, and golden-brown popovers perfect for breakfast or as a side. With a quick batter and a two-temperature baking method, these popovers puff up beautifully and have a crispy exterior with a tender interior.
Ingredients
Popovers Ingredients
- 3 large eggs
- 1 cup whole milk, warmed
- 1 cup all-purpose flour
- 1/2 teaspoon salt
- 2 tablespoons unsalted butter, melted
- Nonstick spray or additional melted butter for greasing muffin tin
Instructions
- Preheat the Oven and Muffin Tin: Preheat your oven to 450°F (230°C) and place the empty muffin tin inside to heat thoroughly, which helps achieve a crispy popover crust.
- Mix Eggs and Milk: In a mixing bowl, whisk together the 3 large eggs and warm whole milk until the mixture is frothy and well combined, ensuring an airy batter.
- Add Flour and Salt: Gradually sift in the all-purpose flour and 1/2 teaspoon salt, whisking continuously until the batter becomes smooth and free of lumps to ensure a perfect texture.
- Incorporate Melted Butter: Stir in the melted unsalted butter to add richness and help with browning during baking.
- Prepare the Muffin Tin: Carefully remove the hot muffin tin from the oven and grease each cup well using nonstick spray or melted butter to prevent sticking and promote crispy edges.
- Fill the Cups: Pour the batter into each muffin cup, filling them about halfway to allow room for the popovers to rise and puff up during baking.
- Bake at High Heat: Bake the popovers at 450°F for 15 minutes to help them rise quickly and form a golden crust.
- Reduce Temperature and Continue Baking: Lower the oven temperature to 350°F and bake for an additional 15–20 minutes until the popovers are fully puffed and have a deep golden color.
- Rest and Serve: Let the popovers rest in the pan for 1 minute to set, then remove them gently and transfer to a wire rack to cool slightly. Serve immediately for the best texture.
Notes
- Warming the milk ensures a light and airy texture by activating the eggs properly.
- Heating the muffin tin before adding batter helps achieve a crisp outer crust.
- Do not open the oven door during the first 15 minutes of baking, or popovers may collapse.
- Serve popovers warm with butter, jam, or savory toppings like cheese and herbs.
- Popovers are best eaten immediately but can be reheated briefly in an oven to restore crispiness.


