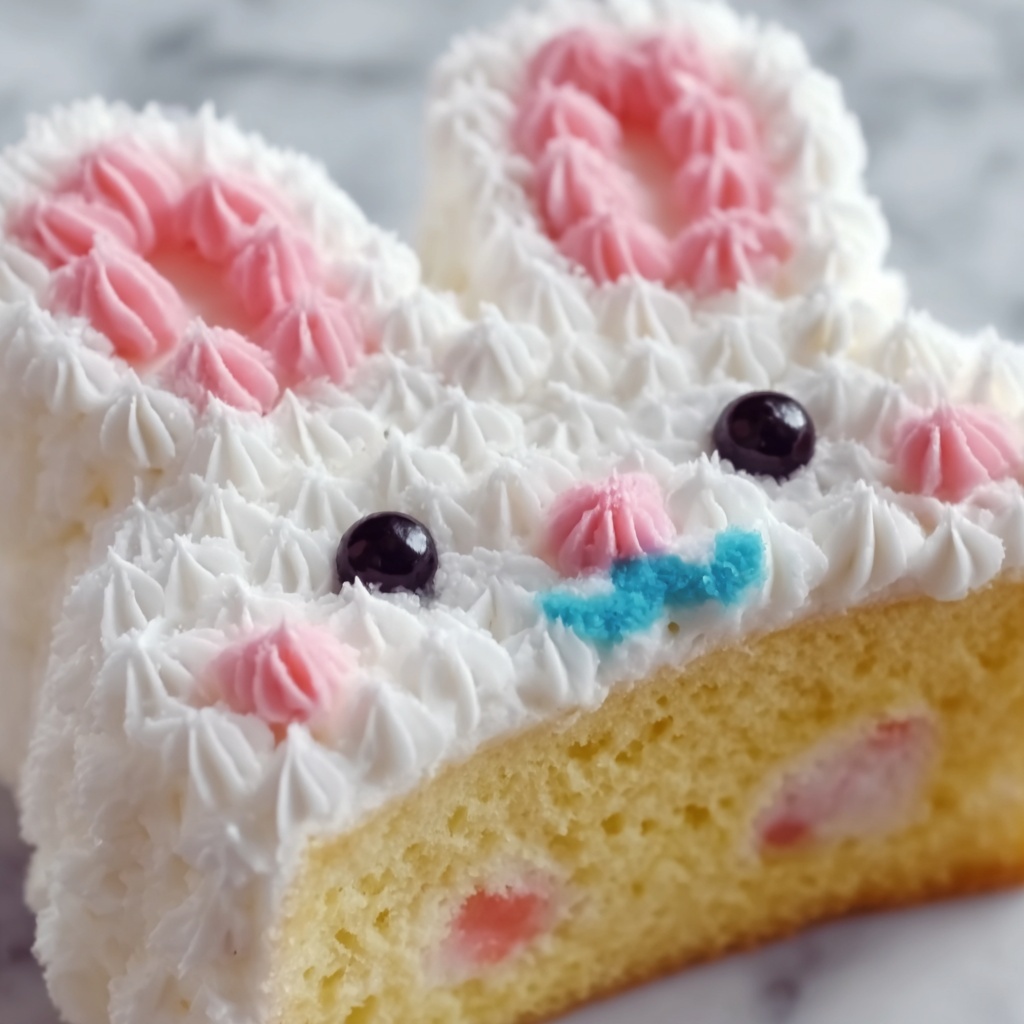
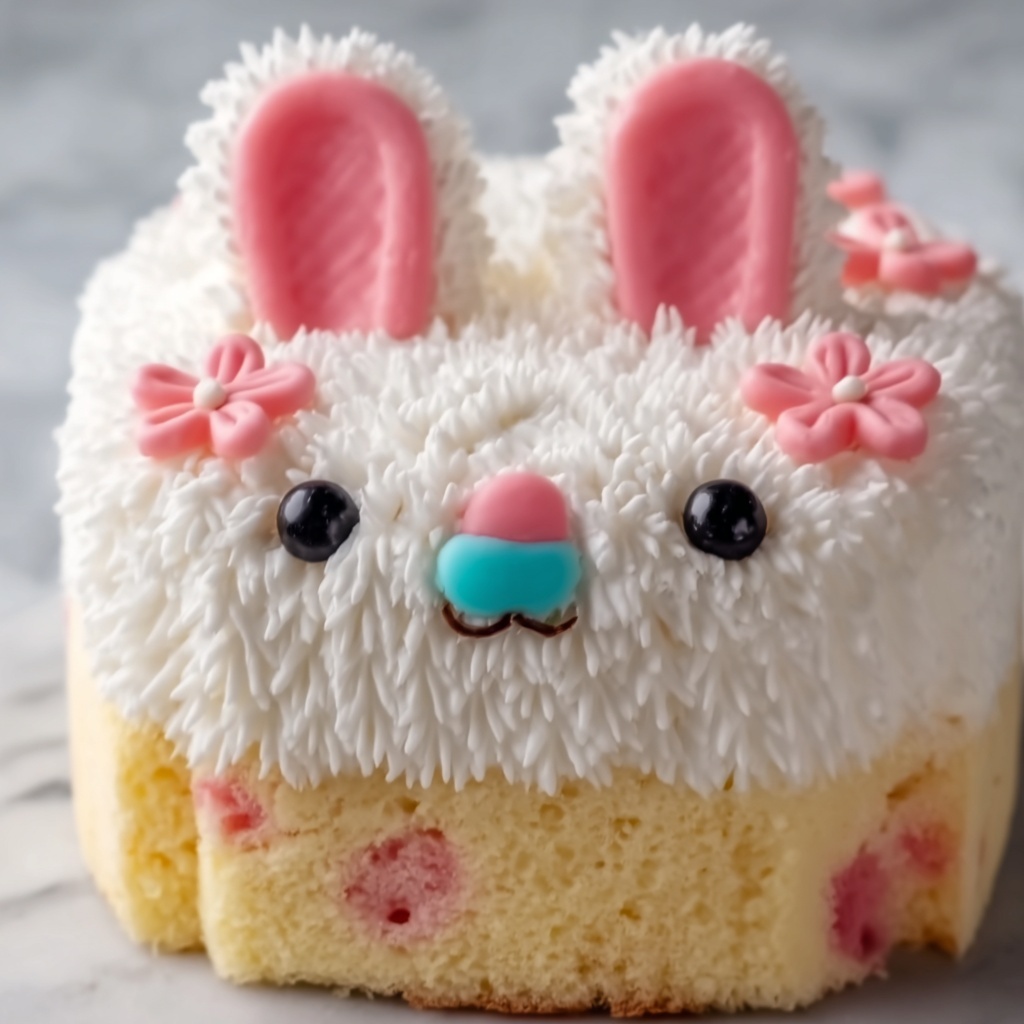
If you’re looking to bring some festive fun and irresistible sweetness to your Easter celebration, this Easter Bunny Poke Cake Recipe is exactly what you need. Light, fluffy cake infused with creamy vanilla pudding and topped with a cloud of whipped topping transforms into a playful bunny face decorated with pastel candies and coconut ears. It’s as charming to look at as it is delightful to eat, making it a guaranteed hit with kids and adults alike. Whether you’re new to poke cakes or a seasoned pro, this recipe promises joy in every bite and smiles around the table.
Ingredients You’ll Need
Don’t worry about complicated ingredients here; this Easter Bunny Poke Cake Recipe calls for simple staples that you probably already have in your pantry. Each component is carefully chosen to build layers of flavor and texture, from the moist cake base to the silky vanilla pudding and fluffy whipped topping that makes this dessert unforgettable.
- White or yellow cake mix (18.25 oz): The foundation for a tender, flavorful cake that bakes up perfectly every time.
- Large eggs (3): Help bind the cake and add richness for a moist texture.
- Water (1 cup): Keeps the cake batter smooth and ensures even baking.
- Vegetable oil (1/2 cup): Adds moisture and keeps the cake soft long after baking.
- Instant vanilla pudding mix (3.4 oz): Creates a luscious filling that seeps into the poke holes for divine creaminess.
- Cold milk (2 cups): Needed to whisk the pudding mix into that perfect custard consistency.
- Whipped topping (8 oz, thawed): Adds a light, airy finish that balances the richness below.
- Pastel-colored jelly beans or candy-coated chocolates: Brighten the cake and build playful Easter bunny faces or patterns.
- Shredded coconut (1 cup): Dyed pink or left white, perfect for crafting fluffy bunny ears.
- Optional candy eyes, licorice strips, and decorations: Bring your bunny to life with fun, edible details.
How to Make Easter Bunny Poke Cake Recipe
Step 1: Prepare and Bake the Cake
Start by preheating your oven to 350°F (175°C) and greasing a 9×13-inch baking dish for an easy release after baking. Mix together the cake mix, eggs, water, and vegetable oil with a whisk or mixer until the batter is silky smooth. Pour this beauty into your pan, slide it into the oven, and bake according to the package instructions—usually about 25 to 30 minutes. The aroma will start filling your kitchen, hinting at the deliciousness to come.
Step 2: Poke Holes and Add Pudding
After baking, give the cake about 10 minutes to cool slightly—it’s important not to poke a piping hot cake that might crumble. Then, take the handle of a wooden spoon and poke holes all over the surface, spacing them evenly so each bite is infused with pudding. Whisk the instant vanilla pudding mix with cold milk until it thickens, then pour it carefully over the cake, allowing it to fill every nook and cranny. Pop the cake into the fridge for an hour so all those amazing flavors can meld together.
Step 3: Frost with Whipped Topping
Once your cake has chilled and soaked up all that creamy pudding goodness, spread the thawed whipped topping in an even layer over the entire surface. This luscious white blanket complements the cake’s gentle sweetness and creates the perfect canvas for your Easter decorations.
Step 4: Decorate the Easter Bunny
Here’s where your creativity shines! Using pastel jelly beans or candy-coated chocolates, craft adorable bunny faces or playful Easter patterns atop the whipped topping. Sprinkle shredded coconut on the sides or in small mounds to mimic bunny ears—dye it pink or leave it natural—either way it adds texture and thematic charm. Finish your masterpiece with candy eyes, licorice whiskers, or any other decorations you prefer. Pop the cake back into the fridge for at least 30 minutes to set everything firmly.
How to Serve Easter Bunny Poke Cake Recipe

Garnishes
To bring that little extra wow factor, consider adding fresh berries or edible flowers on the serving platter for a pop of color. A light dusting of powdered sugar or a drizzle of white chocolate sauce can elevate the presentation while complementing the cake’s gentle sweetness. Garnishes not only make your treat photogenic but also add subtle flavor contrast for the palate.
Side Dishes
This Easter Bunny Poke Cake Recipe is rich, creamy, and sweet, so it pairs beautifully with something light and refreshing. Think fresh fruit salad, citrus sorbet, or even a simple mixed green salad with a tangy vinaigrette if you want to balance dessert with savory fare. These sides keep your celebration menu fresh and well-rounded.
Creative Ways to Present
For a memorable Easter party, consider serving your poke cake on a festive platter surrounded by pastel-colored napkins and springtime decor. Cutting the cake into neat squares and placing each on individual plates garnished with mini chocolate eggs or carrot-shaped candies makes sharing with guests effortless and fun. Alternatively, turn portions into parfaits by layering cake pieces with pudding and whipped topping in clear cups for an interactive dessert experience.
Make Ahead and Storage
Storing Leftovers
This poke cake stays delicious for several days when tightly wrapped or stored in an airtight container in the refrigerator. The pudding and whipped topping keep it moist, but it’s best enjoyed within 3 to 4 days to savor all those fresh flavors and textures. Avoid leaving it out at room temperature for extended periods due to the dairy content.
Freezing
If you want to prepare this Easter Bunny Poke Cake Recipe ahead of time or save leftovers longer, freezing is an option. Wrap individual slices well in plastic wrap and place them in a freezer-safe container. When ready to enjoy, thaw overnight in the fridge. Note that whipped topping texture may change slightly after freezing but will still taste wonderful.
Reheating
Since this dessert is best served chilled, reheating is not recommended. The combination of pudding and whipped topping is meant to be cool and refreshing, making warm serving less appealing. Keep it refrigerated, slice carefully, and enjoy the creamy, cool delight of this festive cake.
FAQs
Can I use homemade cake instead of cake mix for the Easter Bunny Poke Cake Recipe?
Absolutely! Using a homemade white or yellow cake recipe will work wonderfully here and add a personal touch. Just make sure the cake has a sturdy crumb to hold the pudding filling and withstand poking without crumbling.
What can I substitute for the instant vanilla pudding mix?
If you prefer a homemade pudding, prepare vanilla custard from scratch using milk, sugar, cornstarch, and vanilla extract. Just ensure it’s thick enough to pour over the cake and seep into the holes. This will give your poke cake a lovely homemade charm.
How far in advance can I make the Easter Bunny Poke Cake Recipe?
You can prepare the cake base a day ahead, then assemble and decorate it on the day you plan to serve. This helps the pudding soak fully and keeps your decorations fresh and vibrant. Just keep the decorated cake refrigerated until serving time.
Can I make this cake dairy-free or vegan?
With a few ingredient swaps, yes! Choose a vegan cake mix or homemade vegan cake, plant-based milk, and vegan whipped topping. Be sure your pudding substitute aligns with your dietary preferences. This way, everyone can enjoy the festive fun.
What’s the best way to dye shredded coconut for the bunny ears?
Place shredded coconut in a zip-top bag with a few drops of food coloring, then shake until evenly colored. For pastel shades, use only a small amount of dye. Spread the coconut on parchment paper to dry before decorating your cake for perfect fluffy bunny ears.
Final Thoughts
This Easter Bunny Poke Cake Recipe is so much more than just a dessert—it’s a cherished tradition full of sweetness, creativity, and smiles. It brings a joyful centerpiece to your Easter table that everyone will love to dig into and admire. I can’t wait for you to try it and make your holiday celebrations extra special with this whimsical, delicious treat!
Print
Easter Bunny Poke Cake Recipe
- Prep Time: 15 minutes
- Cook Time: 30 minutes
- Total Time: 1 hour 45 minutes
- Yield: 12 servings
- Category: Dessert
- Method: Baking
- Cuisine: American
- Diet: Vegetarian
Description
This delightful Easter Bunny Poke Cake is a festive and fun dessert perfect for celebrating the holiday. With a moist yellow or white cake base, vanilla pudding filling poured into poke holes, and a fluffy whipped topping, it’s beautifully decorated with pastel jelly beans, shredded coconut bunny ears, and candy accents to create an adorable bunny face. Easy to prepare and sure to bring smiles, this cake is a seasonal favorite for family gatherings and spring celebrations.
Ingredients
Cake
- 1 box (18.25 oz) white or yellow cake mix
- 3 large eggs
- 1 cup water
- 1/2 cup vegetable oil
Pudding Filling
- 1 package (3.4 oz) instant vanilla pudding mix
- 2 cups cold milk
Topping and Decorations
- 1 container (8 oz) whipped topping (such as Cool Whip), thawed
- Pastel-colored jelly beans or candy-coated chocolates (e.g., M&M’s)
- 1 cup shredded coconut (dyed pink or left white for bunny ears)
- Optional: Candy eyes, licorice strips, or other decorations for bunny faces
Instructions
- Preheat and Prepare: Preheat your oven to 350°F (175°C) and grease a 9×13-inch baking dish to ensure the cake doesn’t stick.
- Mix and Bake Cake: In a large bowl, combine the cake mix, eggs, water, and vegetable oil. Stir until the batter is smooth. Pour the batter evenly into the prepared baking dish and bake following the package instructions, typically about 25-30 minutes, until a toothpick inserted comes out clean.
- Cool and Poke Holes: After baking, allow the cake to cool for 10 minutes. Using the handle of a wooden spoon or similar tool, poke holes evenly all over the surface of the cake. These holes will later be filled with pudding.
- Prepare Pudding and Pour: Whisk the instant vanilla pudding mix with 2 cups of cold milk until it thickens according to package directions. Pour the pudding evenly over the cake, ensuring it fills the poke holes. Then, refrigerate the cake for 1 hour to let the pudding set.
- Add Whipped Topping: Spread the thawed whipped topping evenly over the chilled cake, covering the pudding layer smoothly.
- Decorate: Use pastel-colored jelly beans or candy-coated chocolates to create fun Easter patterns or bunny faces on top of the whipped topping. Sprinkle shredded coconut on top to form bunny ears, dyeing the coconut pink or leaving it white as preferred.
- Finish Bunny Details: Add optional candy eyes, licorice strips for whiskers, or other creative decorations to complete the bunny face design.
- Chill and Serve: Refrigerate the decorated cake for another 30 minutes before slicing and serving to ensure it is well set and cool.
Notes
- You can dye the shredded coconut with food coloring to create colorful bunny ears.
- Use candy eyes and licorice strips to add personality and detail to the bunny face.
- If you prefer, use a homemade cake recipe instead of a mix for a more personalized flavor.
- This cake is best served chilled and can be stored covered in the refrigerator for up to 3 days.
- Feel free to customize decorations to match your Easter theme or color preferences.


