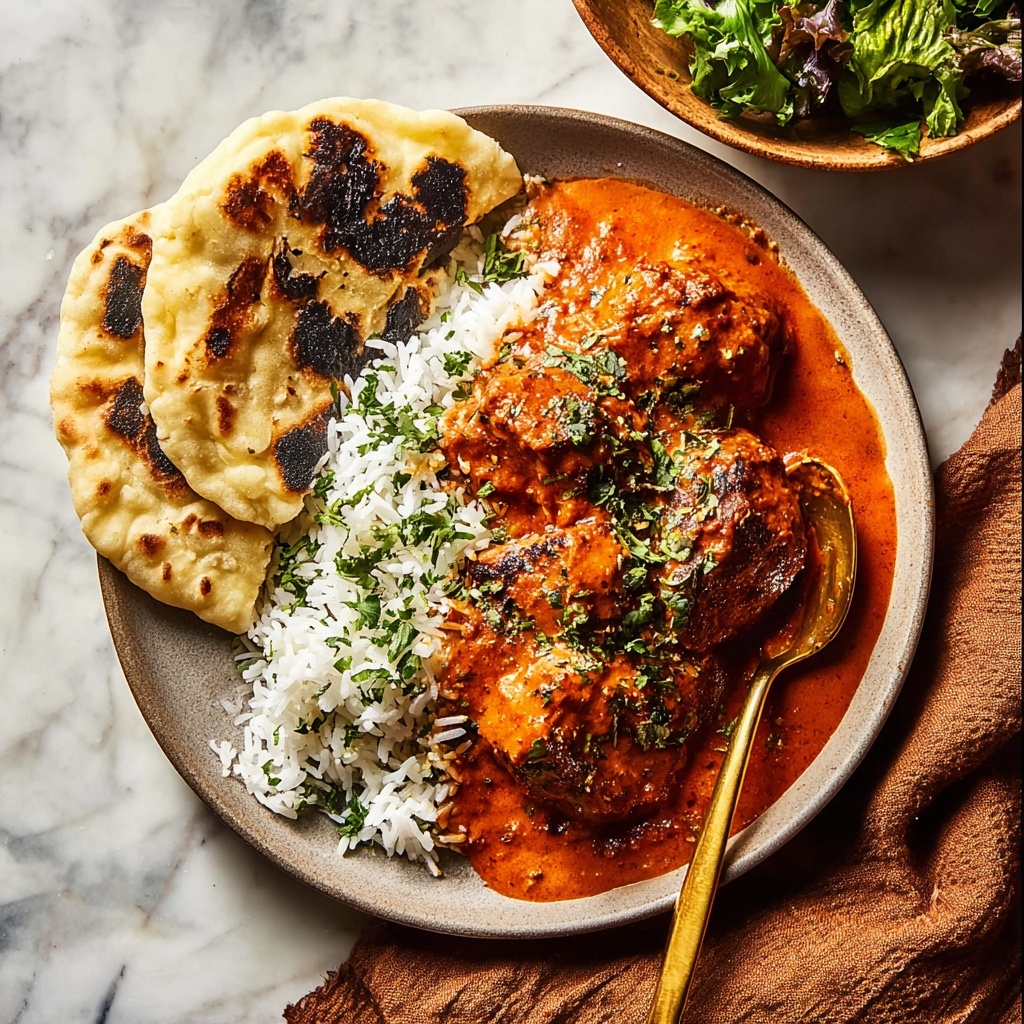
If you are craving a rich, comforting dish that brings warmth and vibrant flavors to your table, this Dutch Oven Chicken Curry Recipe is an absolute must-try. It perfectly combines tender chicken with a fragrant blend of spices, creamy coconut milk, and bright tomatoes, all simmered to perfection in a Dutch oven. Whether you’re aiming for a cozy family dinner or a meal that impresses guests, this recipe delivers a hearty and soul-satisfying curry that will quickly become a favorite in your kitchen.
Ingredients You’ll Need
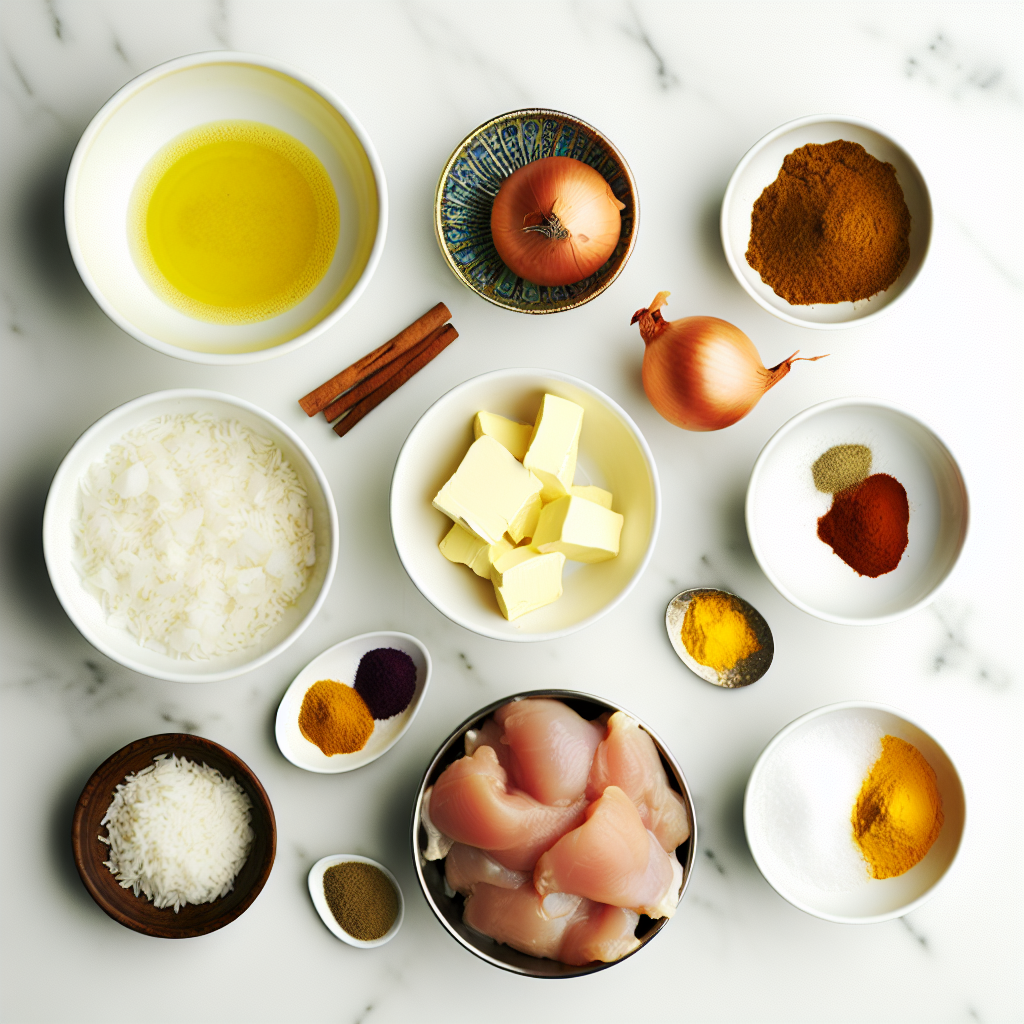
The beauty of this Dutch Oven Chicken Curry Recipe lies in its straightforward ingredients, each playing a vital role in layering flavors and creating a luscious texture. From the warm spices to the creamy coconut milk, every component contributes to a harmonious, deeply flavorful curry.
- Salted butter: Adds a rich base and helps to sear the chicken while blooming the spices.
- Mixed chicken breasts and thighs: Using both ensures juicy, tender chicken pieces with depth in texture.
- Yellow onion, chopped: Builds natural sweetness and body in the curry sauce.
- Fresh garlic, chopped: Gives a fragrant pungency that brightens the overall flavor.
- Ground ginger: Adds warmth and a slight zing that complements the other spices.
- Cumin: Brings earthiness and a hint of nuttiness to the dish.
- Turmeric: Infuses a vibrant golden color and subtle bitterness.
- Cayenne pepper: Provides a gentle heat that awakens the palate.
- Coconut milk (14 ounce can): Supplies creamy richness and a luscious mouthfeel.
- Crushed tomatoes (14 ounce can): Balance creaminess with acidity and depth.
- Cinnamon stick or star anise (optional): Introduces warm aromatic notes for extra complexity.
- Salt: Essential for enhancing all the flavors.
- Fresh cilantro: Used both in the cooking and as a fresh garnish to brighten the curry.
- Rice and naan: Perfect for soaking up the delicious curry sauce when serving.
How to Make Dutch Oven Chicken Curry Recipe
Step 1: Sear the Chicken and Bloom the Spices
Start by heating the butter in your Dutch oven over medium heat. Then add the chicken pieces along with the chopped onion, garlic, ground ginger, cumin, turmeric, cayenne pepper, and a good pinch of salt. Cooking this mixture until the chicken is nicely seared and the spices become fragrant will create a flavor-packed base for the curry. This initial step takes about 5-8 minutes and builds incredible aroma that sets the tone for the dish.
Step 2: Simmer with Coconut Milk and Tomatoes
Once the chicken is golden and the spices are fragrant, pour in the coconut milk and crushed tomatoes. If you want to take the flavor profile to the next level, add a cinnamon stick or star anise at this stage—these optional spices infuse a subtle warm complexity. Stir everything to combine well, then bring the mixture to a gentle simmer. Let it cook for 10-15 minutes, allowing the sauce to thicken and the chicken to become tender. This slow-cooking stage lets all those wonderful flavors meld together beautifully.
Step 3: Finish and Add Fresh Cilantro
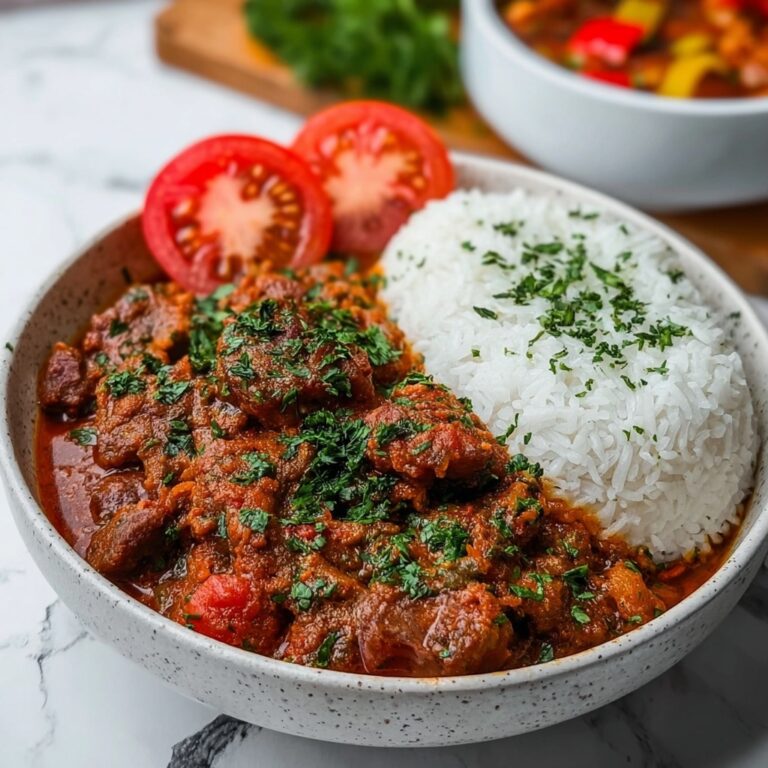
As your curry nears completion, stir in half of your fresh cilantro for a herbaceous brightness right into the sauce. This not only adds freshness but also a pop of color, making the dish as pleasing visually as it is on the palate. If the sauce becomes too thick, simply add a little water to achieve your preferred consistency. Now your Dutch Oven Chicken Curry Recipe base is ready to be served!
How to Serve Dutch Oven Chicken Curry Recipe
Garnishes
Topping your curry with extra fresh cilantro leaves adds the perfect vibrant touch and a refreshing contrast to the warm, rich curry. If you love a bit more texture, a sprinkle of finely chopped green onions or a dollop of cooling yogurt can also elevate your serving experience.
Side Dishes
Serve this curry alongside fluffy steamed rice or fragrant basmati for soaking up every last bit of sauce. Soft, warm naan bread is equally perfect—its pillowy texture complements the creamy curry beautifully. If you want something green and crisp, a simple cucumber salad or sautéed greens make excellent side dishes to balance the meal.
Creative Ways to Present
For a festive touch, serve the curry in mini Dutch ovens or individual ramekins that help keep the curry warm and delightful to eat. Another fun idea is to create a curry bowl with rice on the bottom, topped with the curry, and garnished artistically with cilantro and a wedge of lime. This elevates the presentation and makes every bite a joyful exploration of flavor and color.
Make Ahead and Storage
Storing Leftovers
This Dutch Oven Chicken Curry Recipe tastes even better the next day, so storing leftovers in an airtight container in the fridge after cooling down is perfect for easy meals later. It will keep well for about 3 to 4 days.
Freezing
If you want to store leftovers for longer periods, freezing the curry is a great option. Just let it cool completely, then transfer to a freezer-safe container or bag. Properly frozen, it can last up to 3 months without losing much flavor or texture.
Reheating
When reheating, gently warm the curry over low heat on the stove, stirring occasionally. Avoid high heat as it can cause the coconut milk to split. You can add a splash of water or coconut milk if the sauce has thickened too much in storage. Reheating slowly helps maintain the luscious texture and deep flavors of the dish.
FAQs
Can I use only chicken breasts or thighs for this recipe?
Yes, you can definitely use just chicken breasts or only thighs if you prefer. Thighs tend to be juicier and more forgiving during cooking, while breasts are leaner. Mixing both gives you a nice balance of textures.
Is this recipe very spicy?
The cayenne pepper adds a mild to moderate heat depending on your preference. You can easily adjust the amount or omit it for a gentler curry. The spices should taste warm and warming rather than overwhelmingly spicy.
Can I make this curry without a Dutch oven?
Absolutely! While a Dutch oven is perfect for even heat distribution and simmering, you can use any large heavy-bottomed pot or deep skillet with a lid to make this recipe.
What can I substitute for coconut milk?
If you don’t have coconut milk, you can use heavy cream or plain yogurt to get creaminess, but it will alter the flavor slightly. For a dairy-free option, canned coconut cream or a mix of coconut milk and water works well.
How do I keep the chicken tender and juicy?
Searing the chicken quickly over medium heat and then simmering gently in the sauce helps lock in moisture. Using a combination of breasts and thighs also ensures tenderness and juicy bites throughout.
Final Thoughts
I can’t recommend this Dutch Oven Chicken Curry Recipe enough for those days when you want a meal that feels like a warm hug from the inside. It’s approachable, homey, and bursting with flavor, making it perfect for family dinners or when friends come over. Once you try it, I hope it becomes a go-to in your recipe collection just like it has in mine. Happy cooking and even happier eating!
Print
Dutch Oven Chicken Curry Recipe
- Prep Time: 20 minutes
- Cook Time: 40 minutes
- Total Time: 1 hour
- Yield: 6 servings
- Category: Main Course
- Method: Stovetop
- Cuisine: Indian
Description
This Dutch Oven Chicken Curry is a rich and flavorful dish combining tender chicken breasts and thighs with a fragrant blend of spices, creamy coconut milk, and crushed tomatoes. Perfectly seared and slowly simmered in a Dutch oven, it delivers comforting warmth with a hint of heat. Served with rice and naan, it’s an ideal meal for family dinners or casual gatherings.
Ingredients
Chicken and Spices
- 2 tablespoons salted butter
- 2 pounds mixed chicken breasts and thighs
- 1 yellow onion, chopped
- 1 tablespoon fresh garlic, chopped
- 2 teaspoons ground ginger
- 2 teaspoons cumin
- 2 teaspoons turmeric
- 1 teaspoon cayenne pepper
- Salt, to taste
Liquids and Flavorings
- 1 can (14 ounce) coconut milk
- 1 can (14 ounce) crushed tomatoes
- 1 cinnamon stick or 1 star anise (optional)
Garnish and Serving
- 1/2 cup fresh cilantro
- Cooked rice, for serving
- Naan bread, for serving
Instructions
- Sear the Chicken and Cook Aromatics: In a large Dutch oven, melt the butter over medium heat. Add the mixed chicken breasts and thighs along with the chopped onion, garlic, ground ginger, cumin, turmeric, cayenne pepper, and salt. Cook, stirring occasionally, until the chicken is well-seared and the spices become fragrant, about 5-8 minutes.
- Add Liquids and Simmer: Pour in the coconut milk and crushed tomatoes. If using, add the cinnamon stick or star anise for added depth of flavor. Stir everything to combine thoroughly. Bring the mixture to a gentle simmer, then reduce the heat and cook uncovered for 10-15 minutes, or until the sauce has thickened slightly.
- Slow Cook Option and Adjust Consistency: At this stage, you can continue cooking the curry on low heat for several hours if desired, to deepen flavors further. If the sauce thickens too much, add a little water to reach the preferred consistency. Stir in half of the fresh cilantro.
- Serve: Spoon the chicken curry over bowls of cooked rice. Serve with warm naan bread on the side. Garnish the curry with the remaining fresh cilantro and enjoy your flavorful meal.
Notes
- Using a Dutch oven helps evenly sear the chicken and gently simmer the curry to develop rich flavors.
- The optional cinnamon stick or star anise adds a subtle aromatic depth, but you can omit it if unavailable.
- For milder spice, reduce the cayenne pepper according to taste.
- Leftover curry can be refrigerated for up to 3 days and reheated gently on the stovetop.
- Serve with basmati rice for a fragrant companion or any preferred rice variety.
