
If you adore the cozy flavors of the holidays and want to impress without turning on the oven, the Dreamy No-Bake Eggnog Pie Recipe is your new best friend. This luscious dessert captures the velvety richness of classic eggnog in a delightfully light and airy pie form, layered atop a crisp and buttery graham cracker crust. It’s festive and comforting, with warm spices and a creamy texture that will have everyone asking for seconds. Whether you’re hosting a holiday gathering or craving a sweet treat to brighten your day, this pie hits all the right notes with effortless charm.
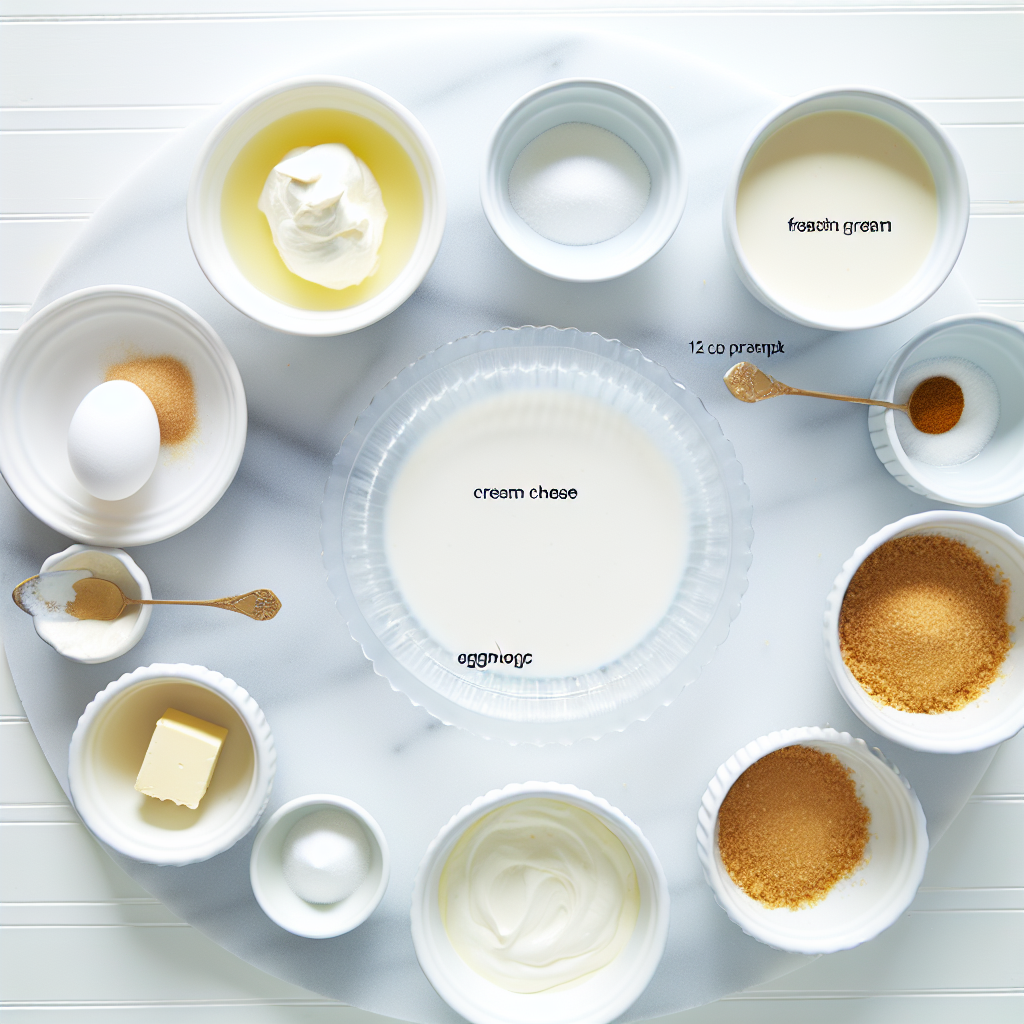
Ingredients You’ll Need
Gathering the ingredients for this Dreamy No-Bake Eggnog Pie Recipe is a breeze, and each one plays an essential role in balancing flavor, texture, and that signature festive feel. From the creamy richness of cream cheese to the aromatic spices, every item enhances your pie’s magic.
- Eggnog (1 ½ cups): The base flavor that brings that unmistakable holiday cheer and creaminess.
- Heavy whipping cream (1 cup): Whipped to stiff peaks for a light, fluffy filling.
- Cream cheese (8 oz): Softened to create a smooth, tangy backbone for the pie.
- Granulated sugar (½ cup + 2 tbsps): Sweetens and balances the spices perfectly.
- Graham cracker crumbs (1 ½ cups): Provides a crunchy, buttery crust that complements the creamy filling.
- Unsalted butter (6 tbsps): Melted to bind the crust and add richness.
- Unflavored gelatin (1 envelope): Helps the filling set firmly without baking.
- Cold water (3 tbsps): Used to bloom the gelatin for perfect texture.
- Vanilla extract (1 tsp): Adds depth and enhances the eggnog flavor.
- Ground nutmeg (½ tsp): Warms the filling with a classic holiday spice note.
- Ground cinnamon (1 tsp): Infuses the pie with gentle spice and fragrance.
- Whipped cream: A fluffy topping to finish the pie with elegance and extra creaminess.
How to Make Dreamy No-Bake Eggnog Pie Recipe
Step 1: Crust Creation
Start by mixing the graham cracker crumbs with melted butter and 2 tablespoons of sugar until the mixture looks like damp sand. This step is crucial because it creates the perfect buttery crust that holds the pie together and adds that irresistible crispy contrast to the creamy filling. Firmly press the mixture into your pie dish, covering the bottom and sides evenly. Then pop it into the refrigerator, allowing it to chill and solidify while you prepare the filling.
Step 2: Cream Cheese Preparation
Next, blend the softened cream cheese and ½ cup of granulated sugar until you achieve a smooth, silky consistency. This creamy base is what gives the pie its luscious texture. To this mixture, add the eggnog, vanilla extract, nutmeg, and cinnamon. Whisk everything together until all the spices are well incorporated, layering your pie with those nostalgic holiday flavors.
Step 3: Gelatin Activation
Sprinkle the gelatin over cold water and let it bloom for several minutes—this step is key to ensuring your pie filling sets perfectly without baking. Gently warm the bloomed gelatin until completely dissolved, then stir it seamlessly into the eggnog mixture. This creates a custard-like texture that will hold its shape when chilled.
Step 4: Cream Incorporation
Using a mixer, whip the heavy cream to stiff peaks. This fluffy, airy cream is essential for the pie’s dreamlike texture. Carefully fold the whipped cream into the eggnog mixture, taking care not to deflate the mixture. The result is a light and velvety filling that melts in your mouth.
Step 5: Pie Assembly
Pour your creamy filling into the chilled crust, smoothing the top to remove any air pockets. This step ensures the pie sets evenly and looks inviting. Place the pie in the refrigerator and let it chill for at least four hours—or overnight if you have the patience—to allow the filling to fully set into that perfect sliceable consistency.
Step 6: Final Touches
Before serving, crown the pie with a generous layer of whipped cream. Then dust it with a little extra nutmeg or cinnamon to sprinkle on that festive aroma and beautiful presentation. This final flourish turns a simple dessert into a showstopper worth sharing.
How to Serve Dreamy No-Bake Eggnog Pie Recipe
Garnishes
A swirl of whipped cream dotted with a sprinkle of freshly grated nutmeg or cinnamon transforms the pie into a holiday masterpiece. For a little extra sparkle, try adding crushed peppermint candies or a few toasted pecans on top. These simple garnishes add both flavor and visual appeal, making every bite feel special.
Side Dishes
This pie pairs wonderfully with fresh fruit like plump berries or citrus segments, which add a bright contrast to the creamy richness. A hot cup of coffee, mulled wine, or a spiced chai latte also complements the warm spices in the pie and rounds out the dessert experience perfectly.
Creative Ways to Present
For festive gatherings, consider serving individual portions in clear glass dishes layered with crushed graham crackers and a small dollop of whipped cream on top. Or slice the pie into elegant wedges and arrange on a holiday-themed platter surrounded by pine sprigs or cranberries to elevate the presentation.
Make Ahead and Storage
Storing Leftovers
The Dreamy No-Bake Eggnog Pie Recipe keeps beautifully in the refrigerator for up to 3 days. Be sure to cover it tightly with plastic wrap or store it in an airtight container to maintain its freshness and prevent the crust from becoming soggy.
Freezing
If you want to prepare this pie well in advance, it freezes quite well. Wrap it securely in plastic wrap and then foil before freezing. Thaw overnight in the refrigerator before serving to preserve its creamy texture and perfect flavor.
Reheating
This pie is best enjoyed cold, so reheating isn’t recommended. Instead, let it thaw naturally in the fridge after freezing. The chilled cream and gelatin-based filling tastes best when served cool and fresh.
FAQs
Can I use low-fat eggnog or cream?
While you can substitute lower-fat versions, using full-fat eggnog and cream ensures the pie stays rich and velvety. The texture might be less smooth with low-fat alternatives, but it will still be tasty!
What if I don’t have unflavored gelatin?
Gelatin is crucial for this no-bake recipe to set properly. If you don’t have any, you might try agar-agar as a vegetarian substitute, but keep in mind the texture and setting time will vary.
Can I make this pie vegan?
This pie relies on dairy and gelatin, so making it vegan would require significant substitutions like plant-based cream cheese, coconut cream, and agar-agar instead of gelatin. It’s doable but will change the classic texture and flavor.
Is it safe to use store-bought eggnog in this recipe?
Absolutely! Most store-bought eggnog is pasteurized and safe to use. Just ensure it’s well chilled before mixing to keep your pie fresh and tasty.
How long does the pie take to set?
Allow at least four hours of chilling for the filling to fully firm up. For best results, refrigerate overnight so the flavors meld and the texture is perfect for slicing.
Final Thoughts
There’s something truly magical about the Dreamy No-Bake Eggnog Pie Recipe. It’s effortless yet elegant, creamy yet light, and packed with all those nostalgic holiday flavors. Whether you’re new to eggnog desserts or a longtime fan, this pie is bound to become a treasured tradition. So go ahead, gather those simple ingredients and treat yourself and your loved ones to a slice of pure festive bliss—you deserve it!
Print
Dreamy No-Bake Eggnog Pie Recipe
- Prep Time: 20 minutes
- Cook Time: 0 minutes
- Total Time: 4 hours 20 minutes
- Yield: 7 servings
- Category: Dessert
- Method: No-Cook
- Cuisine: American
Description
This Dreamy No-Bake Eggnog Pie is the perfect festive dessert that combines creamy eggnog filling with a buttery graham cracker crust. Made without baking, this easy pie is rich, silky, and flavored with nutmeg and cinnamon, offering a light and airy texture thanks to whipped cream folded into the filling. It’s ideal for holiday celebrations or any occasion craving a luscious, spiced treat.
Ingredients
Crust Ingredients
- 1 ½ cups (180 g) graham cracker crumbs
- 6 tablespoons (85 g) unsalted butter, melted
- 2 tablespoons (25 g) granulated sugar
Filling Ingredients
- 1 package (8 oz / 226 g) cream cheese, softened
- ½ cup (100 g) granulated sugar
- 1 ½ cups (360 mL / 12 fl oz) eggnog
- 1 teaspoon vanilla extract
- ½ teaspoon ground nutmeg, plus extra for garnish
- 1 teaspoon ground cinnamon
- 1 envelope (about 2 ½ teaspoons / 7 g) unflavored gelatin
- 3 tablespoons (45 mL) cold water
- 1 cup (240 mL / 8 fl oz) heavy whipping cream
Garnish
- Whipped cream
- Ground nutmeg or cinnamon for dusting
Instructions
- Crust Creation: Pulverize graham crackers with melted butter and sugar in a bowl until the mixture resembles damp sand. Press the mixture firmly into the bottom and sides of a pie dish, ensuring even coverage. Refrigerate the crust to solidify while you prepare the filling.
- Cream Cheese Preparation: In a mixing bowl, use an electric mixer to blend softened cream cheese and sugar until the mixture is silky smooth. Next, incorporate the eggnog, vanilla extract, ground nutmeg, and ground cinnamon. Whisk the mixture thoroughly until all ingredients are fully combined and smooth.
- Gelatin Activation: Sprinkle the unflavored gelatin evenly over the cold water in a small bowl and let it bloom for several minutes. Then, gently warm the gelatin mixture (using a microwave or stovetop just until dissolved) and stir until completely melted. Gradually blend the dissolved gelatin into the eggnog mixture, ensuring an even and consistent filling base.
- Cream Incorporation: In a separate chilled bowl, whip the heavy cream until stiff peaks form. Carefully fold the whipped cream into the eggnog mixture, maintaining the light and airy texture without deflating the whipped cream. Mix until fully incorporated and uniform.
- Pie Assembly: Pour the creamy eggnog filling into the chilled graham cracker crust, smoothing the top surface to remove air pockets. Place the pie in the refrigerator and chill for at least four hours, or until the filling is completely set and firm.
- Final Touches: Just before serving, generously spread whipped cream over the top of the pie. Dust the whipped cream with additional ground nutmeg or cinnamon for an elegant and festive garnish. Slice and serve chilled.
Notes
- Make sure the cream cheese is at room temperature for easier blending and a smoother filling.
- Blooming the gelatin is essential to prevent lumps and ensure proper setting of the pie.
- For a stronger eggnog flavor, use a high-quality eggnog with spices included.
- You can prepare this pie a day ahead to ensure it has sufficient time to set and flavors meld.
- If desired, add a splash of rum or bourbon to the filling for an adult version, but ensure it aligns with your dietary preferences.
