
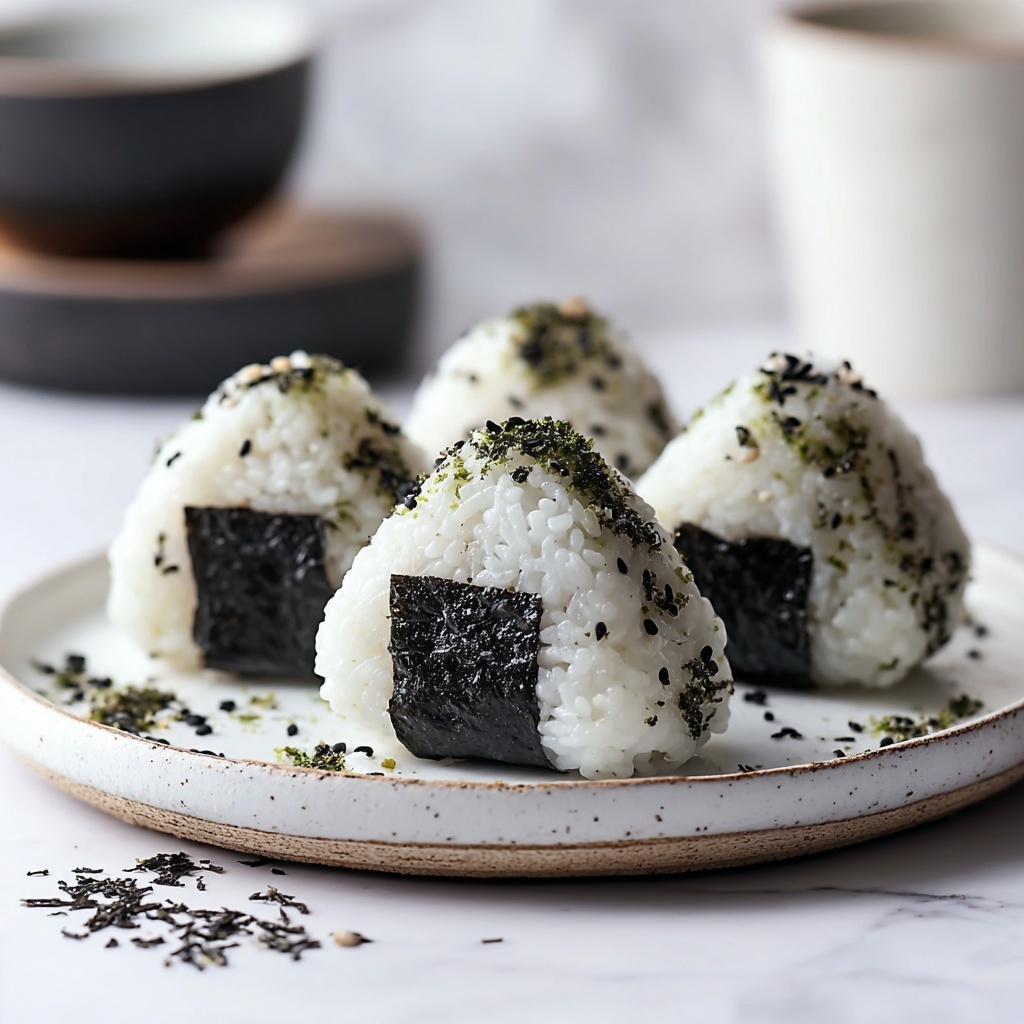
If you are looking for a delightful treat that’s both comforting and incredibly versatile, then this Delicious Onigiri: Japanese Rice Balls You Can Customize Today Recipe is going to steal your heart. Onigiri are simple yet savory rice balls typically wrapped in crisp nori and packed with flavors, making them a perfect snack, lunchbox item, or picnic companion. What makes this recipe stand out is how easy it is to personalize with your favorite fillings or toppings, creating a homemade snack bursting with authentic Japanese charm and wholesome satisfaction.
Ingredients You’ll Need
This recipe calls for just a handful of essential ingredients, each playing a vital role in delivering the perfect balance of taste, texture, and appearance in your onigiri. From fluffy rice to savory seasoning, every component combines to make your onigiri irresistible.
- 2 cups Cooked Rice: Use freshly cooked medium-grain rice for the ideal sticky yet tender base.
- 2 tablespoons Furikake: A Japanese seasoning blend that adds delightful umami and color.
- 1 cup Water: Keeps your hands wet to prevent the rice from sticking during shaping.
- 1 teaspoon Kosher Salt: Enhances the natural flavor of rice with just the right amount of saltiness.
- 4 sheets Roasted Nori: Cut into strips to wrap your rice balls for a satisfying crunch and taste contrast.
- 2 tablespoons Sesame Seeds (optional): Adds a subtle nutty aroma and lovely texture on top of your onigiri.
How to Make Delicious Onigiri: Japanese Rice Balls You Can Customize Today Recipe
Step 1: Prepare the Rice Mixture
Start by placing your freshly cooked medium-grain rice into a mixing bowl. Sprinkle the furikake seasoning evenly over the rice and gently fold it in to distribute flavor consistently without mashing the grains. The furikake is the secret ingredient that transforms plain rice into something unexpectedly delightful, adding bursts of savory, salty, and sometimes even sweet notes.
Step 2: Ready Your Hands for Shaping
Wet your hands thoroughly with water to prevent sticky rice from clinging to your skin. Next, sprinkle a pinch of kosher salt on your palms; this not only seasons the outer layer of the rice balls but also helps keep bacteria away, keeping your onigiri fresh and tasty.
Step 3: Shape Your Onigiri
Scoop about half a cup of the seasoned rice mixture and place it in your palm. Gently press and form it into a classic triangular shape, applying firm yet gentle pressure so the rice sticks well but doesn’t get squashed. For neat edges, you can press the sides of your rice triangle against a flat surface like a cutting board.
Step 4: Add the Nori and Optional Toppings
Wrap a strip of roasted nori around the base of your triangle for that signature Japanese rice ball look and taste. If you love a crunchy finish, sprinkle sesame seeds on top of the nori or directly on the rice before wrapping. The textures contrast beautifully, making each bite wonderfully satisfying.
Step 5: Enjoy or Store Your Onigiri
Your delicious homemade onigiri are ready to be savored immediately! Alternatively, you can wrap each rice ball tightly in plastic wrap for easy storage and grab them quickly on the go. These customizable rice balls are perfect anytime, anywhere.
How to Serve Delicious Onigiri: Japanese Rice Balls You Can Customize Today Recipe

Garnishes
Simple garnishes like a sprinkling of sesame seeds, a small dab of Japanese mayonnaise, or even a tiny piece of pickled plum placed inside add personality and enhance the visual appeal of your onigiri. Feel free to experiment with green onions or shiso leaves for added freshness.
Side Dishes
Onigiri pairs wonderfully with miso soup, steamed vegetables, or a light salad to make a complete meal. These accompaniments provide balance and bring out the comforting qualities of the rice balls while allowing the star ingredient to shine.
Creative Ways to Present
Serve your onigiri on a wooden platter lined with banana leaves or colorful sushi mats for an authentic Japanese vibe. You can get playful by shaping the rice into different molds or using custom nori wraps with patterns — a great conversation starter for gatherings or bento boxes.
Make Ahead and Storage
Storing Leftovers
If you have extra onigiri, keep them wrapped tightly in plastic wrap and place them in an airtight container in the refrigerator. They will stay fresh for up to one day, though they are best enjoyed the same day for that perfect texture.
Freezing
To preserve onigiri longer, wrap each rice ball individually in plastic wrap and place them in a freezer-safe bag. Frozen onigiri can last about one month and make a convenient snack ready to defrost when you need a quick bite.
Reheating
Reheat refrigerated or frozen onigiri by microwaving them (wrapped or uncovered) for about 30 seconds to a minute until warm. This brings back the soft, fluffy texture of the rice and slightly crisps the nori, making your onigiri taste freshly made.
FAQs
Can I use other types of rice for onigiri?
Medium-grain rice works best because of its stickiness, which holds the shape well. Long-grain rice tends to be too dry and won’t bind properly. If you want a gluten-free option, Japanese short-grain rice is ideal.
What fillings can I add inside my onigiri?
Feel free to customize by adding savory fillings like tuna with mayo, pickled plum (umeboshi), grilled salmon, or seasoned vegetables. These enhance flavor and provide delightful surprises inside each rice ball.
Is it okay if my onigiri aren’t perfectly shaped?
Absolutely! Onigiri are meant to be rustic and handmade. Imperfect shapes add charm and show your personal touch, making every bite feel even more special.
How long can I keep onigiri at room temperature?
Since onigiri contain cooked rice, it’s best to eat them within a few hours if left at room temperature to avoid any spoilage, especially in warm climates.
Can I make onigiri without nori?
Yes, you can skip the nori wrap and still enjoy the delicious rice balls. However, nori adds a wonderful texture and flavor contrast that truly completes the onigiri experience.
Final Thoughts
Making this Delicious Onigiri: Japanese Rice Balls You Can Customize Today Recipe at home is such a joyous and rewarding experience. Not only do you get to enjoy a wholesome snack bursting with flavor, but you also tap into a wonderful tradition that’s endlessly adaptable. Whether for a quick bite or a creative party treat, these rice balls are sure to become a beloved staple in your kitchen. So go ahead, grab that bowl of fresh rice, and start shaping your own onigiri masterpiece today!
Print
Delicious Onigiri: Japanese Rice Balls You Can Customize Today Recipe
- Prep Time: 10 minutes
- Cook Time: 25 minutes
- Total Time: 35 minutes
- Yield: 4 servings
- Category: Snack
- Method: No-Cook
- Cuisine: Japanese
- Diet: Gluten Free
Description
Delicious Onigiri are traditional Japanese rice balls that are easy to customize with your favorite seasonings and fillings. This recipe uses freshly cooked medium-grain rice combined with furikake seasoning, shaped into triangles, and wrapped with roasted nori for a delightful snack or meal accompaniment.
Ingredients
Rice and Seasoning
- 2 cups cooked medium-grain rice (freshly cooked)
- 2 tablespoons furikake seasoning blend
- 1 teaspoon kosher salt
- 1 cup water (for wetting hands)
For Wrapping and Garnish
- 4 sheets roasted nori, cut into strips
- 2 tablespoons sesame seeds (optional)
Instructions
- Mix Rice and Seasoning: In a mixing bowl, gently blend the freshly cooked medium-grain rice with furikake seasoning until the rice grains are evenly coated and infused with umami flavor.
- Prepare Your Hands: Wet your hands with water to prevent sticking, then sprinkle a small pinch of kosher salt onto your palms to enhance the rice’s taste and help shape the Onigiri.
- Shape the Rice: Scoop approximately 1/2 cup of the seasoned rice and gently press it into a compact triangle shape using your hands. Take care to press firmly enough to hold shape without crushing the grains.
- Optional Sharpening: For cleaner edges, press the sides of the rice triangle lightly against a flat surface to define the shape further.
- Wrap with Nori: Take a strip of roasted nori and wrap it around the base of the rice triangle. This adds flavor and provides a convenient handle for eating.
- Garnish: If desired, sprinkle sesame seeds on top of the Onigiri for a nutty finish and extra texture.
- Serve or Store: Enjoy the Onigiri fresh as a snack or part of your meal. To store for later, individually wrap each rice ball tightly in plastic wrap to maintain freshness.
Notes
- Use freshly cooked medium-grain rice for the best texture that sticks well when shaping.
- Adjust the amount of furikake seasoning to suit your taste preference.
- Wet your hands before shaping to prevent rice from sticking.
- For added flavor, you can include fillings such as umeboshi (pickled plum), grilled salmon, or tuna mayo inside the Onigiri if desired.
- Consume Onigiri soon after making for optimal freshness, or refrigerate wrapped rice balls for up to 24 hours.

