
If you’re searching for a festive treat that combines rich chocolatey goodness with adorable holiday charm, the Christmas Present Brownies Recipe is your new best friend. These brownies bring together a fudgy, melt-in-your-mouth texture with vibrant red, green, and white decorations that look just like little wrapped gifts. It’s a playful yet delicious way to spread holiday cheer, making these brownies perfect for gatherings, gift exchanges, or cozy nights by the fire. Trust me, once you bake this Christmas Present Brownies Recipe, it will quickly become a beloved staple during the season.
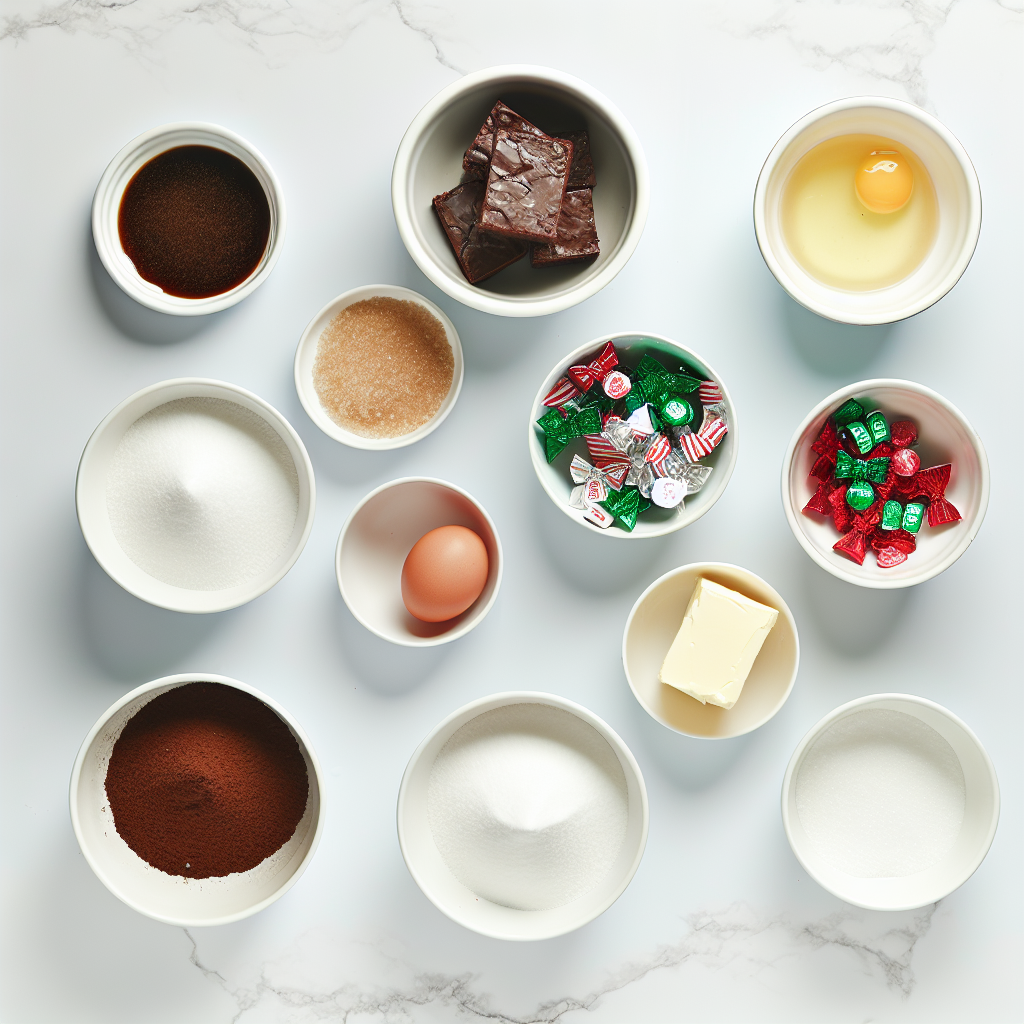
Ingredients You’ll Need
What’s wonderful about this Christmas Present Brownies Recipe is its simplicity. Each ingredient plays a vital role in creating the base that’s both fudgy and rich while the candy melts bring the festive pop of color that turns these treats into little presents.
- Unsalted butter: Melts into a creamy, velvety base that ensures moistness and depth of flavor.
- Granulated sugar: Sweetens just enough to balance the cocoa without overpowering.
- Large eggs: Bind everything together for a perfect chewy texture.
- Vanilla extract: Adds warmth and complexity behind all the chocolate notes.
- All-purpose flour: Gives structure without making the brownies cakey or heavy.
- Unsweetened cocoa powder: Brings that intense chocolate flavor, essential for a rich brownie.
- Baking powder: Provides a gentle lift for the ideal dense but tender crumb.
- Salt: Balances sweetness and enhances the chocolate’s richness.
- Semi-sweet chocolate chips (optional): For those who love surprise pockets of melty chocolate.
- Red, green, and white candy melts: Used for the festive “ribbons” that make the brownies look like Christmas presents.
- Mini candy bows or holiday sprinkles (optional): Adds that extra charming touch to your edible gifts.
How to Make Christmas Present Brownies Recipe
Step 1: Prepare Your Pan and Oven
Start by preheating your oven to 350°F (175°C). Lining a 9×13-inch pan with parchment paper is a crucial step—it ensures your brownies come out cleanly and makes slicing a breeze later.
Step 2: Make the Butter and Sugar Mixture
Melt the butter gently over low heat until smooth. Then whisk in the granulated sugar until it’s completely combined and silky. Allow this mixture to cool slightly before moving forward; this helps the eggs incorporate without cooking and creates a shiny, luscious batter when beaten in.
Step 3: Mix in the Eggs and Vanilla
Add the eggs and vanilla extract into your butter-sugar blend one at a time while whisking continuously. This step builds volume and thickness, resulting in a glossy brownie batter that bakes up rich and fudgy.
Step 4: Combine Dry Ingredients and Fold Them In
Sift together the flour, cocoa powder, baking powder, and salt in a separate bowl. This ensures everything is evenly distributed and prevents lumps. Gently fold the dry mixture into the wet ingredients until just smooth—overmixing here can lead to tougher brownies. If you want extra chocolate pockets, fold in semi-sweet chocolate chips now.
Step 5: Bake the Brownies
Pour the batter evenly into your prepared pan, smoothing the top with a spatula. Place in the oven and bake for 30 to 35 minutes. The test for doneness is crucial: a toothpick inserted should come out with only a few moist crumbs clinging to it. Underbaking will make them too gooey and overbaking dries them out.
Step 6: Decorate to Look Like Christmas Presents
Once cooled completely, lift the brownies out using the parchment paper and cut them into squares. Melt your red, green, and white candy melts gently and drizzle them atop the brownies to resemble festive ribbons. Adding mini candy bows or holiday-themed sprinkles completes the transformation, turning simple brownies into adorable gifts you can serve or share.
Step 7: Let the Decorations Set
Allow the candy melts to firm up at room temperature or pop the decorated brownies into the fridge for 10 to 15 minutes before serving. This step keeps your ribbons solid and your brownies looking picture-perfect.
How to Serve Christmas Present Brownies Recipe
Garnishes
The beauty of this Christmas Present Brownies Recipe is in the details. Besides the candy bows and drizzle, a dusting of powdered sugar or a light sprinkle of edible glitter adds an extra magical sparkle that’s perfect for holiday parties.
Side Dishes
These brownies pair wonderfully with something fresh like a scoop of vanilla bean ice cream or a dollop of lightly whipped cream to balance their rich chocolate flavor. A hot cup of spiced chai or peppermint tea will complement the festive vibe brilliantly.
Creative Ways to Present
Wrap individual brownies in clear cellophane tied with a rustic twine or sparkly ribbon to give guests their own edible Christmas “presents.” Alternatively, serve them on a wooden board lined with fresh pine branches and cranberries for a cozy, woodland holiday feel.
Make Ahead and Storage
Storing Leftovers
If you have brownies left after the festivities (which might be tough, but it happens), store them in an airtight container at room temperature. They stay beautifully moist for up to 4 days, making them a perfect quick snack or dessert option.
Freezing
For longer storage, wrap individual brownie squares tightly in plastic wrap and place them in a freezer-safe bag or container. They freeze well for up to 3 months. To enjoy, simply thaw overnight in the fridge, then bring to room temperature.
Reheating
To warm brownies, pop them into a microwave for 15-20 seconds or heat in a low oven for a few minutes. This gently revives their soft, fudgy texture and melts any chocolate chips inside for that freshly baked feel.
FAQs
Can I use a different type of chocolate chips?
Absolutely! While semi-sweet chocolate chips are classic for this recipe, you can swap in dark, milk, or even white chocolate chips depending on your preference. Each choice will subtly change the overall sweetness and flavor.
Are the candy melts necessary for the recipe?
The candy melts aren’t essential for the brownies themselves but are what make this Christmas Present Brownies Recipe truly festive and fun. If you prefer a simpler treat, you can skip the decorations and still have delicious brownies.
Can I make these gluten-free?
Yes, you can substitute the all-purpose flour with a gluten-free baking blend that includes xanthan gum for structure. Make sure your cocoa powder and other ingredients are also certified gluten-free to avoid cross-contamination.
How do I prevent my brownies from drying out?
The key is not to overbake them. Start checking around 30 minutes and remove the brownies once a toothpick comes out with a few moist crumbs. Also, storing them properly in an airtight container helps maintain moisture.
Can I add nuts or other mix-ins?
Definitely! Chopped walnuts, pecans, or even dried cranberries can be folded into the batter before baking for extra texture and flavor that complement the chocolate beautifully.
Final Thoughts
There’s something genuinely joyful about making and sharing the Christmas Present Brownies Recipe. They’re not only an irresistible chocolate treat but also a delightful way to add some holiday whimsy to your baking table. Whether you’re gifting them, serving at a party, or enjoying a cozy moment at home, these brownies bring warmth and cheer with every bite. Give this recipe a try and watch as it quickly becomes a festive tradition everyone looks forward to each year!
Print
Christmas Present Brownies Recipe
- Prep Time: 15 minutes
- Cook Time: 35 minutes
- Total Time: 55 minutes
- Yield: 12 servings
- Category: Dessert
- Method: Baking
- Cuisine: American
Description
Delight in these festive Christmas Present Brownies, rich and fudgy treats perfect for holiday celebrations. Made with unsalted butter, cocoa powder, and optional chocolate chips, these brownies are baked to perfection and decorated with colorful candy melts and festive sprinkles to resemble wrapped gifts, adding a fun and delicious touch to your holiday dessert table.
Ingredients
Brownie Batter
- 2 sticks unsalted butter
- 2 cups granulated sugar
- 4 large eggs
- 1 teaspoon vanilla extract
- 1 cup all-purpose flour
- 1 cup unsweetened cocoa powder
- ½ teaspoon baking powder
- ¼ teaspoon salt
- 1 cup semi-sweet chocolate chips (optional)
Decorations
- Red, green, and white candy melts (for decoration)
- Mini candy bows or holiday sprinkles (optional)
Instructions
- Preheat Oven: Preheat your oven to 350°F (175°C). Line a 9×13-inch baking pan with parchment paper to prevent sticking and make removal easier.
- Melt Butter and Mix Sugar: Melt the butter in a saucepan over low heat. Once melted, whisk in the granulated sugar until the mixture is smooth. Allow to cool slightly to prevent scrambling the eggs.
- Add Eggs and Vanilla: Whisk in the eggs and vanilla extract into the butter and sugar mixture until the batter becomes thick and glossy, ensuring proper incorporation for a rich texture.
- Prepare Dry Ingredients: In a separate bowl, sift together the all-purpose flour, unsweetened cocoa powder, baking powder, and salt. This ensures even distribution and a smooth batter.
- Combine Ingredients: Fold the dry ingredients gently into the wet mixture until just combined and smooth. If desired, fold in the semi-sweet chocolate chips to add bursts of chocolate throughout the brownies.
- Bake the Brownies: Pour the batter evenly into the prepared pan, smoothing out the top. Bake for 30 to 35 minutes, or until a toothpick inserted into the center comes out with a few moist crumbs, indicating a fudgy center.
- Cool and Cut: Let the brownies cool completely in the pan. Once cooled, lift them out using the parchment paper and cut into squares to resemble gift boxes.
- Decorate: Melt the red, green, and white candy melts according to package instructions. Drizzle these over the brownie squares to create ribbon-like designs. Add mini candy bows or holiday sprinkles for festive embellishment.
- Set Decorations: Allow the candy melt decorations to set at room temperature or place them in the refrigerator for 10–15 minutes before serving to ensure the ribbons harden and hold shape.
Notes
- Be cautious not to overbake; a few moist crumbs on the toothpick indicate perfect fudginess.
- You can substitute semi-sweet chocolate chips with dark or milk chocolate chips based on preference.
- Use parchment paper for easy removal and cleaner edges when cutting brownies.
- Allow brownies to cool completely before decorating to prevent candy melts from melting undesirably.
- Store leftovers in an airtight container at room temperature for up to 3 days, or refrigerate for up to a week.


