
If you love the festive joy of peppermint combined with the classic charm of a soft cookie, you are going to adore this Candy Cane Kiss Cookies Recipe. Each bite marries buttery, tender cookie dough with a melting Hershey’s Candy Cane Kiss that delivers a burst of minty sweetness. These cookies aren’t just delicious; they’re the perfect holiday treat to share, gift, or savor alongside your favorite warm drink. Whether you’re a seasoned baker or just looking for a fun project, this recipe brings a delightful combination of textures and flavors that will quickly become a new seasonal favorite.
Ingredients You’ll Need
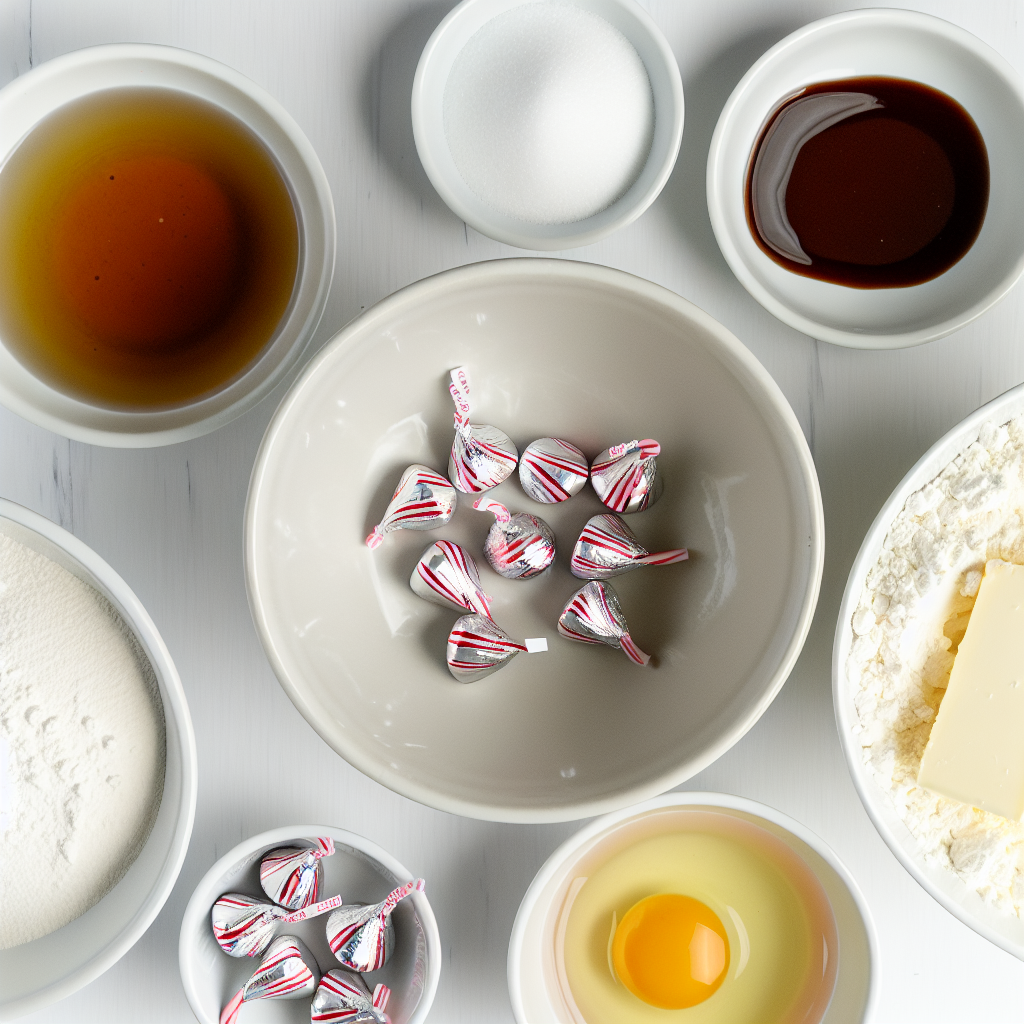
Gathering simple, everyday ingredients is what makes this recipe accessible and rewarding. Each component plays a key role: butter lends richness and tenderness, sugar sweetens and helps with structure, while the peppermint extract and candy cane kisses provide that signature festive flavor. These ingredients balance each other beautifully, creating cookies that are as tasty to eat as they are easy to make.
- Butter (1 cup, softened): Provides the rich base and moisture for soft, melt-in-your-mouth cookies.
- Granulated Sugar (1 1/2 cups): Sweetens the dough and helps achieve a light texture when creamed with butter.
- Large Egg (1): Acts as a binder and adds moisture.
- Large Egg Yolk (1): Adds extra richness and tenderness to the cookie dough.
- Vanilla Extract (2 teaspoons): Enhances the overall flavor with its warm, sweet notes.
- Peppermint Extract (1/4 teaspoon, optional): Gives the cookies a fresh, minty kick to complement the candy cane kisses.
- Flour (2 2/3 cups): The sturdy backbone that shapes the cookie, balanced carefully for softness.
- Baking Powder (1 teaspoon): Helps the cookies rise just enough for a light texture.
- Baking Soda (1/2 teaspoon): Contributes to leavening and browning.
- Salt (3/4 teaspoon): Balances sweetness and enhances the flavors.
- Hershey’s Candy Cane Kisses (1 9-ounce package): The star ingredient, melting into the center for that iconic peppermint punch.
How to Make Candy Cane Kiss Cookies Recipe
Step 1: Cream the Butter and Sugar
Start by beating the softened butter and granulated sugar until the mixture is light and fluffy—about four minutes. This step is crucial because it incorporates air, which helps give these cookies their tender, soft texture that practically melts on your tongue.
Step 2: Add the Eggs and Flavors
Next, add the egg and egg yolk along with vanilla extract, and peppermint extract if you’re using it. Mixing these in for about a minute more blends everything thoroughly, ensuring your cookies have that perfect balance of rich and minty flavor.
Step 3: Fold in the Dry Ingredients
Gently fold in the flour, baking powder, baking soda, and salt. Be careful not to overmix here—just combine until the dough forms. Overworking the dough can develop gluten, which may make your cookies tough instead of soft and chewy.
Step 4: Chill the Dough (Optional)
Though optional, chilling the dough for 20 to 30 minutes can make it easier to handle and can help control spread during baking. It’s a little extra step that’s worth it if you want perfectly shaped cookies.
Step 5: Roll and Prepare for Baking
Preheat your oven to 350°F (177°C) and line your baking sheets with parchment paper. Roll the dough into small balls—about an inch or so in diameter. If you’re feeling festive, roll the dough balls in sparkling sugar or sprinkles for an added pop of color and texture.
Step 6: Bake and Add the Candy Cane Kisses
Bake the cookies for 8 to 10 minutes until they are still soft in the center. While they bake, unwrap all the Candy Cane Kisses so they’re ready. When the cookies come out, wait about two minutes (to avoid burning yourself), then gently press one candy kiss into the center of each cookie. This melts them slightly and creates that beautiful, glossy peppermint center.
Step 7: Optional Chilling for a Set Finish
For an extra neat presentation, pop the cookies into the refrigerator for 5 to 10 minutes after adding the kisses. This helps the chocolate and peppermint harden slightly, giving you that perfect firm-yet-soft bite.
How to Serve Candy Cane Kiss Cookies Recipe
Garnishes
Sprinkle a little crushed candy cane or peppermint bark pieces on top right after pressing in the kisses for added crunch and festive flair. You can also dust them lightly with powdered sugar for a snowy winter look that’s just adorable on a holiday platter.
Side Dishes
These cookies pair wonderfully with hot chocolate, peppermint tea, or a classic mug of warm milk. The warm beverages highlight the cooling peppermint flavor of the cookies and make a cozy treat perfect for gatherings or quiet nights in.
Creative Ways to Present
Arrange your Candy Cane Kiss Cookies Recipe on a festive plate lined with evergreen sprigs or place them in holiday-themed tins as gifts. For a fun twist, serve them alongside a scoop of vanilla or peppermint ice cream for a dessert that’s both cool and comforting.
Make Ahead and Storage
Storing Leftovers
Store leftover cookies in an airtight container at room temperature for up to a week. This keeps them soft and flavorful, ensuring you can enjoy your Candy Cane Kiss Cookies Recipe even days after baking.
Freezing
You can freeze the dough balls before baking or the fully baked cookies. Freeze dough balls on a baking sheet until firm, then transfer them to a freezer bag. Bake frozen dough balls as needed, adding a couple of minutes to the baking time. Baked cookies freeze best in airtight containers separated by parchment paper.
Reheating
To refresh the cookies, warm them in a microwave for 10-15 seconds or in a preheated oven at 300°F for about 5 minutes. This softens the cookies and melts the candy centers slightly, bringing back that freshly baked charm.
FAQs
Can I use regular chocolate kisses instead of candy cane kisses?
Absolutely! While using candy cane kisses gives these cookies their signature peppermint flavor, substituting regular milk chocolate kisses will yield a delicious chocolate-centered cookie that’s just as enjoyable.
Is peppermint extract necessary in the recipe?
The peppermint extract is optional because the candy cane kisses already add plenty of peppermint flavor. However, a small amount enhances the overall minty aroma and taste, making the cookies extra festive.
How do I prevent the cookies from spreading too much during baking?
Chilling the dough before baking helps reduce spreading. Also, be careful not to use too much butter or let the dough warm up too much before baking. Using parchment paper or a silicone baking mat helps keep the bottoms from burning while the cookies bake evenly.
Can I make these cookies gluten-free?
Yes, you can substitute all-purpose flour with a gluten-free baking blend designed for cookies. Just make sure the blend you choose contains xanthan gum or another binder to help with texture.
How should I handle the candy kisses when baking for kids?
Since the kisses soften quickly once pressed into the warm cookies, it’s best to have an adult unwrap and press them in. Letting the cookies cool slightly before adding the kisses helps prevent burns and keeps the candy from melting too much on little fingers.
Final Thoughts
There’s honestly nothing quite like baking a batch of these Candy Cane Kiss Cookies Recipe during the holiday season. They’re festive, fun, and completely irresistible with that perfect combo of soft cookie and peppermint chocolate center. Trust me, once you try them, they’ll be your go-to treat for spreading joy and indulging your sweet tooth all winter long. Go ahead, bake a batch, and share the magic!
Print
Candy Cane Kiss Cookies Recipe
- Prep Time: 15 minutes
- Cook Time: 10 minutes
- Total Time: 25 minutes
- Yield: 50 cookies
- Category: Dessert
- Method: Baking
- Cuisine: American
Description
Delight in these festive Candy Cane Kiss Cookies, a perfect holiday treat combining soft, buttery cookie dough with the refreshing taste of peppermint. These cookies are easy to prepare, baked until just soft, and topped with Hershey’s Candy Cane Kisses for a melt-in-your-mouth chocolate and mint experience.
Ingredients
Cookie Dough Ingredients
- 1 cup Butter (softened)
- 1 1/2 cups Granulated Sugar
- 1 large Egg
- 1 large Egg Yolk
- 2 teaspoons Vanilla Extract
- 1/4 teaspoon Peppermint Extract (optional)
- 2 2/3 cups Flour
- 1 teaspoon Baking Powder
- 1/2 teaspoon Baking Soda
- 3/4 teaspoon Salt
Topping
- 1 (9-ounce) package Hershey’s Candy Cane Kisses (about 50–60 kisses)
Instructions
- Cream the Butter and Sugar: In a large mixing bowl, beat the softened butter and granulated sugar together for about 4 minutes or until the mixture becomes light and fluffy. Be sure to scrape the sides of the bowl to incorporate all ingredients evenly.
- Add Eggs and Extracts: Add the egg, egg yolk, vanilla extract, and peppermint extract (if using) to the butter-sugar mixture. Mix for an additional 1 minute to combine thoroughly.
- Fold in Dry Ingredients: Gently fold in the flour, baking powder, baking soda, and salt. Be careful not to overmix to avoid developing gluten that could make the cookies tough.
- Chill Dough (Optional): For easier rolling, chill the dough in the refrigerator for 20 to 30 minutes; this step is optional.
- Preheat and Prepare Baking Sheets: Preheat your oven to 350°F (175°C). Line baking sheets with parchment paper to prevent sticking.
- Shape and Decorate Cookies: Roll the dough into small balls. If you choose, roll each ball in sparkling sugar, sprinkles, or nonpareils for added texture and visual appeal. Place each ball on the prepared baking sheets, spacing them evenly.
- Bake the Cookies: Bake for 8 to 10 minutes, until the cookies are still soft in the centers but cooked through.
- Unwrap and Add Candy Cane Kisses: While cookies bake, unwrap all the Candy Cane Kisses. After removing cookies from the oven, wait about 2 minutes before gently pressing one kiss into the center of each cookie.
- Set the Candy (Optional): For best results, refrigerate the cookies for 5 to 10 minutes to help the kisses set firmly onto the cookies.
Notes
- Be careful not to overmix the dough to avoid dense, tough cookies.
- Chilling the dough is optional but can make handling the dough easier and the cookies more uniform.
- Use light-colored baking sheets to prevent over-browning the cookie bottoms.
- Refrigerating after adding the kisses helps the chocolate retain its shape and creates a neat finish.
- These cookies keep well stored in an airtight container for up to a week.


