
“`html
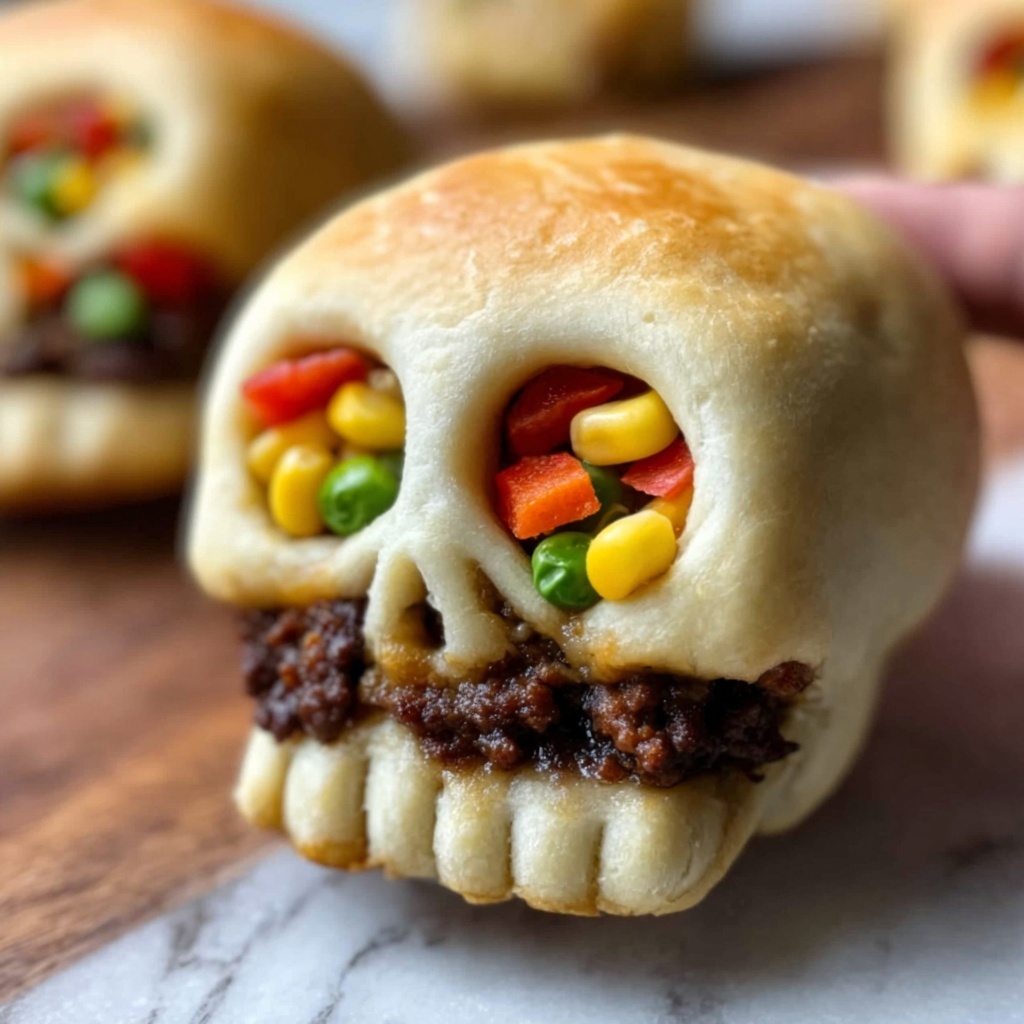
If you love the idea of a fun, flavorful twist on classic burritos, then you are going to adore this Burrito Skulls Recipe. It captures everything you want in a comforting meal—a crispy golden crust, seasoned beef, cheesy goodness, and vibrant veggies—wrapped up in an irresistibly cute skull-shaped tortilla. It’s perfect for sharing with friends, celebrating special occasions, or just treating yourself to something both delicious and visually impressive. This recipe brings together simple everyday ingredients but presents them in a way that feels extraordinary and festive.
Ingredients You’ll Need
Nothing fancy here—just everyday ingredients that work harmoniously to create the perfect balance of textures and flavors in your Burrito Skulls Recipe. Each component plays a vital role, from the tender homemade tortillas to the savory seasoned beef and fresh veggies that add pops of color and brightness.
- All-purpose flour (2 ½ cups): The base for our soft, pliable tortillas that hold everything together.
- Baking powder (2 ½ teaspoons): Gives a slight lift and tenderness to the tortilla dough.
- Kosher salt (1 teaspoon): Enhances all the flavors just right.
- Lard or shortening (½ cup): Creates a flaky, rich texture in the tortillas.
- Water (¾ cup): Brings the flour and fat together to form the dough.
- Vegetable oil (2 teaspoons): For browning the ground beef to perfection.
- Ground beef (1 pound): The hearty, savory core of the burrito filling.
- Taco seasoning (1 packet): Adds the signature bold, spicy flavor that makes your burritos sing.
- Shredded cheddar cheese (1 cup): Melted cheesy goodness that ties the filling together.
- Black beans (6 tablespoons): A creamy, protein-packed addition for more texture and nutrition.
- Corn (6 tablespoons): Sweet kernels that bring brightness and color.
- Chopped tomatoes (6 tablespoons): Fresh and juicy, rounding out the filling.
- Large egg (1): Mixed with water for a shiny, golden egg wash on top.
- Water (1 teaspoon): Blended with the egg to help brush onto the crust.
- Sour cream, guacamole, salsa: Ideal accompaniments to add creaminess and zesty flair when serving.
How to Make Burrito Skulls Recipe
Step 1: Prepare the Tortilla Dough
Start by whisking together the flour, baking powder, and salt in a bowl. Then, cut in half of the lard using a pastry cutter or your fingertips until it resembles coarse crumbs—this helps create a flaky texture later. Repeat with the remaining lard. Gradually stir in the water until the dough comes together, then knead briefly on a floured surface until you have a smooth ball. Cover the dough to let it rest for 10 to 20 minutes, allowing the gluten to relax for easy rolling.
Step 2: Cook the Beef Filling
Heat one teaspoon of vegetable oil over high heat in a skillet and brown half of the ground beef until richly caramelized. Remove it from the pan, add the remaining oil, and brown the rest of the beef similarly. Combining these small batches keeps the meat evenly cooked and flavorful. Return all the beef to the pan, sprinkle in the taco seasoning, pour in the water, and simmer until most of the liquid evaporates, leaving a thick, deliciously seasoned filling.
Step 3: Shape and Assemble the Burrito Skulls
Preheat your oven to 350°F (175°C) to get ready for baking. Divide the dough into six equal portions. Roll each into thin oval or rectangular shapes large enough to drape over each cavity of your skull-shaped pan. Press the dough gently into each skull cup so it molds perfectly. Fill each skull dough with an equal share of the taco meat, cheese, black beans, corn, and chopped tomatoes. Fold the dough over the filling, pinch seams tightly to seal everything inside, and trim any dough that hangs over the edges.
Step 4: Add the Egg Wash and Bake
Whisk the egg with a teaspoon of water to create a glossy egg wash, then brush it generously over the tops of your burrito skulls. This will give them a beautiful golden finish as they bake. Place the pan in the oven and let your Burrito Skulls Recipe bake for 24 to 26 minutes. You’ll know they’re ready when the crusts turn golden brown and look enticingly crisp. Let them cool a few minutes in the pan before transferring them to a rack—simple patience makes for the best eating experience here.
How to Serve Burrito Skulls Recipe

Garnishes
A dollop of cool sour cream, creamy guacamole, and vibrant salsa are ideal on the side. They complement the spicy, hearty filling and add layers of flavor and texture while making each bite feel fresh and indulgent. Sprinkle a little chopped cilantro or sliced jalapeños if you want to add even more punch.
Side Dishes
To round out the meal, serve Burrito Skulls Recipe with a crisp green salad or Mexican rice. A simple cilantro-lime rice and some grilled corn on the cob would pair beautifully, balancing the richness of the burritos and adding color to your plate.
Creative Ways to Present
For a party or festive gathering, set the burrito skulls on a platter surrounded by small bowls of salsa, guacamole, and sour cream. You could also arrange them with fresh lime wedges and colorful tortilla chips for a fun, interactive dining experience that’s sure to get everyone smiling.
Make Ahead and Storage
Storing Leftovers
Wrap any leftover burrito skulls tightly in plastic wrap or place them in an airtight container. Refrigerate for up to 3 days. They maintain their flavor well, so you can enjoy the tasty leftovers without worrying about soggy textures.
Freezing
If you want to keep Burrito Skulls Recipe longer, freeze them individually wrapped in foil or plastic wrap and placed in a freezer-safe container or bag. They’ll keep well for up to 2 months, allowing you to enjoy this special dish anytime you crave it.
Reheating
For best results, reheat burrito skulls in a preheated oven at 350°F (175°C) for about 15 minutes or until warmed through and the crust is crispy again. Avoid microwaving if possible, as it can soften the crust. This method brings back that freshly baked texture and flavor you fell in love with.
FAQs
Can I use flour tortillas instead of making the dough from scratch?
While pre-made flour tortillas save time, making the dough from scratch is key to shaping the burrito skulls perfectly in the pans and achieving that golden, flaky crust that sets this recipe apart. If pressed for time, very large store-bought tortillas might work, but the texture won’t be quite the same.
Is there a vegetarian alternative for the filling?
Absolutely! You can swap the ground beef with spiced plant-based crumbles or simply use extra beans, corn, and vegetables like bell peppers and zucchini, seasoned with taco spices. This will keep the flavors vibrant without sacrificing the hearty filling.
Do I need a skull-shaped pan to make this recipe?
Using a skull-shaped pan helps the burritos take on their fun, festive form, but if you don’t have one, you can shape the burritos by hand or use small oven-safe bowls to mimic the shape. The taste will still be incredible!
Can I prepare the filling ahead of time?
Yes! The beef filling can be cooked a day or two in advance and stored in the refrigerator. Just keep it covered to maintain freshness. This makes assembly even quicker when you’re ready to bake.
What’s the best way to avoid soggy burrito crusts?
The egg wash and baking the burritos in a shaped pan help create a sturdy, crisp crust that keeps sogginess at bay. Also, avoid adding extra wet ingredients inside the filling, and let the burrito skulls cool slightly after baking for the best texture.
Final Thoughts
I can’t recommend this Burrito Skulls Recipe enough if you want to impress family or friends with a delicious, playful meal. It celebrates bold flavors, fresh ingredients, and a bit of whimsy all in one bite. Give it a try—you might just find yourself making these skull-shaped burritos over and over again!
“`
Print
Burrito Skulls Recipe
- Prep Time: 20 minutes
- Cook Time: 34 minutes
- Total Time: 54 minutes
- Yield: 6 servings
- Category: Main Course
- Method: Baking
- Cuisine: Mexican
Description
These Burrito Skulls are a fun and festive twist on traditional burritos, perfect for parties or themed meals. Homemade tortillas are shaped into skull molds, filled with seasoned ground beef, cheese, black beans, corn, and tomatoes, then baked to golden perfection. Served with classic sides like sour cream, guacamole, and salsa, these burrito skulls deliver bold Tex-Mex flavors wrapped in a unique presentation.
Ingredients
Tortillas
- 2 ½ cups all-purpose flour
- 2 ½ teaspoons baking powder
- 1 teaspoon kosher salt
- ½ cup lard or shortening
- ¾ cup water
Filling
- 2 teaspoons vegetable oil
- 1 pound ground beef
- 1 packet taco seasoning
- 1 cup shredded cheddar cheese
- 6 tablespoons black beans
- 6 tablespoons corn
- 6 tablespoons chopped tomatoes
Finishing
- 1 large egg
- 1 teaspoon water
- Sour cream, for serving
- Guacamole, for serving
- Salsa, for serving
Instructions
- Make the Tortillas: In a mixing bowl, whisk together the flour, baking powder, and salt until combined.
- Incorporate Lard: Add half of the lard to the flour mixture and use a pastry cutter or your fingers to blend until the mixture resembles coarse crumbs. Repeat with remaining lard to ensure even texture.
- Add Water and Form Dough: Gradually pour in ¾ cup water while stirring until a dough starts to form. Adjust with a little extra water if necessary.
- Knead and Rest: Knead the dough on a floured surface until it forms a cohesive ball. Cover with a clean towel and let it rest for 10-20 minutes to allow gluten relaxation for easier rolling.
- Brown Ground Beef: Heat 1 teaspoon vegetable oil in a skillet over high heat. Brown half of the ground beef until fully cooked; transfer to a plate and repeat with remaining oil and beef.
- Combine and Season Meat: Return all browned meat to the skillet. Stir in taco seasoning and a small amount of water from the seasoning packet, then simmer until most liquid evaporates and meat is well coated.
- Preheat Oven: Set your oven to 350°F (175°C) so it will be ready for baking the burrito skulls.
- Shape Tortillas: Divide the rested dough into 6 equal portions. Roll each into thin oval or rectangular shapes large enough to fit over each cavity of a skull-shaped pan.
- Mold Dough: Carefully drape each piece of dough over the skull cavities, pressing gently to shape the dough to the pan’s contours.
- Fill Burrito Skulls: Add to each dough-lined cavity approximately ⅙ of the seasoned beef mixture, followed by cheddar cheese, black beans, corn, and chopped tomatoes.
- Seal and Trim: Fold dough edges over the filling, pinch seams to seal completely, and trim off any excess dough for a neat finish.
- Apply Egg Wash: In a small bowl, whisk the egg with 1 teaspoon water. Brush this wash over the top of each burrito skull to encourage golden browning during baking.
- Repeat for All Skulls: Continue the molding, filling, sealing, and washing steps for all six burrito skulls.
- Bake: Place the filled pans in the oven and bake for 24-26 minutes, or until the tops are a beautiful golden brown and cooked through.
- Cool and Serve: Allow the burrito skulls to cool slightly in the pans for a few minutes before transferring to a rack. Serve warm with sour cream, guacamole, and salsa for dipping.
Notes
- Use a pastry cutter or your fingertips to incorporate lard well for tender tortillas.
- Resting the dough is crucial for easier rolling and shaping.
- If skull-shaped pans are unavailable, small oven-safe bowls or muffin tins can be used as molds.
- Adjust seasoning and spice levels in the taco meat according to taste preference.
- These burrito skulls can be prepared ahead and baked just before serving.
- Make sure to seal the dough edges well to avoid filling leaks during baking.


