
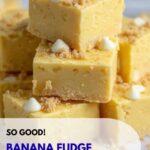
If you have a sweet tooth craving something truly unique, creamy, and bursting with that tropical twist, this Banana Fudge Recipe is your new best friend in the kitchen. Combining the rich softness of classic fudge with the bright, cheerful flavor of banana, this treat is perfect for sharing or indulging all by yourself. The dreamy texture paired with a subtle yellow hue makes every bite a joyful experience that feels like a little celebration of flavor. Whether you’re making it for a party or just because you deserve a delicious treat, this Banana Fudge Recipe will quickly become a beloved classic.
Ingredients You’ll Need
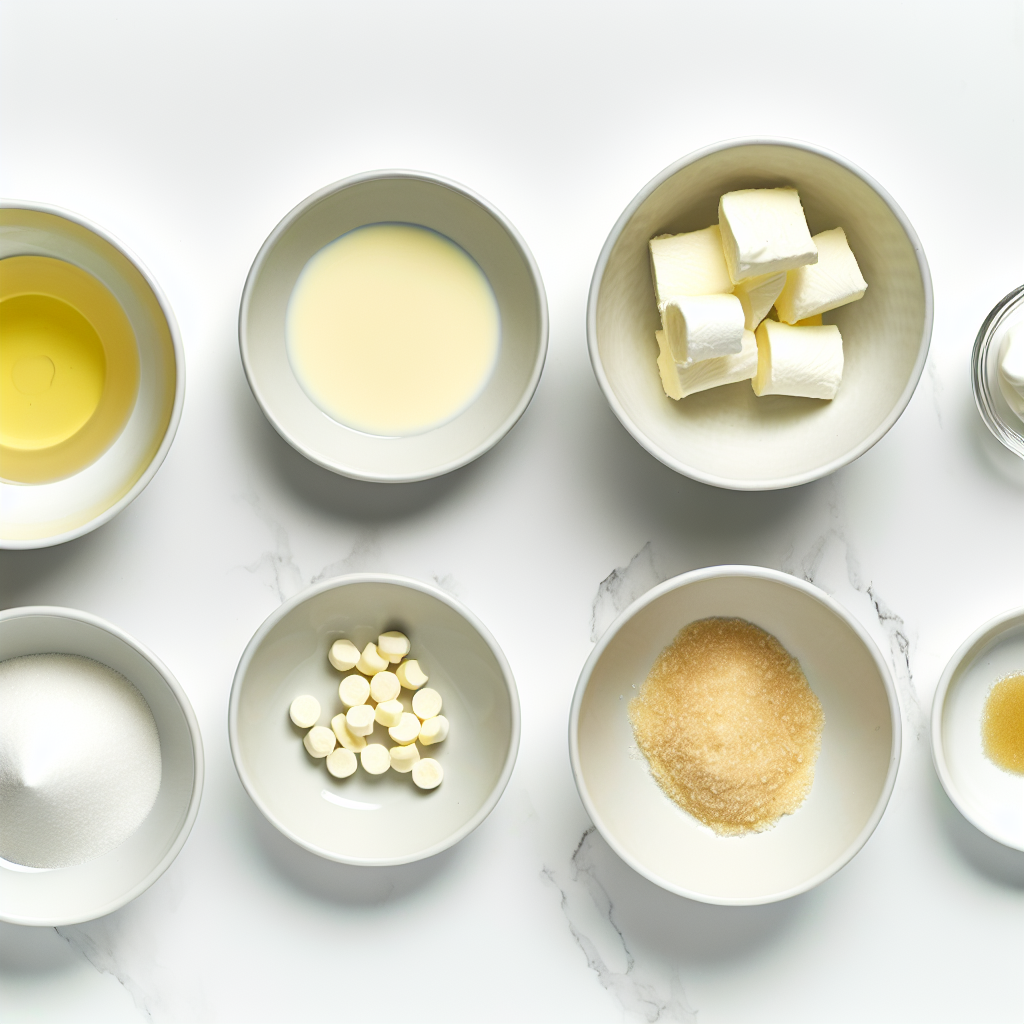
Getting the perfect balance of creamy, sweet, and banana-y goodness depends on simple yet purposeful ingredients. Each one plays a vital role, whether it’s enhancing the texture, deepening the flavor, or creating that iconic fudge consistency and color that you’ll fall in love with.
- Banana flavoring: Adds the unmistakable banana essence that transforms traditional fudge into something wonderfully distinct.
- Yellow food color gel: Gives the fudge its sunny, appealing look, making it visually irresistible.
- Salted sweet cream butter: Enriches the fudge with creamy smoothness and a subtle salty contrast to the sweetness.
- Half and half: Brings a light dairy creaminess that helps create a luscious, soft texture.
- Heavy cream: Adds richness and helps achieve that melt-in-your-mouth consistency.
- Clear vanilla flavoring: Deepens the flavor profile without overpowering the banana.
- Granulated sugar: The backbone of the sweet goodness, essential for perfect fudge crystallization.
- White baking chips: Melt smoothly to enhance the creamy base and add body to the fudge.
- Marshmallow fluff: Introduces lightness and a subtle chewiness that’s just irresistible.
- Crushed Nilla wafers (optional): Perfect for a subtle crunch and a hint of vanilla cookie flavor as a garnish.
How to Make Banana Fudge Recipe
Step 1: Prepare Your Pan
Start by lining a 9-by-9-inch baking dish with parchment paper that extends up the sides, then lightly spray it with nonstick cooking spray. This little prep ensures your fudge won’t stick and makes it a breeze to lift out once it’s set.
Step 2: Mix Banana Flavoring and Yellow Color
In a small glass bowl, combine your banana flavoring and yellow food color gel. This mix will later infuse the fudge with vibrant color and that spot-on banana taste, so set it aside until you’re ready to add it in.
Step 3: Heat the Dairy Base
In a heavy-bottomed saucepan, melt together the butter, half and half, heavy cream, and clear vanilla flavoring over medium heat. Stir continuously until the butter is fully melted; this builds the creamy base essential for smooth fudge.
Step 4: Add Sugar and Simmer
Now stir in the granulated sugar and bring your mixture to a gentle simmer, about 6 to 7 minutes, then let it simmer for an additional 3 minutes. This step helps the sugar dissolve perfectly and starts the fudge’s thickening process.
Step 5: Melt the White Baking Chips
Remove from heat and add the white baking chips, covering the saucepan. Let it sit for 3 to 4 minutes to allow the chips to melt thoroughly, then stir until the mixture is smooth and velvety.
Step 6: Incorporate Marshmallow Fluff
Next, blend in the marshmallow fluff until fully combined. This addition gives the fudge a wonderful lightness and a subtle, chewy texture that makes every bite extra special.
Step 7: Add Banana and Color Mixture
Stir your banana and yellow food gel mixture into the fudge, making sure the color and flavor are evenly distributed for a bright, consistent look and perfectly banana-infused flavor.
Step 8: Spread and Garnish
Pour the fudge mixture evenly into your prepared pan and sprinkle the crushed Nilla wafers on top if using. These will add a delightful crunch and a hint of extra vanilla charm to your finished fudge. Cover with aluminum foil to keep it fresh while setting.
Step 9: Let It Set
Allow the fudge to rest at room temperature for 30 minutes, then place it in the refrigerator for at least 4 hours until it’s completely firm and ready to enjoy.
Step 10: Cut and Serve
Use the parchment paper to lift the fudge out of the pan, then slice it into 25 perfectly sized pieces. Each piece should have a velvety texture and a gorgeous pale yellow color that invites you to savor every bite.
How to Serve Banana Fudge Recipe
Garnishes
While the crushed Nilla wafers add a lovely texture contrast, you can also consider garnishing with finely chopped bananas, toasted coconut flakes, or a drizzle of white chocolate to boost the banana vibe and add visual appeal.
Side Dishes
This Banana Fudge Recipe shines on its own but pairs beautifully with fresh berries, a cup of strong coffee, or even a scoop of vanilla ice cream to complement its creamy richness and mild sweetness.
Creative Ways to Present
Try presenting your banana fudge in mini cupcake liners for an easy grab-and-go treat or stack several pieces between parchment to create an elegant layered dessert box. You could even use a cookie cutter to create fun shapes for parties and special occasions.
Make Ahead and Storage
Storing Leftovers
Store any leftover banana fudge in an airtight container at room temperature for up to 3 days to maintain its smooth texture. For longer storage, refrigeration helps preserve freshness and keeps the fudge firm.
Freezing
The Banana Fudge Recipe freezes wonderfully! Wrap pieces individually in plastic wrap and place them in a freezer bag or airtight container. They’ll keep well for up to 3 months and thaw quickly on the counter.
Reheating
If you prefer your fudge a little softer, let it sit at room temperature for about 15 minutes before serving. Avoid microwaving to prevent melting or a change in texture—this fudge is best enjoyed as is or gently softened naturally.
FAQs
Can I use real bananas instead of banana flavoring in this Banana Fudge Recipe?
While fresh bananas are delicious, they contain moisture that could alter the fudge’s texture. Banana flavoring is ideal here because it delivers a consistent, concentrated taste without compromising the fudge’s consistency.
Is it necessary to use white baking chips?
Yes, white baking chips contribute smoothness and sweetness that balance the banana flavor perfectly. Substituting with other types of chocolate chips might change the color and texture significantly.
What if I don’t have yellow food color gel? Can I skip it?
You can skip the yellow color, but it really enhances the visual appeal by giving the fudge that sunshine-yellow look, which matches the banana flavor beautifully. Natural coloring alternatives like turmeric are not recommended, as they may influence the taste.
How long does the Banana Fudge Recipe keep once made?
Stored in an airtight container in the refrigerator, the fudge stays fresh for up to one week. Beyond that, the texture and flavor might start to degrade, so it’s best enjoyed sooner rather than later.
Can I make this Banana Fudge Recipe vegan or dairy-free?
This recipe relies heavily on dairy for its creamy texture and flavor. While you could experiment with dairy-free alternatives like coconut cream and vegan butter, the final texture and taste will differ from the original lusciousness.
Final Thoughts
This Banana Fudge Recipe is such a joyful twist on the classic treat that it’s bound to bring smiles wherever it’s served. Its creamy texture, gorgeous color, and delightful banana flavor will quickly make it a go-to for cozy nights, celebrations, or anytime you need a little sweet escape. Give it a try—you might just find yourself hooked like I am!
Print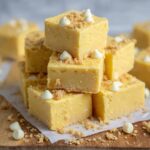
Banana Fudge Recipe
- Prep Time: 15 minutes
- Cook Time: 15 minutes
- Total Time: 4 hours 30 minutes
- Yield: 25 servings
- Category: Dessert
- Method: Stovetop
- Cuisine: American
Description
This Banana Fudge recipe offers a creamy, sweet treat infused with banana flavor and a hint of vanilla. Made with a blend of butter, cream, sugar, white baking chips, and marshmallow fluff, it’s a luscious dessert that sets into a smooth, rich fudge perfect for sharing or gifting. The optional crushed Nilla wafers topping adds a delightful crunch and texture contrast.
Ingredients
Flavor and Coloring
- 2 teaspoons banana flavoring
- ½ teaspoon yellow food color gel
Dairy and Creams
- ¾ cup salted sweet cream butter
- ½ cup half and half
- ⅓ cup heavy cream
- 1 teaspoon clear vanilla flavoring
Sugars and Sweeteners
- 3 cups granulated sugar, plus 2 tablespoons
- 1¾ cups white baking chips
- 7 ounces marshmallow fluff
Garnish
- 2 tablespoons crushed Nilla wafers, optional garnish
Instructions
- Prepare Baking Dish: Line a 9×9-inch baking dish with parchment paper, making sure the paper extends up all four sides. Lightly spray the parchment with nonstick cooking spray to prevent sticking, and set the dish aside for later use.
- Mix Flavoring and Coloring: In a small glass bowl, combine the banana flavoring and yellow food color gel. Set this mixture aside; it will be incorporated later to add flavor and color to the fudge.
- Melt Butter and Creams: In a heavy-bottomed saucepan over medium heat, add the salted butter, half and half, heavy cream, and clear vanilla flavoring. Stir continuously to ensure the butter melts fully and the mixture combines uniformly.
- Add Sugar and Simmer: Gradually add 3 cups of granulated sugar to the saucepan, stirring constantly. Allow the mixture to come to a simmer, which should take about 6-7 minutes, then continue simmering gently for another 3 minutes before removing the pan from the heat to prevent burning.
- Melt White Baking Chips: Add the white baking chips to the hot mixture, cover the saucepan with a lid, and let it rest for 3-4 minutes. After resting, stir thoroughly until all the chips have melted completely, creating a smooth fudge base.
- Incorporate Marshmallow Fluff: Add the marshmallow fluff to the mixture and stir until fully combined. This gives the fudge a light, fluffy texture while enhancing its sweetness.
- Add Banana Flavor and Color: Pour the banana flavoring and yellow food color gel mixture into the fudge and stir well until the color and flavor are evenly distributed throughout the mixture.
- Pour and Garnish: Spread the fudge evenly into the prepared baking dish. Sprinkle the optional crushed Nilla wafers on top for added crunch and texture. Cover the dish tightly with aluminum foil to protect during setting.
- Set the Fudge: Let the fudge sit at room temperature for about 30 minutes to begin firming up. Then transfer it to the refrigerator and chill for at least 4 hours to set fully.
- Cut and Serve: Once the fudge has completely set, lift it out of the baking dish using the parchment paper edges. Cut into 25 equal pieces and serve or store in an airtight container.
Notes
- Using a heavy-bottomed saucepan ensures even heat distribution and prevents burning of the sugar mixture.
- Make sure to stir constantly when heating the butter and cream mixture to avoid scorching.
- The resting time after adding the white baking chips is crucial for melting without direct heat, preventing the chips from seizing or burning.
- For a more pronounced banana flavor, ensure your banana flavoring is high quality and natural.
- Crushed Nilla wafers are optional but add a pleasant texture contrast to the creamy fudge.
- Allow the fudge to set fully in the refrigerator for best slicing results without crumbling.


