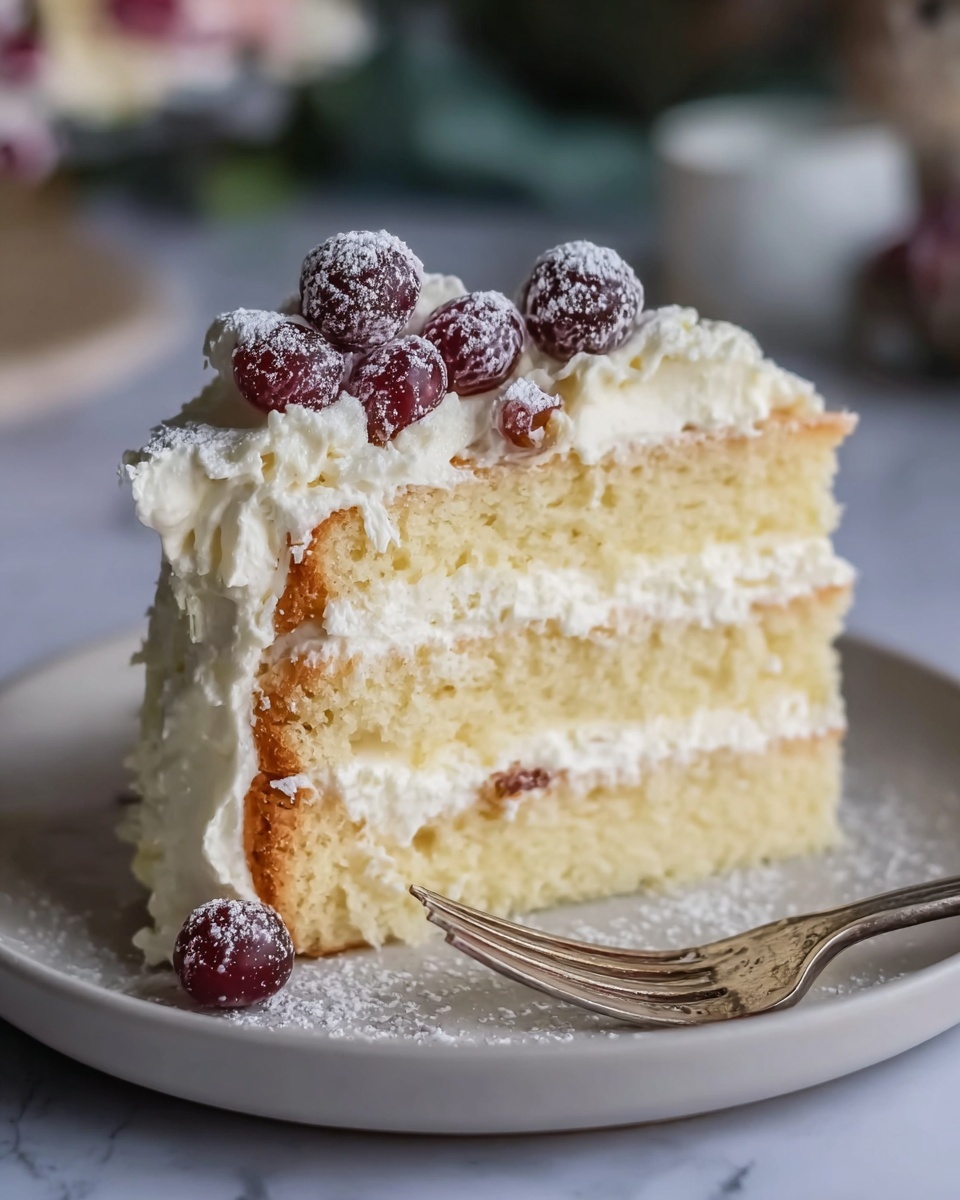
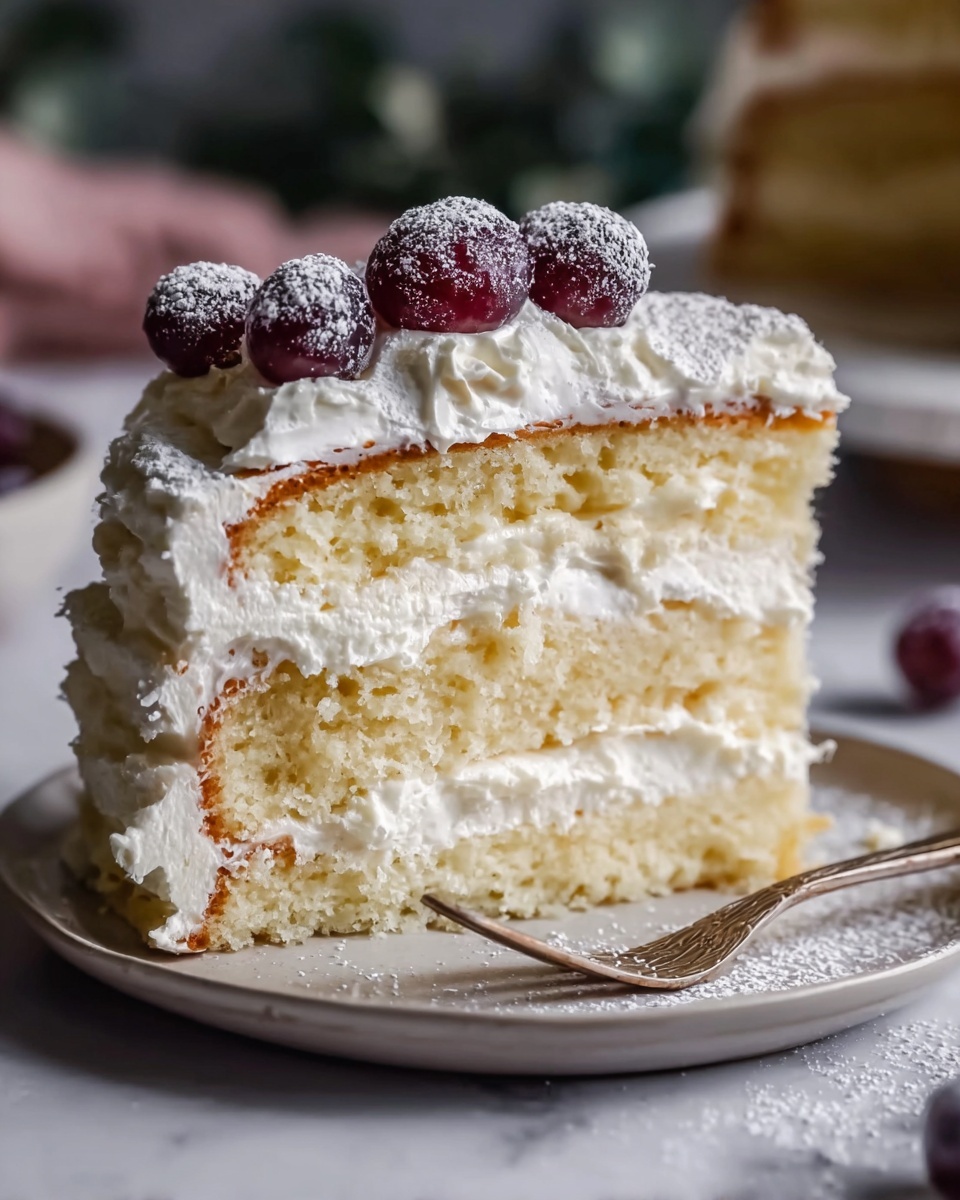
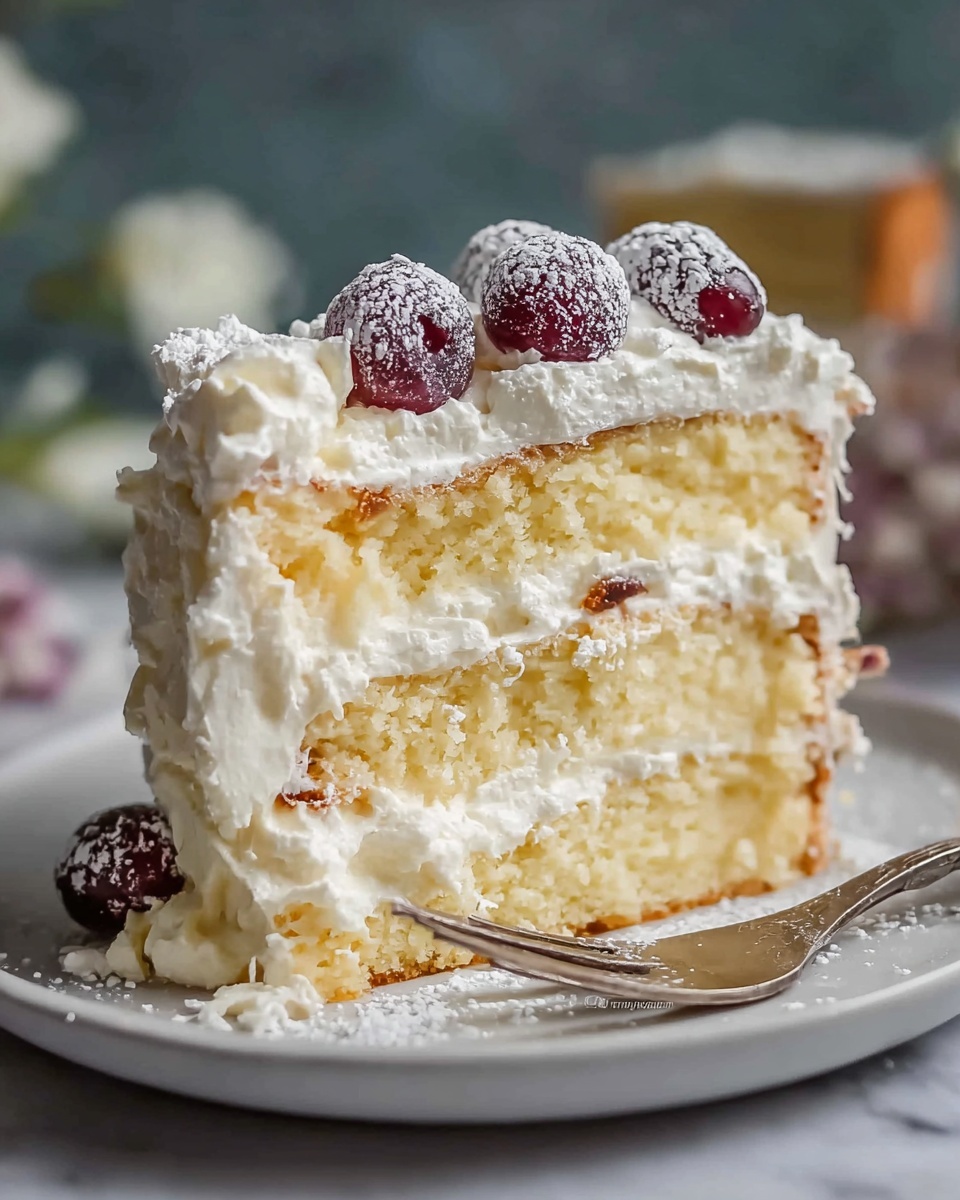
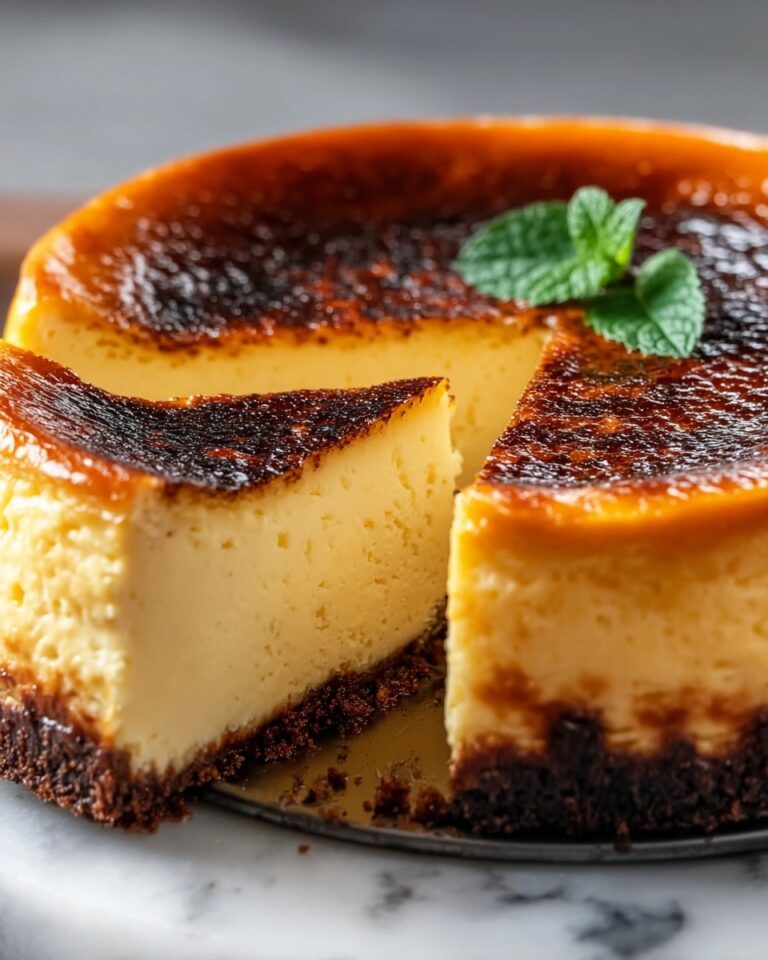
If you have a sweet tooth and an appreciation for layered, nutty desserts, you are going to fall head over heels for the Kiev Cake with Hazelnut Meringue, Cherry and Russian Buttercream Recipe. This is not just any cake; it is a symphony of textures and flavors. From the crisp yet tender hazelnut meringue, the burst of tart cherries, to the rich, silky Russian buttercream, every bite takes you on a delightful journey. It’s a show-stopping dessert that elegantly blends crunch, creaminess, and a touch of fruitiness, perfect for celebrations or a special treat on any day.
Ingredients You’ll Need
Gathering the right ingredients is the first joyful step toward making this unforgettable cake. Each component plays a vital role, from the sponge cake forming the body, to the hazelnuts adding a toasty crunch, and the cherries infusing a refreshing tartness.
- Yellow Sponge Cake: Light and airy, providing the perfect base that soaks up the syrup beautifully.
- Russian Buttercream: Rich and velvety, this buttercream adds a luscious, creamy texture that holds the cake together.
- Meringue Cookies: Crisp and sweet, these bring a delicate crunch and nutty flavor when combined with hazelnuts.
- Roasted Hazelnuts (1 cup, chopped): Their roasted aroma deepens the cake’s flavor and adds irresistible texture.
- Tart Cherries (1/2 cup): Frozen or canned drained cherries give tartness to balance the sweetness.
- Sugar (1/4 cup): Essential for creating the syrup that moistens the sponge.
- Water (1/4 cup): Combined with sugar to make the soaking syrup, enriching moisture and flavor.
- Vanilla Extract (1 tablespoon): Adds a warm, fragrant note that ties the flavors together.
- Hot Heavy Cream (3 tablespoons): Used to make the smooth chocolate ganache that crowns the cake.
- Chocolate Chips or Chopped Chocolate (3 tablespoons): Provides the final luscious layer of chocolate ganache.
How to Make Kiev Cake with Hazelnut Meringue, Cherry and Russian Buttercream Recipe
Step 1: Make the Meringue
This step sets the foundation for the cake’s signature crunch. Whip the meringue until it’s glossy and stiff, then pipe it onto a parchment-lined baking sheet. Half of the meringue will receive a generous sprinkle of chopped roasted hazelnuts, which toast even more during the low and slow baking process. Baking at a low temperature for two hours ensures the meringue dries properly, crisping on the outside but still tender inside – just how it should be.
Step 2: Prepare Cake Base
Once your yellow sponge cake has cooled completely, gently slice it into two even layers. Place the top half of the cake upside-down on your serving board with a small dab of buttercream to help it stick. This layer will eventually house the meringue and buttercream filling, making it crucial to have a sturdy yet soft base.
Step 3: Layer with Syrup and Buttercream
A simple syrup made from sugar, water, and vanilla will be your cake’s secret weapon for moistening the sponge layers without making them soggy. Brush half the syrup generously over the sponge, then spread about two-thirds of your Russian buttercream thickly over it. Dip the meringue pieces into buttercream and carefully attach them to the sponge, filling any gaps with crumbled meringue. This step is where those gorgeous textures start to come together.
Step 4: Add Cherries and Top Layer
Scatter the tart cherries and some chopped hazelnuts on top of the buttercream layer, adding freshness and crunch precisely where it’s needed. Soak the second sponge layer with the remaining syrup, then spread the remaining buttercream before gently placing this layer on top of the meringue-filled base. Press gently to unify the layers, then chill the entire assembly for one hour to let the flavors meld.
Step 5: Frost the Cake
Now comes the luscious part: removing any cake ring if used, then smothering the whole cake in the remaining 1.5 cups of Russian buttercream. This creates a silky, indulgent outer layer that will hold everything in place and offer a rich contrast to the crunchy meringue inside.
Step 6: Make Ganache
Pour the hot heavy cream over the chocolate chips and let it sit for two minutes before stirring gently until smooth. This makes a glossy ganache that is the perfect consistency to drizzle and drip elegantly over your cake’s frosted surface.
Step 7: Ganache and Decorate
Pour the ganache over the cake letting it naturally cascade down the sides. Finish by decorating with the remaining meringue pieces and extra hazelnuts, giving a beautiful, inviting invite to slice in.
Step 8: Refrigerate
Chill the cake for at least four hours before serving to allow the layers to set perfectly and the flavors to intensify. This patience will be rewarded with a cake bursting with flavor and a stunning combination of textures.
How to Serve Kiev Cake with Hazelnut Meringue, Cherry and Russian Buttercream Recipe
Garnishes
Enhance the Kiev Cake with a sprinkle of extra chopped hazelnuts and a few fresh cherries on top for a pop of color and a hint of fresh tartness. A light dusting of powdered sugar can add an elegant, snowy finish that looks delightful on any dessert table.
Side Dishes
This cake shines best as the star of dessert, but a simple dollop of lightly whipped cream or a scoop of vanilla bean ice cream on the side takes it to a new level of indulgence. If you want something more refreshing, serve it with a small fruit salad featuring berries or citrus segments to cut through the richness.
Creative Ways to Present
Try plating individual slices with a drizzle of cherry syrup or a sprig of fresh mint for a refined presentation. For parties, serve mini versions or even cake pops using crumbled cake, cream, and meringue mixed together and rolled into bite-sized treats. The Kiev Cake with Hazelnut Meringue, Cherry and Russian Buttercream Recipe is versatile in its enjoyment and presentation.
Make Ahead and Storage
Storing Leftovers
Because this cake contains delicate meringue and buttercream, store leftovers in an airtight container in the refrigerator. This keeps the cake fresh and the meringue crunchy for up to three days. Avoid leaving it out at room temperature to maintain its texture and flavor.
Freezing
Freezing is not ideal as it can affect the texture of the meringue and cherry components, causing sogginess upon thawing. If freezing is necessary, wrap the cake tightly and freeze only for short periods, then thaw gently in the refrigerator overnight.
Reheating
Since this cake is best enjoyed chilled, reheating is not recommended. Serve it straight from the fridge for the perfect balance of creamy buttercream and crisp meringue.
FAQs
Can I use fresh cherries instead of frozen or canned?
Absolutely! Fresh cherries can add extra juiciness and flavor, just be sure to pit them and drain any excess juice to prevent the cake from becoming soggy.
What type of hazelnuts works best for this cake?
Roasting the hazelnuts before chopping really brings out their flavor, so fresh raw hazelnuts roasted in the oven at 350°F for about 10 minutes is your best bet.
Can I make the Russian buttercream in advance?
Yes, Russian buttercream can be made ahead and stored in the refrigerator for a few days. Just bring it to room temperature and re-whip before using to restore its creamy texture.
Is it possible to make this cake gluten-free?
It’s doable if you substitute the yellow sponge cake with a gluten-free version. Make sure all other ingredients like meringues and buttercream are free from any gluten-containing additives.
How long does it take to prepare this cake in total?
Plan for about 4 hours including baking, cooling, assembling, and chilling. While it takes time, each step is worth it for the rich complexity of the final result.
Final Thoughts
Now you have the full inside scoop on making the stunning Kiev Cake with Hazelnut Meringue, Cherry and Russian Buttercream Recipe. It’s one of those dishes that’s as rewarding to make as it is to eat, filled with layers of flavor and texture that never fail to impress. I truly encourage you to try this show-stopping dessert for your next gathering or special moment – it’s bound to become a favorite for years to come.
Print
Kiev Cake with Hazelnut Meringue, Cherry and Russian Buttercream Recipe
- Prep Time: 30 minutes
- Cook Time: 2 hours 30 minutes
- Total Time: 4 hours
- Yield: 9 servings
- Category: Dessert
- Method: Baking
- Cuisine: Russian
Description
Kiev Cake is a classic Russian dessert featuring layers of light yellow sponge cake, crunchy hazelnut meringue, tart cherries, and rich Russian buttercream. This elegant cake is finished with a glossy chocolate ganache and garnished with meringues and hazelnuts, combining contrasting textures and flavors for a delightful treat. Perfect for special occasions or an indulgent afternoon dessert, it requires several hours to prepare and chill.
Ingredients
Base Components
- 1 recipe Yellow Sponge Cake
- 1.5 recipe Russian Buttercream
- 1 recipe Meringue Cookies
Additional Ingredients
- 1 cup roasted hazelnuts, chopped
- 1/2 cup tart cherries, frozen or canned, juice drained
- 1/4 cup sugar
- 1/4 cup water
- 1 tablespoon vanilla extract
- 3 tbsp hot heavy cream
- 3 tbsp chocolate chips or chopped chocolate
Instructions
- Make the Meringue: Whip the meringue mixture until stiff peaks form, then pipe onto parchment-lined baking sheets. Sprinkle chopped hazelnuts on half of the piped meringues.
- Bake Meringue: Bake the meringue at 225°F (107°C) for 2 hours, then let it cool inside the oven for 30 minutes before transferring to room temperature to cool completely.
- Prepare Cake Base: Take the cooled yellow sponge cake and carefully slice it horizontally into two equal layers.
- Assemble First Layer: Place the top half of the sponge cake, cut side facing up, onto your serving board. Apply a small dab of buttercream to secure it in place.
- Layer with Syrup and Buttercream: Soak the sponge layer evenly with half of the prepared syrup made from sugar, water, and vanilla. Spread approximately two-thirds of the buttercream over this layer.
- Attach Meringues: Dip the meringue pieces in buttercream and attach them onto the frosted sponge layer, filling any gaps with crumbled meringue for texture.
- Add Cherries and Top Layer: Sprinkle the cherries and some chopped hazelnuts over the meringue layer. Soak the bottom half of the sponge cake with remaining syrup and spread the remaining buttercream on it, then place this layer gently over the meringue and cherry layer, pressing lightly to adhere. Chill for 1 hour.
- Frost the Cake: If using a cake ring, remove it carefully. Use the reserved 1.5 cups of buttercream to evenly frost the outside of the cake.
- Make Ganache: Pour the hot heavy cream over the chocolate chips or chopped chocolate. Let sit for 2 minutes, then stir gently until smooth. Cool the ganache until pourable but not hot.
- Ganache and Decorate: Pour the ganache evenly over the frosted cake, allowing it to drip down the sides. Decorate the top with remaining meringues and additional chopped hazelnuts if desired.
- Chill Before Serving: Refrigerate the assembled cake for at least 4 hours to allow flavors to meld and ganache to set before slicing and serving.
Notes
- The meringue must be baked slowly at low temperature to properly dry out and achieve a crisp texture.
- Cherries should be drained thoroughly to prevent sogginess in the cake layers.
- Use room temperature ingredients when making buttercream for easier spreading.
- Chilling the cake properly enhances flavor integration and firmness for cleaner slicing.
- Make sure the ganache is cooled to a pourable but not hot consistency to avoid melting the buttercream underneath.


