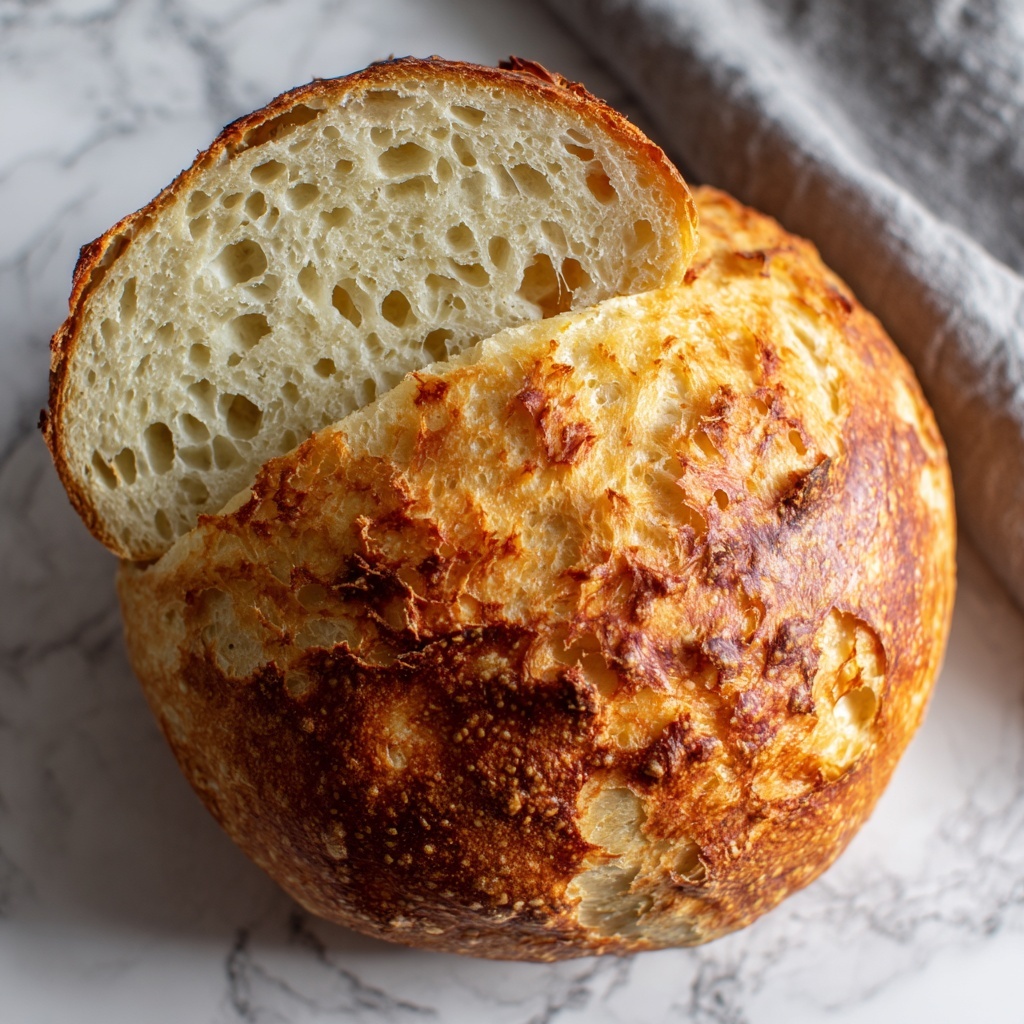
If you’ve ever dreamed of baking your own bread that boasts a perfectly crisp crust and a wonderfully chewy, airy crumb, this Homemade Rustic Sourdough Bread Recipe is the answer. It’s not only deeply satisfying but also a journey in patience and love, rewarding you with a loaf that carries the complex flavors and textures only a naturally fermented sourdough can offer. Whether you’re a novice baker or a seasoned pro, this recipe will guide you step-by-step to create bread that feels like it came straight from a cozy countryside bakery.

Ingredients You’ll Need
Here’s the magic lineup of simple, natural ingredients that come together to create this extraordinary loaf. Each one plays a vital role, from the lively starter that cultivates flavor and rise, to the salt that brings balance and enhances the bread’s aroma and texture.
- Active sourdough starter (50 to 100 grams): This bubbly culture is the heart of your bread, responsible for fermentation and that signature tangy taste.
- Warm water (350 to 375 grams): Hydrates the flour and helps activate the starter; slightly adjusting amounts depending on humidity can improve dough consistency.
- Bread flour (500 grams): Provides the gluten structure needed for a chewy crumb, with King Arthur Bread Flour being a reliable favorite.
- Fine sea salt (10 to 12 grams): Enhances flavor, regulates fermentation, and strengthens gluten.
How to Make Homemade Rustic Sourdough Bread Recipe
Step 1: Feed Your Starter
Before diving into the dough, ensure your sourdough starter is lively and bubbly. Feeding it the night before and again the morning you plan to bake creates the perfect growth environment, making sure it’s doubled in size and ready to give your bread that irresistible flavor and rise.
Step 2: Make The Dough
Mix your active starter with warm water and salt, then blend in the bread flour until a wet, sticky dough forms. It’s rich and tacky at this stage, signaling the beginning of transformation from simple ingredients into something magical. Cover and rest for 30 minutes to allow the flour to hydrate fully.
Step 3: Perform Stretch and Folds
This technique is key for building gluten strength without heavy kneading. Using a wet hand, gently pull and fold the dough’s edges into the center, rotating around the bowl 4 to 5 times. Repeat this process every 30 minutes for up to two hours to develop structure and elasticity, essential for that perfect crumb.
Step 4: Bulk Fermentation
Let your dough rest, covered and undisturbed, for 6 to 9 hours depending on the temperature. During this phase, the dough rises and flavors deepen as the wild yeast and bacteria work their magic. You’ll know it’s ready when it has grown noticeably, jiggles when moved, and shows bubbles beneath the surface.
Step 5: Pre-shape the Dough
Flip the dough onto a floured surface and gently fold it into a round. Creating tension by folding edges into the center prepares the dough for its final shape and promotes oven spring—a must for that lift and open crumb.
Step 6: Bench Rest
Flip the dough smooth side down and let it rest uncovered for 30 minutes. This relaxation period allows the gluten to ease, making the final shaping step easier and more effective.
Step 7: Final Shaping
Dust your proofing basket or bowl with flour and carefully shape the dough into a tight ball, folding edges inward to create surface tension. Place dough seam-side up in the basket, cover, and get ready for the final fermentation.
Step 8: Cold Fermentation (Second Rise)
Refrigerate your dough overnight or for 18 to 24 hours to develop complex flavors and improve crust quality. If pressed for time, a shorter rest at room temperature will still yield good results, but this cold proof will truly elevate your loaf.
Step 9: Baking Your Bread
Preheat your oven to 450° F and prepare your Dutch oven with parchment paper. Gently flip your dough onto the parchment, score the top to control how it expands, and carefully lift it into the Dutch oven. The sealed environment traps steam, allowing the crust to crisp beautifully.
Step 10: Bake and Cool
Bake covered for 30 minutes, then remove the lid, lower heat to 400° F, and bake for another 20 to 30 minutes uncovered to achieve that rich, golden crust. Once baked, cool your bread on a wire rack for at least an hour to let the interior finish setting before slicing.
How to Serve Homemade Rustic Sourdough Bread Recipe

Garnishes
A touch of butter melted on a warm slice or a drizzle of good olive oil sprinkled with flaky sea salt can highlight the bread’s rustic charm. Fresh herbs, like rosemary or thyme, also complement the sourdough’s depth perfectly for a fancy snack or appetizer.
Side Dishes
This sourdough pairs wonderfully with just about anything! Think creamy soups, rich stews, or a colorful salad. Its sturdy yet tender crumb holds up beautifully to dips and spreads, making it ideal for a cozy lunch or dinner accompaniment.
Creative Ways to Present
Why not turn your loaf into a show-stopping centerpiece? Slice it thick for bruschetta topped with vibrant tomatoes and basil, or hollow it out and fill with a warm dip for parties. Toasted cubes make fantastic croutons, adding crunch and flavor to your greens.
Make Ahead and Storage
Storing Leftovers
Wrap your leftover loaf in a clean kitchen towel and store it in a bread box or paper bag to keep the crust crisp while allowing the crumb to breathe. Avoid plastic bags as they trap moisture and soften the crust prematurely.
Freezing
If you want to keep your homemade rustic sourdough bread recipe fresh for longer, slice it before freezing. Wrap slices tightly in plastic wrap and place in a freezer-safe bag so you can pull out exactly how much you need without thawing the whole loaf.
Reheating
To bring frozen or day-old bread back to life, sprinkle the crust with water and bake in a preheated oven at 350° F for 5 to 10 minutes. This revives the crunch and warms the crumb, so every bite tastes as fresh as the day it was baked.
FAQs
Can I use all-purpose flour instead of bread flour?
Absolutely! All-purpose flour can be used in this Homemade Rustic Sourdough Bread Recipe, though bread flour typically gives better gluten development for a chewier texture and better rise. Adjust water slightly if the dough feels too dry.
How do I know when my starter is ready to use?
Your starter is ready when it’s doubled in size, bubbly, and passes the float test—meaning a spoonful floats in water. This indicates it has enough yeast activity to properly ferment your dough.
Can I speed up the fermentation times?
While it’s tempting, rushing fermentation can sacrifice flavor and texture. For the best results, allow the dough time to develop flavors slowly at room temperature or in the fridge for the second rise.
Do I really need a Dutch oven to bake this bread?
You don’t absolutely need a Dutch oven, but it helps create a steamy environment that crisps the crust. Alternatively, baking on a hot stone or adding a pan of water to the oven can help replicate this effect.
How should I store the sourdough starter when not baking?
If you’re not baking regularly, storing your starter in the fridge and feeding it once a week keeps it alive and healthy. Bring it to room temperature and feed it a day or two before baking.
Final Thoughts
Baking this Homemade Rustic Sourdough Bread Recipe is like welcoming a bit of warm tradition into your kitchen. The steps may ask for patience, but every moment is worth it when you slice into that golden crust and breathe in its tantalizing aroma. I can’t wait for you to try this recipe and make your own homemade loaf that’s perfect for everything from breakfast to dinner or just a comforting snack anytime.
Print
Homemade Rustic Sourdough Bread Recipe
- Prep Time: 1 hour 30 minutes (including starter feeding, mixing, and folding stretches)
- Cook Time: 50 to 60 minutes
- Total Time: 29 hours (including bulk and cold fermentation times)
- Yield: 1 large loaf (slices about 28 pieces)
- Category: Bread
- Method: Baking
- Cuisine: American
- Diet: Vegetarian
Description
This classic sourdough bread recipe guides you through the process of making a flavorful, crusty loaf with a light and airy crumb. Using a bubbly active starter and a series of stretches and folds, followed by a long fermentation period, this bread delivers satisfying texture and tang. Baking in a Dutch oven creates a perfect crust while retaining moisture for a soft interior. Ideal for bread lovers seeking a hands-on, traditional baking experience.
Ingredients
Starter and Dough
- 50 to 100 grams ripe bubbly active sourdough starter (¼ to ½ cup; 100 grams recommended)
- 350 to 375 grams warm water (375 grams recommended; less if humid)
- 500 grams bread flour (about 4 cups plus 2 tbsp; organic King Arthur Bread Flour preferred)
- 10 to 12 grams fine sea salt (pink Himalayan sea salt recommended)
Instructions
- Feed Your Starter: The day you plan to make your dough, feed your sourdough starter. If refrigerated, take it out the night before and feed it. Feed it again a few hours before making dough. It is ready when doubled in size and starting to fall back.
- Make The Dough: In a large mixing bowl, combine the active starter with warm water and salt, stirring with a spoon. Add bread flour and mix until a wet, sticky dough forms and ingredients are well combined. Cover with a damp towel and rest for 30 minutes at room temperature.
- Stretches and Folds: With wet hands, gently pull and fold the dough’s edges towards the center around the bowl, rotating as you go, 4 to 5 times until it forms a ball. Rest covered for 30 minutes. Repeat this folding process every 30 minutes for 3 more times (total 4 folds over 2 hours). If short on time, doing 2 folds is acceptable.
- Bulk Fermentation: Cover dough with a damp towel and a lid or plate to prevent drying. Let rise 6 to 7 hours at room temperature or 8 to 9 hours if colder. Dough is ready when increased 50–70% in volume, jiggles when shaken, and has bubbles visible.
- Pre-shape: Turn dough onto a lightly floured surface. Shape gently into a round by folding edges into the center and rotating fully. Use a bench scraper if available to create dough tension by tucking edges underneath.
- Bench Rest: Flip dough so smooth side is up and let rest 30 minutes. Pull edges gently towards you to tighten dough surface, rotating to form a tight, smooth ball.
- Shaping: Prepare a proofing basket by heavily dusting with flour or line a medium bowl with a floured clean towel. Alternatively, spray bowl with cooking spray then flour well. Fold dough edges around in a circle until tight, place smooth side up into basket or bowl, and cover with plastic wrap or shower cap.
- Cold Fermentation: Refrigerate dough overnight or up to 24 hours for best flavor and crumb. If baking same day, let rest 1 to 2 hours at room temperature until puffy.
- Preheat Oven: Preheat oven to 450°F (232°C). Cut parchment paper to fit your Dutch oven.
- Turn Out Dough: Gently invert dough from basket onto parchment paper placed on a plate, then flip the plate over basket to transfer dough smoothly.
- Score Dough: Using a sharp blade or serrated knife, score the top of dough, commonly a simple ‘X’, to allow expansion in the oven.
- Bake: Carefully transfer dough with parchment paper into Dutch oven, cover with lid. Bake at 450°F for 30 minutes. Remove lid, reduce temperature to 400°F (204°C), and bake uncovered for an additional 20 to 30 minutes until golden brown, hollow sound when tapped, or internal temperature 205–210°F.
- Cool: Remove bread from Dutch oven and transfer to wire rack. Let cool completely for at least 1 hour before slicing and serving to ensure proper crumb texture.
Notes
- Feeding and maintaining an active starter is essential for proper fermentation and rise.
- The series of stretches and folds develops gluten strength without kneading.
- Cold fermentation enhances flavor depth and crumb structure but can be substituted with a room temperature proof if necessary.
- Use a Dutch oven or heavy, lidded oven-safe pot for best crust development.
- Letting the bread cool completely prior to slicing prevents gummy texture inside.
- Adjust water slightly depending on humidity to maintain the right dough consistency.


