
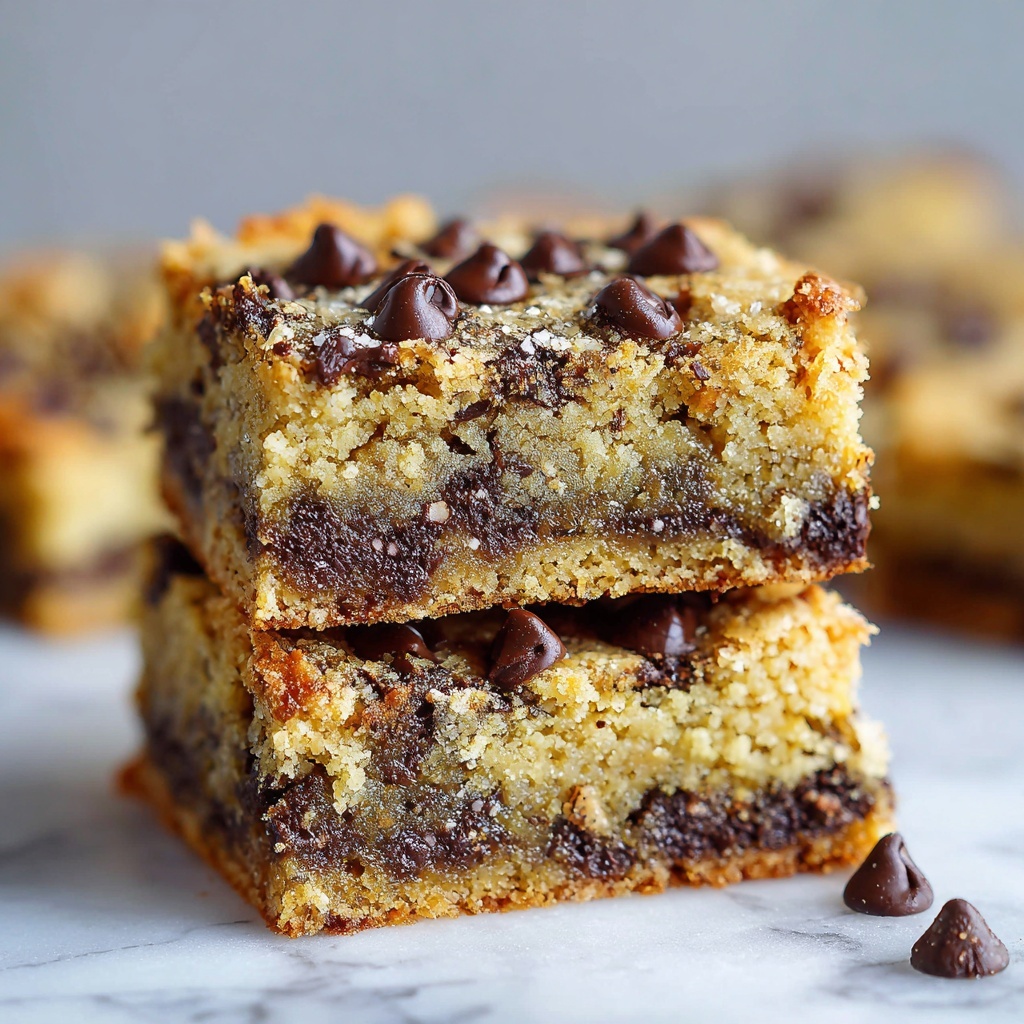
If there is one treat that perfectly combines rich peanut butter and melty chocolate, it has to be this Easy Peanut Butter Chocolate Chip Bars Recipe. These bars are an absolute dream—soft, chewy, packed with irresistible nutty flavor, and dotted with bursts of semi-sweet chocolate that create a perfect balance of sweetness. Whether you’re craving a quick dessert or an indulgent snack, these bars come together in just 30 minutes and deliver bite after bite of comfort and joy. Trust me, once you try this recipe, it will quickly become one of your favorite go-to sweets to whip up and share.
Ingredients You’ll Need
The magic of these peanut butter chocolate chip bars lies in their simple yet perfectly chosen ingredients. Each item plays a crucial role in getting that ideal texture and flavor, from creamy peanut butter lending richness to brown sugar providing just the right caramel undertone.
- 1/2 cup (115g) unsalted butter, melted: Melting the butter ensures a moist and tender bar texture.
- 1 cup (240g) creamy peanut butter: This is the star ingredient that infuses every bite with creamy nuttiness.
- 1 cup (200g) packed brown sugar: Adds natural sweetness and a subtle molasses flavor that complements peanut butter perfectly.
- 2 large eggs: These bind everything together while adding to the soft chewiness.
- 1 teaspoon vanilla extract: Enhances the overall flavors and adds a warm aroma.
- 1 1/2 cups (190g) all-purpose flour: Provides structure without making bars dense or heavy.
- 1 teaspoon baking soda: Helps the bars rise slightly and keeps them tender.
- 1/4 teaspoon salt: Balances the sweetness and enhances the peanut butter flavor.
- 1 1/2 cups (250g) semi-sweet chocolate chips, divided: Stirring most into the batter and saving some for topping ensures melty pockets and a gorgeous finish.
How to Make Easy Peanut Butter Chocolate Chip Bars Recipe
Step 1: Preheat and Prepare the Pan
Start off by heating your oven to 350°F (175°C). A well-prepared baking pan is key, so line a 9×13-inch pan with parchment paper or give it a light coating of butter or nonstick spray to keep your bars from sticking and make cleanup easier.
Step 2: Mix the Wet Ingredients
In a large bowl, whisk together your melted butter, creamy peanut butter, brown sugar, and vanilla extract. Stir these until the mixture is perfectly smooth and shiny, which guarantees a luscious base for your bars. Adding eggs one at a time works best here—make sure each is fully incorporated before adding the next to keep the batter silky.
Step 3: Add the Dry Ingredients
In a separate bowl, whisk together the flour, baking soda, and salt so everything is evenly combined. Slowly add this dry mix to your wet ingredients and stir gently until just mixed. Be careful not to overmix because you want your bars tender and soft, not tough or cakey.
Step 4: Fold in the Chocolate Chips
The most delicious part—fold about 1 1/4 cups of chocolate chips into your thick batter, then reserve 1/4 cup to sprinkle on top before baking. This layering guarantees chocolate in every bite and that irresistible, gooey chocolate chip topping.
Step 5: Bake the Bars
Spread the batter evenly in your prepared pan and sprinkle the remaining chocolate chips on top. Bake for 20 to 25 minutes until the edges turn golden and a toothpick inserted near the center comes out with just a few moist crumbs. This timing keeps the bars soft but fully set so they don’t crumble.
Step 6: Cool and Slice
Patience is a virtue when it comes to cutting these bars—let them cool entirely in the pan. This resting time allows the bars to set, making it easy to slice into clean squares without falling apart. Then, get ready to enjoy every luscious bite!
How to Serve Easy Peanut Butter Chocolate Chip Bars Recipe

Garnishes
Sprinkle a light dusting of powdered sugar or a drizzle of melted chocolate across the bars for a visually stunning, sweet touch. Toasted chopped peanuts scatter on top add a satisfying crunch and amplify the peanut flavor brilliantly.
Side Dishes
Pair these bars with a scoop of vanilla ice cream or a dollop of whipped cream for an indulgent dessert experience that’s hard to beat. For a morning or afternoon treat, a hot cup of coffee or creamy milk complements the rich peanut butter and chocolate notes beautifully.
Creative Ways to Present
Cut the bars into mini bite-sized squares for parties or gatherings—they make excellent finger foods for sharing. Create layered parfaits by breaking bars into chunks and alternating them with yogurt or pudding in dessert glasses. These ideas give a simple bar recipe a fresh twist.
Make Ahead and Storage
Storing Leftovers
Keep any leftover peanut butter chocolate chip bars fresh by storing them in an airtight container at room temperature for up to 4 days. The bars maintain their softness and moistness, making them perfect for snacks on the go.
Freezing
For longer storage, wrap bars tightly in plastic wrap and place them in a freezer-safe bag or container. Frozen bars can be kept for up to 3 months and thawed at room temperature when you’re ready to enjoy that familiar, comforting taste.
Reheating
If you like your bars warm, a few seconds in the microwave or a brief stint in a warm oven will bring back that just-baked softness and melty chocolate charm. Just be careful not to overheat or the bars can dry out.
FAQs
Can I use crunchy peanut butter instead of creamy?
Absolutely! Using crunchy peanut butter will add delightful bits of texture in each bite, making the bars a bit more interesting and nutty. Just make sure it’s well stirred before mixing with the other ingredients.
What if I don’t have semi-sweet chocolate chips? Can I use milk or dark chocolate?
You can swap in milk chocolate for a sweeter, creamier taste or dark chocolate for a richer, more intense flavor. Either option works great and changes the bars’ character slightly to suit your preference.
Is it possible to make this recipe gluten-free?
Yes, replace the all-purpose flour with a gluten-free flour blend that measures cup for cup the same, and ensure your baking soda and other ingredients are gluten-free certified. The texture might be a little different, but still delicious!
Can I double this recipe for a larger batch?
Definitely! Just double all the ingredients and use a larger pan—such as two 9×13-inch pans or a bigger baking dish—while keeping the baking time similar but always checking for doneness with a toothpick.
How can I make these bars more chewy or cakey?
For chewier bars, try using more brown sugar or slightly underbaking them. For cakier bars, add a bit more flour and a pinch of baking powder, though this recipe is designed to be the perfect balance between chewy and soft already.
Final Thoughts
Making these Easy Peanut Butter Chocolate Chip Bars Recipe is such a joy. They come together quickly with pantry staples yet deliver incredible flavor and texture that will delight everyone who takes a bite. Whether it’s a last-minute dessert, snack, or packed lunch treat, these bars are sure to become a loved classic in your kitchen. Give them a try and watch them disappear fast—you’ll want to make them again and again!
Print
Easy Peanut Butter Chocolate Chip Bars Recipe
- Prep Time: 10 minutes
- Cook Time: 20-25 minutes
- Total Time: 30-35 minutes
- Yield: 12 servings
- Category: Dessert
- Method: Baking
- Cuisine: American
Description
These Easy Peanut Butter Chocolate Chip Bars are a deliciously rich and chewy treat perfect for any occasion. Combining creamy peanut butter and semi-sweet chocolate chips, these bars offer a perfect balance of nutty flavor and chocolatey sweetness. They bake up quickly and are sure to become a favorite snack or dessert.
Ingredients
Wet Ingredients
- 1/2 cup (115g) unsalted butter, melted
- 1 cup (240g) creamy peanut butter
- 1 cup (200g) packed brown sugar
- 2 large eggs
- 1 teaspoon vanilla extract
Dry Ingredients
- 1 1/2 cups (190g) all-purpose flour
- 1 teaspoon baking soda
- 1/4 teaspoon salt
Chocolate Chips
- 1 1/2 cups (250g) semi-sweet chocolate chips, divided (1 1/4 cups for the batter, 1/4 cup for topping)
Instructions
- Preheat and Prepare the Pan: Preheat your oven to 350°F (175°C). Line a 9×13-inch baking pan with parchment paper or lightly grease it to prevent sticking.
- Mix the Wet Ingredients: In a large bowl, combine the melted butter, creamy peanut butter, brown sugar, and vanilla extract. Stir until the mixture is smooth and well blended. Add the eggs one at a time, mixing thoroughly after each addition to create a uniform batter.
- Add Dry Ingredients: In a separate bowl, whisk together the all-purpose flour, baking soda, and salt. Gradually add these dry ingredients to the wet mixture, stirring gently until just combined, being careful not to overmix to maintain a tender texture.
- Fold in Chocolate Chips: Gently fold in 1 1/4 cups of the semi-sweet chocolate chips into the batter, reserving the remaining 1/4 cup for topping the bars.
- Bake the Bars: Spread the batter evenly in the prepared baking pan. Sprinkle the reserved chocolate chips on top. Bake for 20-25 minutes or until the edges turn golden brown and a toothpick inserted into the center comes out with a few moist crumbs.
- Cool and Slice: Allow the bars to cool completely in the pan before slicing them into squares for serving. Cooling ensures the bars set properly and slice cleanly.
Notes
- Use parchment paper for easy removal and cleaner slicing.
- Do not overmix the batter to prevent dense bars.
- Allow bars to cool fully to avoid crumbling when slicing.
- You can substitute peanut butter with almond or cashew butter if desired.
- For a firmer texture, refrigerate the bars after cooling.
