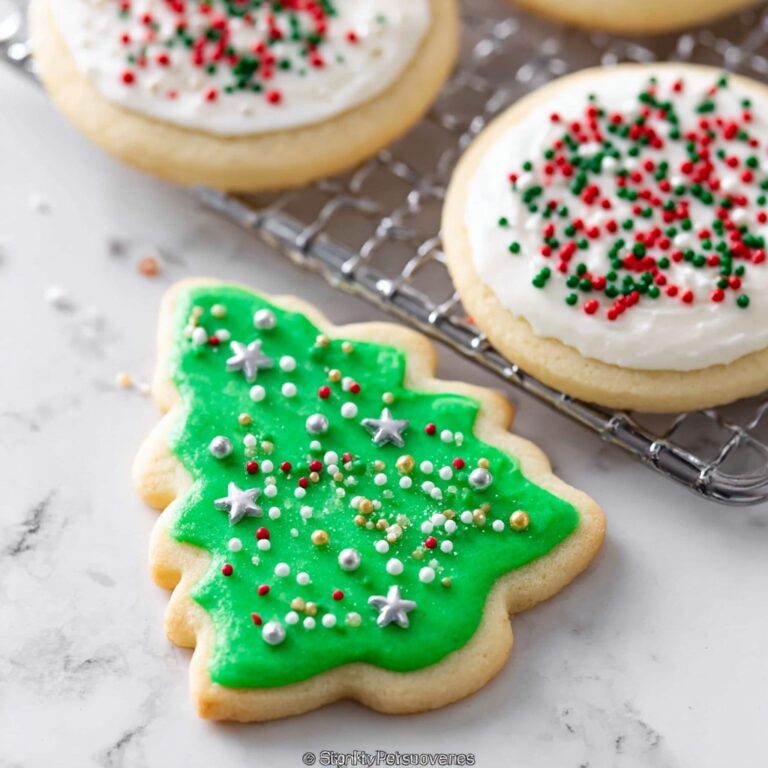
If you’ve ever wanted to create festive treats bursting with color and charm, then this Slice and Bake Colorful Christmas Cookies Recipe will absolutely delight you. It’s a wonderful way to bring a splash of holiday cheer to your kitchen with vibrant doughs and playful shapes that are as fun to make as they are delicious. Imagine the joy of slicing through a log of bright, layered cookies that bake up just perfectly tender and buttery, guaranteed to make your holiday gatherings extra special.
Ingredients You’ll Need
This cookie recipe calls for simple, classic ingredients that come together beautifully to create the perfect texture, tenderness, and vibrant hues. From creamy butter that offers richness, to the all-purpose flour which provides structure, and the gel food coloring that brings the magic to life, each item plays its own crucial role.
- Unsalted butter (1 cup / 227 grams): Softened for creamy richness and tender crumb.
- Confectioners’ sugar (3/4 cup / 90 grams): Adds smooth sweetness and a subtle melt-in-your-mouth texture.
- White sugar (3/4 cup / 150 grams): Brings sweetness and helps with cookie crispness and color.
- Vanilla extract (1 ½ teaspoons): Infuses a warm, familiar flavor base.
- Eggs (2 large): Bind ingredients while adding moisture.
- All-purpose flour (4 cups / 480 grams): The foundation creating dough structure and sturdiness.
- Baking powder (3/4 teaspoon): Helps the cookies rise gently for a light texture.
- Salt (1/4 teaspoon): Balances sweetness and enhances flavor complexity.
- Gel food coloring: The key to adding vibrant, vivid hues to your cookies without altering the dough’s consistency.
How to Make Slice and Bake Colorful Christmas Cookies Recipe
Step 1: Combine Dry Ingredients
Start by whisking together the all-purpose flour, baking powder, and salt in a large mixing bowl. This ensures even distribution of the leavening agent and seasoning, setting the stage for a perfectly balanced dough.
Step 2: Cream Butter and Sugars
In a separate large bowl, beat your softened butter with the confectioners’ sugar and white sugar until the mixture is light and fluffy—about three minutes. This step is essential for incorporating air, which results in tender, delightful cookies.
Step 3: Incorporate Vanilla and Eggs
Add the vanilla extract and eggs to the creamed mixture, beating until smooth and fully combined. This will add flavor and moisture, binding the wet and dry ingredients together seamlessly.
Step 4: Form the Dough
Gradually add the dry flour mixture into the wet butter-sugar-egg blend and mix until a soft, non-sticky dough forms. This balance ensures the dough holds together well but isn’t tough or crumbly.
Step 5: Divide and Chill Dough
Wrap about two-thirds of the dough in plastic wrap and refrigerate for later. Divide the remaining dough into portions equal to the number of colors you want to work with (three colors like green, brown, and blue work great!). This division lets you create those gorgeous colorful layers.
Step 6: Add Food Coloring and Chill Again
Add gel food coloring to each dough portion and knead by hand (or mix carefully) until evenly colored. Wrap each colored segment tightly in plastic wrap and chill in the fridge for at least one hour. This rest not only firms the dough but intensifies the colors.
Step 7: Roll and Cut Colored Shapes
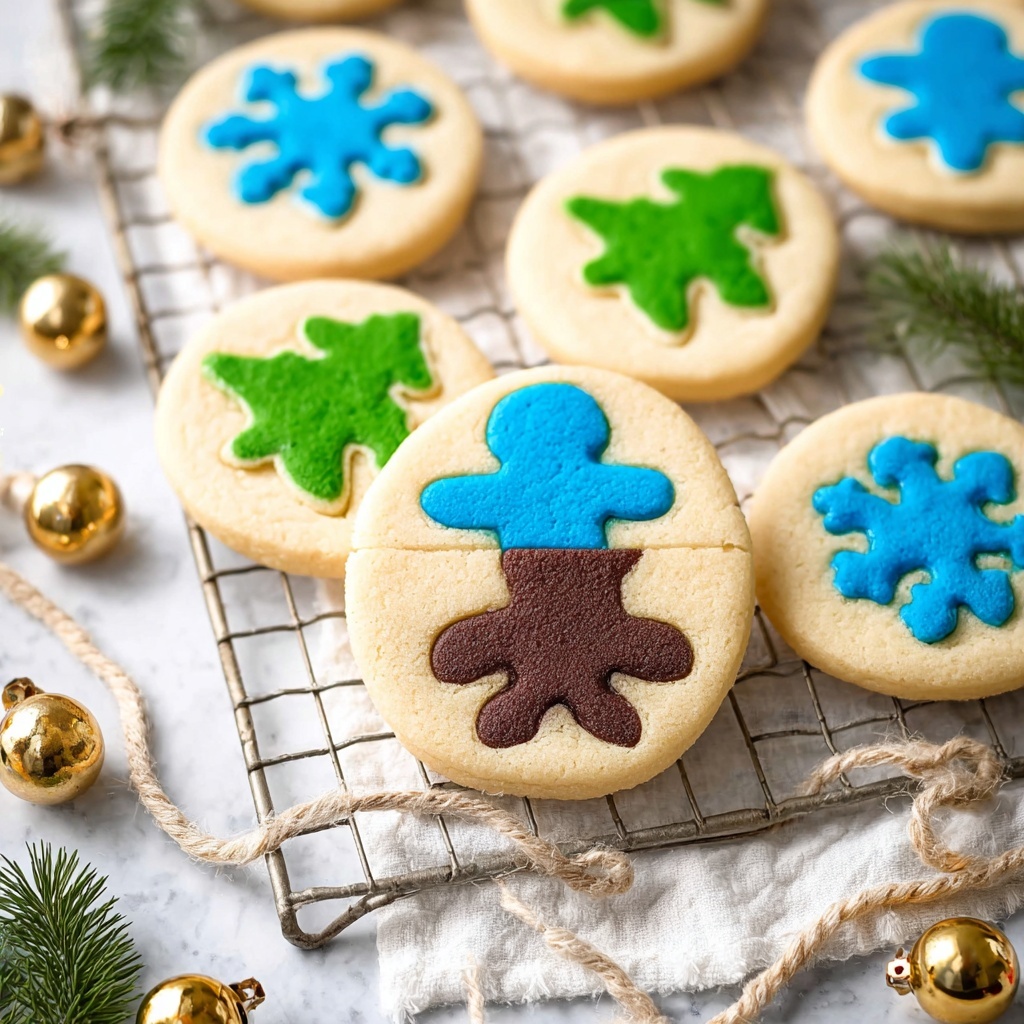
Roll each colored dough out to a 1/2-inch thickness and cut out mini shapes using cookie cutters. Stack matching shapes into tall, firm piles. This stacking is what creates the striking layered effect when baked. Freeze these stacks for no less than four hours to harden them sufficiently.
Step 8: Soften Plain Dough
After three hours of freezing the color stacks, remove the plain dough from the fridge and let it soften at room temperature for about an hour. Softened dough makes it easier to wrap around the colored shape stacks for those smooth logs.
Step 9: Wrap Colored Stacks in Plain Dough
Take the frozen shape stacks out and gently press the softened plain dough around them, ensuring the colorful stack runs through the center of the log. For intricate shapes with tight angles, sneak little bits of plain dough into crevices to secure all parts tightly.
Step 10: Roll and Freeze Logs
Roll each log gently until smooth and even, then wrap tightly in plastic wrap. Freeze again for at least four hours or overnight. This solidifies the logs, making final slicing much easier.
Step 11: Prepare for Baking
Preheat your oven to 350°F and line baking sheets with parchment paper to prevent sticking and promote even baking.
Step 12: Slice Cookies
Remove your logs from the freezer and let them soften just slightly for about 20 minutes. Use a sharp knife to slice them into ¼-inch thick cookies—this thickness bakes perfectly crisp around the edges and tender inside.
Step 13: Bake to Perfection
Place cookie slices on prepared baking sheets and bake for 9 to 10 minutes, or until the edges turn a delicate golden hue. Watch closely to prevent over-baking, aiming for that ideal melt-in-your-mouth experience.
How to Serve Slice and Bake Colorful Christmas Cookies Recipe
Garnishes
To elevate these colorful cookies, consider sprinkling them with a light dusting of powdered sugar or edible glitter right after baking. A drizzle of white chocolate adds an elegant touch that pairs beautifully with the buttery cookie base.
Side Dishes
These cookies love a cozy companion like a warm cup of spiced holiday tea, hot cocoa with marshmallows, or even a classic glass of cold milk. The contrast enhances the sweet, buttery bite and rounds out any festive snack platter.
Creative Ways to Present
Try arranging the cookies on a tiered holiday platter surrounded by fresh pine sprigs or cranberries for a festive display. Wrapping individual slices in colorful cellophane tied with ribbon turns them into perfect homemade gifts that show extra thought and love.
Make Ahead and Storage
Storing Leftovers
Once cooled completely, store your colorful cookies in an airtight container at room temperature. They’ll stay fresh and flavorful for up to a week, making them perfect for enjoying as a sweet treat throughout the holiday season.
Freezing
If you want to prepare these festive delights well in advance, remember that both shaped dough stacks and fully assembled logs freeze beautifully. Just wrap tightly and freeze for up to three months. Slice and bake cookies directly from the freezer for fresh-baked goodness anytime.
Reheating
To refresh the cookies after storage, place them in a warm oven (around 300°F) for 5 minutes. This brings back that just-baked warmth and tender texture—perfect when you want that fresh-from-the-oven feel.
FAQs
Can I use different food coloring types for this recipe?
Gel food coloring is highly recommended because it provides vibrant colors without changing the dough’s texture or consistency. Liquid food coloring can make the dough too wet, so it’s best to avoid it for this recipe.
How do I prevent the colored dough from staining my hands?
Wearing disposable gloves while kneading the colored dough is the easiest way to keep your hands clean and avoid unwanted staining. Alternatively, you can mix the food coloring with a hand mixer to minimize direct contact.
What if I don’t have mini cookie cutters?
You can easily improvise by using small household items like bottle caps or the rim of a small cup to cut shapes. The key is maintaining an even dough thickness to bake uniformly and look beautiful once sliced.
Can I make this recipe dairy-free or vegan?
While this recipe relies on butter and eggs for texture and flavor, you can experiment with vegan butter substitutes and flax eggs. Just note that texture and taste might vary slightly, so a small test batch is a smart idea.
Why is freezing dough important in this recipe?
Freezing helps the dough firm up, making it easier to slice cleanly and keeps the colorful layers distinct during baking. It also prevents the cookies from spreading too much, ensuring that beautiful design stays intact.
Final Thoughts
This Slice and Bake Colorful Christmas Cookies Recipe is truly one of those joyful kitchen projects that fills your home with warmth and festive spirit. With its vibrant colors, buttery richness, and the satisfying way it all comes together slice by slice, it’s a recipe you’ll treasure year after year. So gather your ingredients, get those hands colorful, and create some magical, delicious memories this holiday season!
Print
Slice and Bake Colorful Christmas Cookies Recipe
- Prep Time: 25 minutes
- Cook Time: 10 minutes
- Total Time: 35 minutes active plus chilling time (approximately 10 hours including freezing and resting)
- Yield: 20-24 cookies
- Category: Dessert
- Method: Baking
- Cuisine: American
Description
These Slice and Bake Christmas Cookies are festive, colorful, and perfect for holiday celebrations. Made by layering vibrant colored dough shapes inside a log of plain dough, these cookies are sliced and baked to reveal beautiful patterns. The recipe is straightforward, using simple ingredients and hands-on techniques like chilling, shaping, and slicing, resulting in charming homemade cookies that are both delicious and visually delightful.
Ingredients
Basic Dough
- 1 cup (227 grams) unsalted butter, softened
- 3/4 cup (90 grams) confectioners’ sugar
- ¾ cup (150 grams) white sugar
- 1 ½ teaspoons vanilla extract
- 2 eggs
- 4 cups (480 grams) all-purpose flour
- 3/4 teaspoon baking powder
- 1/4 teaspoon salt
Decoration
- Gel food coloring (various colors such as green, brown, blue, as desired)
Instructions
- Mix Dry Ingredients: In a large mixing bowl, whisk together the all-purpose flour, baking powder, and salt until evenly combined. Set this mixture aside for later use.
- Cream Butter and Sugars: In a separate large bowl, beat the softened butter with confectioners’ sugar and white sugar using a hand mixer until the mixture is light and fluffy, approximately 3 minutes.
- Add Vanilla and Eggs: To the butter mixture, add the vanilla extract and eggs, then beat again until the mixture is smooth and fully incorporated.
- Combine Wet and Dry: Gradually add the dry flour mixture into the wet ingredients, beating until a soft dough forms that is not sticky to the touch.
- Chill Dough Portions: Wrap and refrigerate two-thirds of the plain dough for later use. Divide the remaining third of the dough into portions equal to the number of desired colors.
- Color the Dough: Add gel food coloring to each divided portion. Mix well using a hand mixer or by kneading with gloved hands. Wrap each colored dough portion in plastic wrap and refrigerate for at least 1 hour to set.
- Shape Colored Dough: Roll each chilled colored dough to about 1/2 inch thickness. Use mini cookie cutters to cut out small shapes. Stack identical shapes into firm tall stacks and freeze these stacks for at least 4 hours to harden.
- Soften Plain Dough: Remove the plain dough from the fridge after about 3 hours of chilling and let it sit at room temperature for approximately 1 hour until softened.
- Assemble Logs: Take the frozen colored dough stacks from the freezer and press the softened plain dough around each stack, forming a log shape. Make sure the stack runs through the center. For intricate shapes, gently press bits of plain dough into crevices before fully wrapping.
- Smooth and Freeze Logs: Roll each log gently between your hands to create an even, smooth, rounded shape. Wrap tightly in plastic wrap and freeze for at least 4 hours or overnight.
- Preheat Oven and Prepare Baking Sheets: Preheat your oven to 350°F (175°C). Line two baking sheets with parchment paper to prevent sticking.
- Slice Cookies: Remove the frozen logs from the freezer and allow them to sit for about 20 minutes to soften slightly. Using a sharp knife, slice the logs into ¼-inch thick cookies carefully.
- Bake Cookies: Place the sliced cookies onto the prepared baking sheets, spacing them out appropriately. Bake for 9 to 10 minutes or until cookies are set and edges turn very lightly golden.
Notes
- For best results, use gel food coloring which does not add extra moisture to the dough.
- Ensure dough portions are well chilled at each stage to maintain shape during slicing and baking.
- Use gloves when kneading colored dough to prevent staining your hands.
- Slicing the logs with a very sharp knife helps achieve clean edges.
- These cookies can be made ahead and stored frozen before baking for convenience.
- Adjust color portions and shapes for personalized holiday themes.