
If you are looking to wow your guests with a treat that combines charm, flavor, and festive flair, this Red Velvet Wreath Whoopie Pies Recipe is absolutely the way to go. Imagine the rich, tender red velvet cakes shaped into adorable wreaths, filled with a luscious cream cheese frosting that perfectly balances sweetness and tang. These whoopie pies don’t just taste incredible—they look like little edible holiday decorations, guaranteed to brighten up any gathering. Whether you’re baking for a holiday party or simply craving a delightful dessert, this recipe brings a show-stopping centerpiece that’s almost too cute to eat, yet impossible to resist.
Ingredients You’ll Need
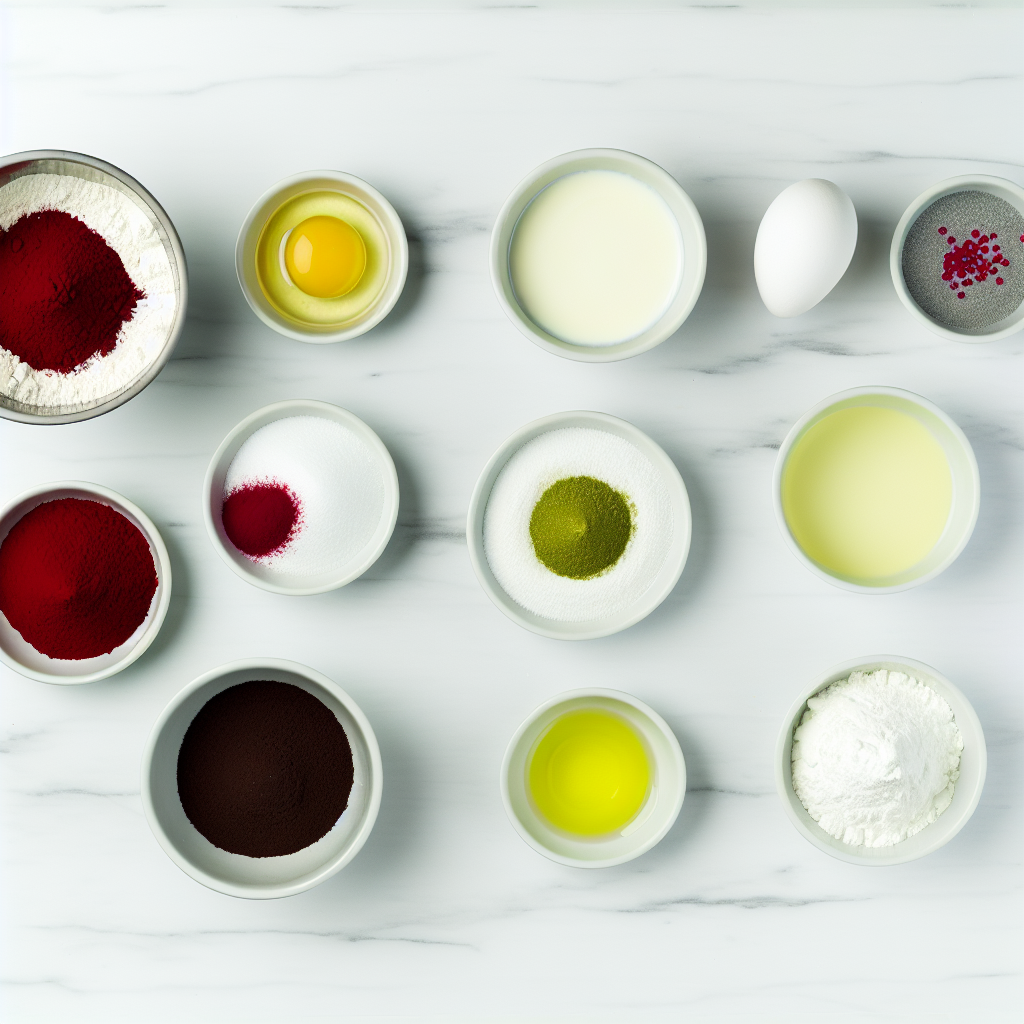
Gathering the ingredients for this Red Velvet Wreath Whoopie Pies Recipe is straightforward and rewarding. Each component plays a vital role, from the cocoa powder adding depth to the classic red velvet flavor, to the cream cheese frosting providing that smooth and tangy finish. These simple essentials come together to create a textural and taste harmony you’ll fall in love with.
- 2 cups all-purpose flour: The base of your whoopie pies, ensuring a soft and tender bite.
- 1/4 cup cocoa powder: Adds a subtle chocolatey richness that enhances the red velvet flavor.
- 1 teaspoon baking powder: Helps your wreaths rise to perfect fluffiness.
- 1/2 teaspoon baking soda: Works with buttermilk to give that tender crumb you expect.
- 1/4 teaspoon salt: Balances sweetness and enhances overall flavor.
- 1/2 cup unsalted butter, softened: For rich, buttery moisture in your cakes.
- 1 cup granulated sugar: Sweetens the batter evenly for a perfect treat.
- 1 large egg: Binds ingredients and adds structure to the cakes.
- 1 teaspoon vanilla extract: Brings warmth and depth to the flavor profile.
- 1 cup buttermilk: Adds moisture and tang while reacting with baking soda for lift.
- 1 tablespoon red food coloring: Creates that signature vibrant red, turning your whoopie pies into festive masterpieces.
- 8 ounces cream cheese, softened: The heart of the luscious frosting filling.
- 1/2 cup unsalted butter, softened (for filling): Adds richness and smoothness to the frosting.
- 2 cups powdered sugar: Sweetens and thickens the frosting to perfection.
- 1 teaspoon vanilla extract (for filling): A subtle hint of vanilla that ties the filling flavors together.
- Green icing: For decorating your wreaths with festive color and charm.
- Red sprinkles or sugar pearls: Adds a pop of holiday spirit and texture on top of the finished pies.
How to Make Red Velvet Wreath Whoopie Pies Recipe
Step 1: Prepare Your Oven and Baking Sheets
Start by preheating your oven to 350°F (175°C). Line your baking sheets with parchment paper to ensure your whoopie pies bake evenly and release easily when done. This small step keeps the cooking process hassle-free and your treats looking pristine.
Step 2: Combine Dry Ingredients
Whisk together the all-purpose flour, cocoa powder, baking powder, baking soda, and salt in a medium bowl. This mixture forms the dry base for your red velvet cakes, making sure every bite is perfectly balanced and fluffy.
Step 3: Cream Butter and Sugar
In a separate large bowl, beat the softened butter and granulated sugar until light and fluffy, about 2-3 minutes. This step is crucial for creating a tender crumb and giving your wreaths a melt-in-your-mouth quality. Then, add the egg and vanilla extract, mixing well to incorporate air and flavor.
Step 4: Alternate Adding Dry Ingredients and Buttermilk
Gradually add the flour mixture to the butter mixture alternately with buttermilk, beginning and ending with the flour mixture. Mix until smooth, careful not to overbeat. Finally, stir in the red food coloring thoroughly, turning your batter into that iconic festive red.
Step 5: Shape Your Wreaths
Using a piping bag or a spoon, carefully shape the batter into small wreath forms on your prepared baking sheets. Leave a small hole in the center of each wreath to give it that classic holiday shape. This step does double duty—giving you visual appeal and perfectly portioned treats.
Step 6: Bake and Cool
Bake the wreaths in your preheated oven for 8 to 10 minutes, or until the edges spring back when lightly pressed. Remove them from the oven and transfer to a wire rack to cool completely, ensuring your whoopie pies hold their shape and texture.
Step 7: Make the Cream Cheese Filling
While the cakes cool, whip together softened cream cheese and butter until smooth. Gradually add powdered sugar and vanilla extract, beating until creamy and spreadable. This frosting creates the perfect sweet and tangy balance to the red velvet cakes.
Step 8: Assemble the Whoopie Pies
Pipe or spread a generous dollop of cream cheese filling onto the flat side of one wreath-shaped cake. Sandwich it with another, pressing gently to fill the center hole and secure the two pieces together.
Step 9: Decorate Your Festive Wreaths
Finish by decorating your whoopie pies with green icing, piping it like garlands along the wreath edges, and adding red sprinkles or sugar pearls like berries. This festive touch transforms these delicious treats into holiday conversation starters.
How to Serve Red Velvet Wreath Whoopie Pies Recipe
Garnishes
Adding green icing and red sprinkles not only makes your whoopie pies visually festive but adds a slight crunch and subtle sweetness that complements the creamy filling perfectly. You can also try edible glitter or tiny white sugar stars to evoke snow for extra holiday cheer.
Side Dishes
These whoopie pies pair beautifully with a warm cup of cocoa or a glass of cold milk. For a grown-up touch, serve alongside mulled wine or spiced chai. Their rich, velvety flavor stands up well to creamy and spicy beverages alike.
Creative Ways to Present
Place your finished whoopie pies on a holiday-themed platter surrounded by pine sprigs or cranberries for a stunning centerpiece. Additionally, you can stack them on a tiered dessert stand or wrap individual pies in cellophane tied with a festive ribbon for charming edible gifts.
Make Ahead and Storage
Storing Leftovers
Store leftover Red Velvet Wreath Whoopie Pies in an airtight container in the refrigerator for up to 4 days. Keeping them chilled maintains the freshness of the cream cheese filling and keeps the cakes soft and moist.
Freezing
Wrap each whoopie pie individually in plastic wrap and place them in a freezer bag to freeze for up to 1 month. Thaw in the refrigerator overnight before serving to keep their texture intact.
Reheating
Since these are best enjoyed chilled or at room temperature, avoid microwaving. Instead, let the whoopie pies sit out for 15 to 30 minutes after removing from the refrigerator to soften slightly, bringing out their full flavor and creaminess.
FAQs
Can I make these whoopie pies without food coloring?
Yes, you can skip the red food coloring, but the iconic vibrant red color that makes this recipe a holiday favorite will be missing. The flavor will still be delicious but less festive in appearance.
What’s the best way to pipe the wreath shapes?
Use a piping bag fitted with a round tip or a sturdy zip-top bag with a small corner snipped off. Pipe a ring shape on the parchment paper, leaving a small hole in the center to mimic a wreath.
Can I use regular milk instead of buttermilk?
Buttermilk adds acidity that reacts with baking soda to create a tender crumb. If you don’t have buttermilk, you can make a substitute by adding one tablespoon of lemon juice or vinegar to one cup of milk and letting it sit for 5 minutes.
How do I prevent the whoopie pies from sticking to the parchment paper?
Using parchment paper generally prevents sticking, but if you want extra insurance, you can lightly grease the paper. Make sure to let the pies cool completely before removing them to maintain their shape.
Can I make the cream cheese filling ahead of time?
Absolutely! You can make the filling a day in advance and keep it refrigerated. Before assembly, give it a quick whip to restore its creaminess if needed.
Final Thoughts
I can’t recommend this Red Velvet Wreath Whoopie Pies Recipe enough for anyone wanting to add a whimsical and delicious touch to their holiday baking lineup. The blend of classic red velvet with rich cream cheese frosting and festive decoration makes these treats a total crowd-pleaser. Give them a try—you’ll find yourself baking these charming wreaths year after year!
Print
Red Velvet Wreath Whoopie Pies Recipe
- Prep Time: 20 minutes
- Cook Time: 10 minutes
- Total Time: 30 minutes
- Yield: 10 whoopie pies
- Category: Dessert
- Method: Baking
- Cuisine: American
Description
These Red Velvet Wreath Whoopie Pies are a festive and show-stopping treat perfect for holiday celebrations. Soft, rich red velvet cookies shaped like wreaths are sandwiched with a creamy cream cheese filling, then decorated with green icing and red sprinkles to mimic traditional Christmas wreaths. The combination of cocoa, buttermilk, and a hint of vanilla creates moist, tender cookies, while the luscious filling adds the perfect balance of sweetness and tang.
Ingredients
Dry Ingredients
- 2 cups all-purpose flour
- 1/4 cup cocoa powder
- 1 teaspoon baking powder
- 1/2 teaspoon baking soda
- 1/4 teaspoon salt
Wet Ingredients
- 1/2 cup unsalted butter, softened
- 1 cup granulated sugar
- 1 large egg
- 1 teaspoon vanilla extract
- 1 cup buttermilk
- 1 tablespoon red food coloring
Filling
- 8 ounces cream cheese, softened
- 1/2 cup unsalted butter, softened
- 2 cups powdered sugar
- 1 teaspoon vanilla extract
Decoration
- Green icing
- Red sprinkles or sugar pearls
Instructions
- Preheat and Prepare Baking Sheets: Preheat your oven to 350°F (175°C) and line baking sheets with parchment paper to prevent sticking.
- Mix Dry Ingredients: In a medium bowl, whisk together the all-purpose flour, cocoa powder, baking powder, baking soda, and salt until evenly combined.
- Cream Butter and Sugar: In a separate large bowl, beat the softened butter and granulated sugar together until the mixture is light and fluffy, which incorporates air for a tender texture.
- Add Egg and Vanilla: Beat in the egg and vanilla extract to the butter and sugar mixture until well combined.
- Combine Dry and Wet Ingredients: Gradually add the dry ingredients alternately with the buttermilk, mixing just until smooth after each addition. Stir in the red food coloring evenly to achieve a vibrant red color.
- Shape the Wreaths: Using a piping bag or spoon, form small wreath shapes on the prepared baking sheets, leaving a small hole in the center to mimic a wreath.
- Bake: Bake the cookies for 8 to 10 minutes until they spring back when lightly touched. Remove from the oven and allow the cookies to cool completely on a wire rack.
- Make the Filling: Beat the softened cream cheese and butter together until smooth and creamy. Gradually add powdered sugar and vanilla extract, continuing to beat until the filling is fluffy and spreadable.
- Assemble Whoopie Pies: Pipe or spread the cream cheese filling onto the flat side of one cookie, then sandwich it with another cookie to create the whoopie pie.
- Decorate: Finish by decorating the assembled whoopie pies with green icing to resemble leaves and red sprinkles or sugar pearls as berry accents for the wreath appearance.
Notes
- Make sure the cookies are completely cooled before assembling to prevent the filling from melting.
- You can adjust the amount of red food coloring to your preferred shade of red.
- Store whoopie pies in an airtight container in the refrigerator for up to 3 days.
- Allow refrigerated whoopie pies to come to room temperature before serving for optimal flavor and texture.
- Use a piping bag with a small round tip for precise wreath shapes and for decorating with icing.


