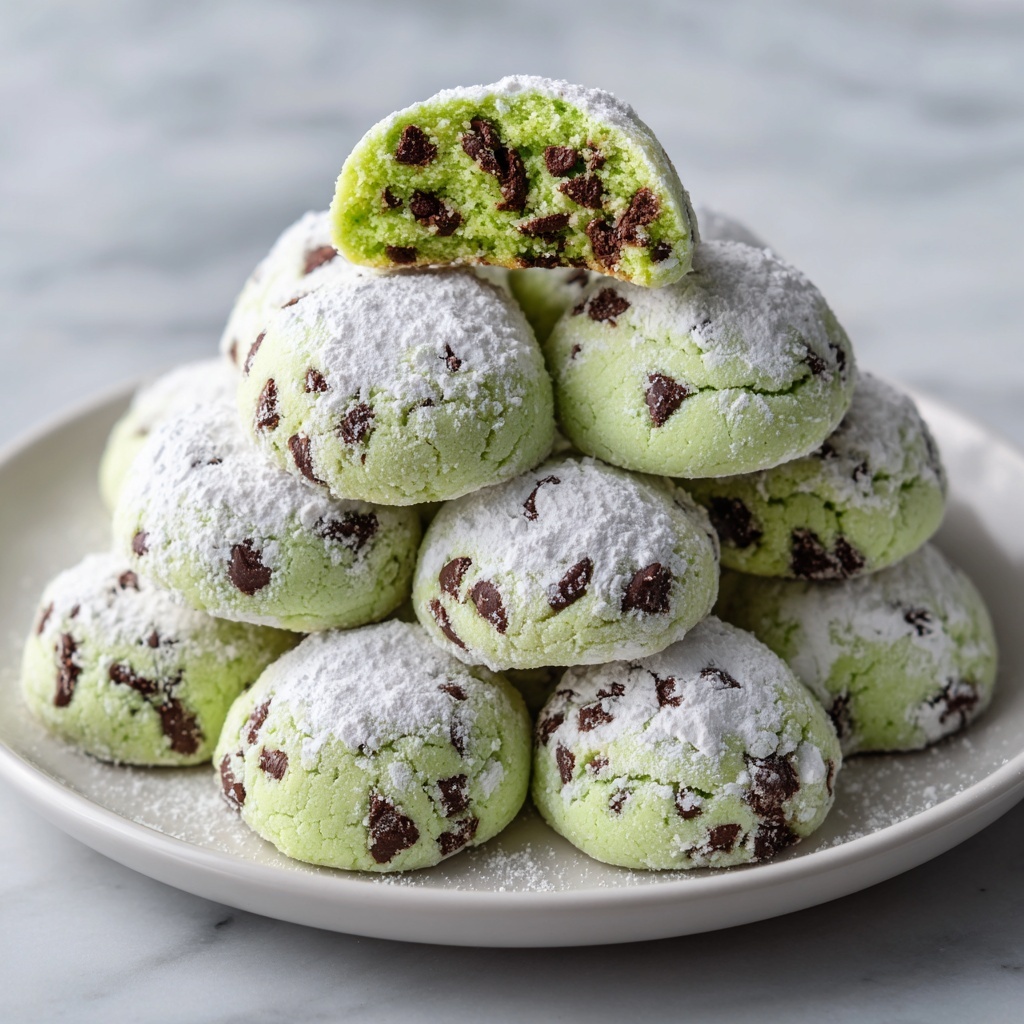
If you adore the refreshing combination of mint and chocolate in a delightfully soft and tender cookie, you are going to flip for this Mint Chocolate Chip Snowball Cookies Recipe. These treats balance the cool brightness of peppermint with luscious mini chocolate chips, all wrapped in a buttery, melt-in-your-mouth dough coated in a veil of sweet powdered sugar. Perfect for any occasion, these cookies feel festive and comforting all at once, guaranteed to become your go-to recipe when you want something special yet effortlessly charming.
Ingredients You’ll Need
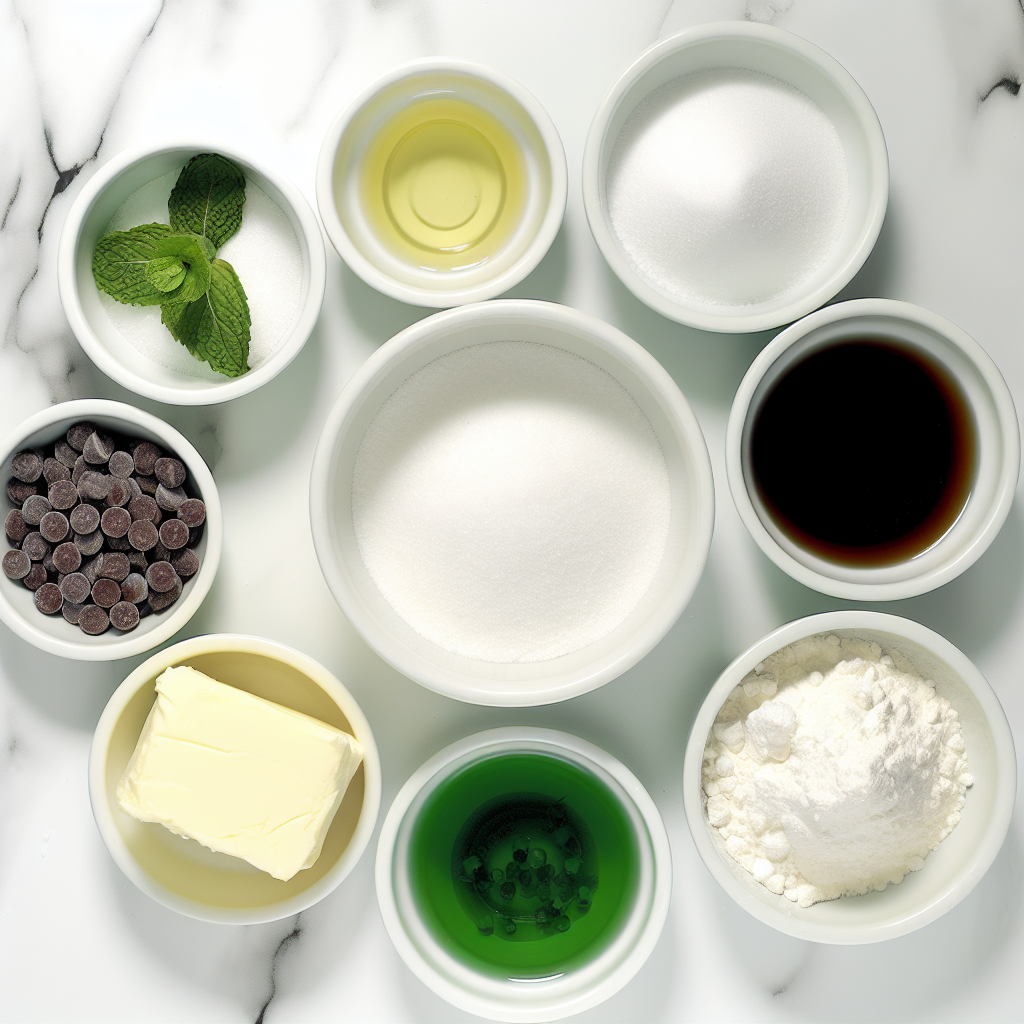
Gathering simple, quality ingredients is the secret to creating these charming Mint Chocolate Chip Snowball Cookies. Each component plays a vital role, from the smoothness of the unsalted butter to the refreshing punch of peppermint extract, contributing to the perfect blend of flavor, texture, and color.
- Unsalted Butter (1 cup or 2 sticks/226g): Softened to a creamy texture, it provides the rich, tender base for your cookies.
- Granulated Sugar (1/2 cup or 100g): Adds just the right amount of sweetness and helps with the cookie structure.
- Pure Vanilla Extract (1 teaspoon): Brings out depth and warmth to complement the mint.
- Peppermint Extract (1 teaspoon): Infuses that unmistakable minty sparkle which defines this recipe.
- All-Purpose Flour (2 1/4 cups or 270g): The foundation of the cookie dough, balancing softness and shape.
- Salt (1/4 teaspoon): Enhances all the flavors and balances sweetness beautifully.
- Mini Chocolate Chips (1 cup or 170g): Tiny bursts of chocolate magic that melt just slightly in your bite for perfect texture contrast.
- Powdered Sugar (1 1/2 cups or 180g), divided: Used for that classic snowball cookie coating, adding sweet, snowy crunch.
- Optional: Green Food Coloring: Just a few drops add a festive pop of color if you wish your cookies to match the minty theme visually.
How to Make Mint Chocolate Chip Snowball Cookies Recipe
Step 1: Preheat and Prepare Your Baking Sheets
Start by heating your oven to 350°F (175°C) and lining two or three baking sheets with parchment paper or silicone mats. This prep ensures even baking and easy cleanup, giving your cookies the best environment to become perfectly tender and just lightly golden.
Step 2: Mix the Dry Ingredients
In a medium bowl, whisk together all-purpose flour and salt. Setting this aside keeps your dry ingredients ready for the next steps and helps distribute the salt evenly for balanced flavor.
Step 3: Cream Butter and Sugar
Using an electric mixer, beat your softened unsalted butter on medium speed until it’s light and fluffy, around 1-2 minutes. Gradually add granulated sugar and continue beating for 2-3 minutes until the mixture becomes pale and airy. This fluffy base is essential for the light texture that snowball cookies are so loved for.
Step 4: Add Extracts and Optional Color
Beat in pure vanilla and peppermint extracts until just combined. Here’s where your cookies start getting their signature minty aroma. If you want a holiday-inspired look, add a few drops of green food coloring, mixing until you achieve the shade you like.
Step 5: Incorporate Dry Ingredients
With mixer on low, gradually add your flour and salt mixture in three parts, mixing just until combined after each addition. Avoid overmixing; you want to maintain a tender, delicate dough that will bake up soft and crumbly.
Step 6: Fold in Mini Chocolate Chips
Remove the bowl from the mixer and gently fold in the mini chocolate chips with a rubber spatula. This careful folding helps distribute the chocolate evenly without toughening the dough, which stays thick and luscious in this stage.
Step 7: Chill the Dough
Cover the dough tightly with plastic wrap and chill in the refrigerator for at least 30 minutes or up to an hour. Chilling firms up the butter, making the dough easier to scoop and helping cookies bake evenly with the perfect texture.
Step 8: Form Cookie Balls
Using a small cookie scoop or measuring tablespoon, portion the dough into rounded balls about 1 inch in diameter. Roll each between your palms to make smooth, compact spheres and space them 1 to 1 1/2 inches apart on the prepared baking sheets, allowing room for gentle spreading.
Step 9: Bake to Perfection
Bake the cookies for 10-12 minutes, watching closely for lightly golden edges and centers that are set but still pale. Overbaking will rob them of their tender interior, so pulling them at just the right moment ensures the soft, melt-in-your-mouth texture that is classic to snowball cookies.
Step 10: Cool and Begin the Sugar Coating Process
Remove the trays from the oven and let the cookies cool on the sheets for 5-10 minutes so they firm up just enough to handle easily. Then, prepare two shallow bowls: one with 1/2 cup powdered sugar and the other with the remaining 1 cup for that double snowball effect.
Step 11: First Powdered Sugar Coat
While the cookies are still warm but manageable, gently roll them in the smaller powdered sugar bowl until fully covered. Then transfer them to a wire rack to cool completely, allowing the sugar to set on the surface.
Step 12: Final Snowy Sugar Coat
Once the cookies have cooled to room temperature, roll each cookie thoroughly in the larger bowl of powdered sugar, creating a thick, snowy finish that defines these classic cookies. This double coating locks in moisture and adds the irresistible sweetness.
How to Serve Mint Chocolate Chip Snowball Cookies Recipe
Garnishes
For an extra festive touch, sprinkle a few crushed peppermint candies atop freshly rolled snowball cookies or add a tiny mint leaf for beauty and aroma. This elevates a simple cookie to a dazzling holiday treat that friends and family will adore.
Side Dishes
Pair these minty snowballs with a steaming mug of hot chocolate or a creamy glass of cold milk. Both contrast beautifully with the cool peppermint and rich chocolate, creating a dreamy combination that’s hard to beat during chilly days or cozy celebrations.
Creative Ways to Present
Place your Mint Chocolate Chip Snowball Cookies in a festive holiday tin or a clear glass jar tied with a ribbon for gorgeous gift-giving. Arrange them on a decorative platter dusted with extra powdered sugar for an eye-catching centerpiece at your next party or family gathering.
Make Ahead and Storage
Storing Leftovers
Your Mint Chocolate Chip Snowball Cookies will stay fresh in an airtight container at room temperature for up to 5 days. The powdered sugar coating might soften slightly over time but the flavor and texture remain beautifully intact.
Freezing
To freeze, wrap the baked cookies tightly in plastic wrap then place them into a freezer-safe container or bag. They’ll keep perfectly for up to 3 months. Thaw at room temperature, then give a quick roll in powdered sugar again if you want to revive that fresh, snowy look.
Reheating
No need to heat these cookies, but if you prefer them slightly warm, gently microwave a cookie on low for about 10 seconds. This softens the center without melting the powdered sugar coating, giving a cozy, just-baked feel.
FAQs
Can I use regular chocolate chips instead of mini chocolate chips?
Absolutely! Regular chocolate chips will work fine, but mini chips distribute more evenly throughout the delicate dough, giving you chocolaty bites in every mouthful without overwhelming the texture.
Is there a substitute for peppermint extract?
If peppermint extract is hard to find, you can substitute with spearmint extract or even a small amount of fresh finely chopped mint leaves, although the flavor may be slightly different and less intense.
Can I make these cookies gluten-free?
Yes! Substitute the all-purpose flour with a gluten-free baking blend that includes xanthan gum to maintain the right texture. Be mindful that baking times may vary slightly.
Why do I need two coatings of powdered sugar?
The first coating on the warm cookies helps sugar stick, while the second after cooling creates that signature thick, snowy appearance and a sweet outer crunch that defines snowball cookies.
How do I prevent these cookies from spreading too much?
Chilling the dough is key. The cold dough holds its shape better during baking, preventing excessive spreading and keeping that perfect round snowball look you want.
Final Thoughts
There is something truly magical about the Mint Chocolate Chip Snowball Cookies Recipe that combines festive flavors with an irresistibly soft texture and snowy powdered sugar finish. Whether you’re baking for the holidays or simply craving a refreshing cookie treat, these snowballs offer a delicious adventure you’ll want to revisit again and again. Give this recipe a try soon and prepare for some serious cookie love from everyone who tastes them!
Print
Mint Chocolate Chip Snowball Cookies Recipe
- Prep Time: 30 minutes
- Cook Time: 12 minutes
- Total Time: 2 hours 45 minutes
- Yield: 3 dozen cookies
- Category: Dessert
- Method: Baking
- Cuisine: American
Description
Mint Chocolate Chip Snowball Cookies are delicate, buttery cookies infused with refreshing peppermint and loaded with mini chocolate chips. These festive treats feature a soft crumb that gently melts in your mouth and are coated in a generous double layer of powdered sugar for a snowy, sweet finish. Perfect for holiday celebrations or any time you want a cool, minty twist on classic snowball cookies.
Ingredients
Cookie Dough
- 1 cup (2 sticks or 226g) Unsalted Butter, softened
- 1/2 cup (100g) Granulated Sugar
- 1 teaspoon Pure Vanilla Extract
- 1 teaspoon Peppermint Extract
- 2 1/4 cups (270g) All-Purpose Flour
- 1/4 teaspoon Salt
- 1 cup (170g) Mini Chocolate Chips
- Optional: Green Food Coloring (a few drops)
Coating
- 1 1/2 cups (180g) Powdered Sugar (Confectioners’ Sugar), divided
Instructions
- Preheat Oven and Prepare Pans: Preheat your oven to 350°F (175°C). Line two or three large baking sheets with parchment paper or silicone baking mats to ensure easy cookie removal and even baking.
- Mix Dry Ingredients: In a medium bowl, whisk together the all-purpose flour and salt until well combined. Set this mixture aside for later use.
- Cream Butter and Sugar: In a large mixing bowl, use an electric mixer to beat the softened unsalted butter on medium speed for 1-2 minutes until it becomes light and creamy. Gradually add the granulated sugar and continue to beat for another 2-3 minutes until the mixture is fluffy and lighter in color. Occasionally scrape down the sides of the bowl to incorporate all ingredients.
- Add Extracts and Color: Beat in the pure vanilla extract and peppermint extract just until combined. If desired, add a few drops of green food coloring and mix until you achieve your preferred shade of green.
- Incorporate Dry Ingredients: With the mixer on low speed, add the flour and salt mixture gradually in three additions. Mix only until just combined after each addition to maintain a delicate texture and avoid overmixing the dough.
- Fold in Chocolate Chips: Remove the bowl from the mixer and gently fold in the mini chocolate chips using a rubber spatula until evenly distributed throughout the dough, which will be thick.
- Chill the Dough: Tightly cover the bowl with plastic wrap and refrigerate the dough for at least 30 minutes to 1 hour. This step helps solidify the butter, making the dough easier to handle and shaping the cookies better.
- Form Cookie Balls: Once chilled, scoop dough portions using a small cookie scoop (about 1 tablespoon). Roll each portion between your palms to form smooth, compact balls approximately 1 inch in diameter. Place the balls on prepared baking sheets, spacing them about 1 to 1 1/2 inches apart.
- Bake the Cookies: Bake in the preheated oven for 10-12 minutes until the edges are lightly golden and the centers appear set but still pale. Be careful not to overbake to keep the cookies tender.
- Cool on Baking Sheets: Remove the baking sheets from the oven and allow the cookies to cool on the sheets for 5-10 minutes. This allows them to firm up enough to handle.
- Prepare Powdered Sugar Bowls: While the cookies are still warm but not hot, set up two shallow bowls for the powdered sugar. Place about 1/2 cup of powdered sugar in the first bowl and the remaining 1 cup in the second.
- First Sugar Coating: Working with a few cookies at a time, gently roll each warm cookie in the first bowl of powdered sugar until fully coated. Then place them back on a wire cooling rack to finish cooling completely.
- Allow Cookies to Cool Completely: It is essential that the cookies cool to room temperature before proceeding to the next sugar coating. Allow at least 30-60 minutes for this step.
- Second Sugar Coating: Once fully cooled, roll each cookie in the second, larger bowl of powdered sugar, coating them thoroughly for a thick, snowy finish. Serve the cookies immediately or store them for later enjoyment.
Notes
- Do not overmix the dough after adding flour to maintain a tender, delicate cookie texture.
- Chilling the dough is crucial to help the cookies hold their shape and to make handling easier.
- Using mini chocolate chips distributes chocolate more evenly throughout the dough.
- The double coating of powdered sugar creates the signature snowball appearance and adds sweetness.
- Cookies must be completely cooled before the second sugar coating to prevent melting and clumping.
- Optional green food coloring adds a festive touch but is not necessary for flavor.
- Store cookies in an airtight container at room temperature for up to 1 week.


