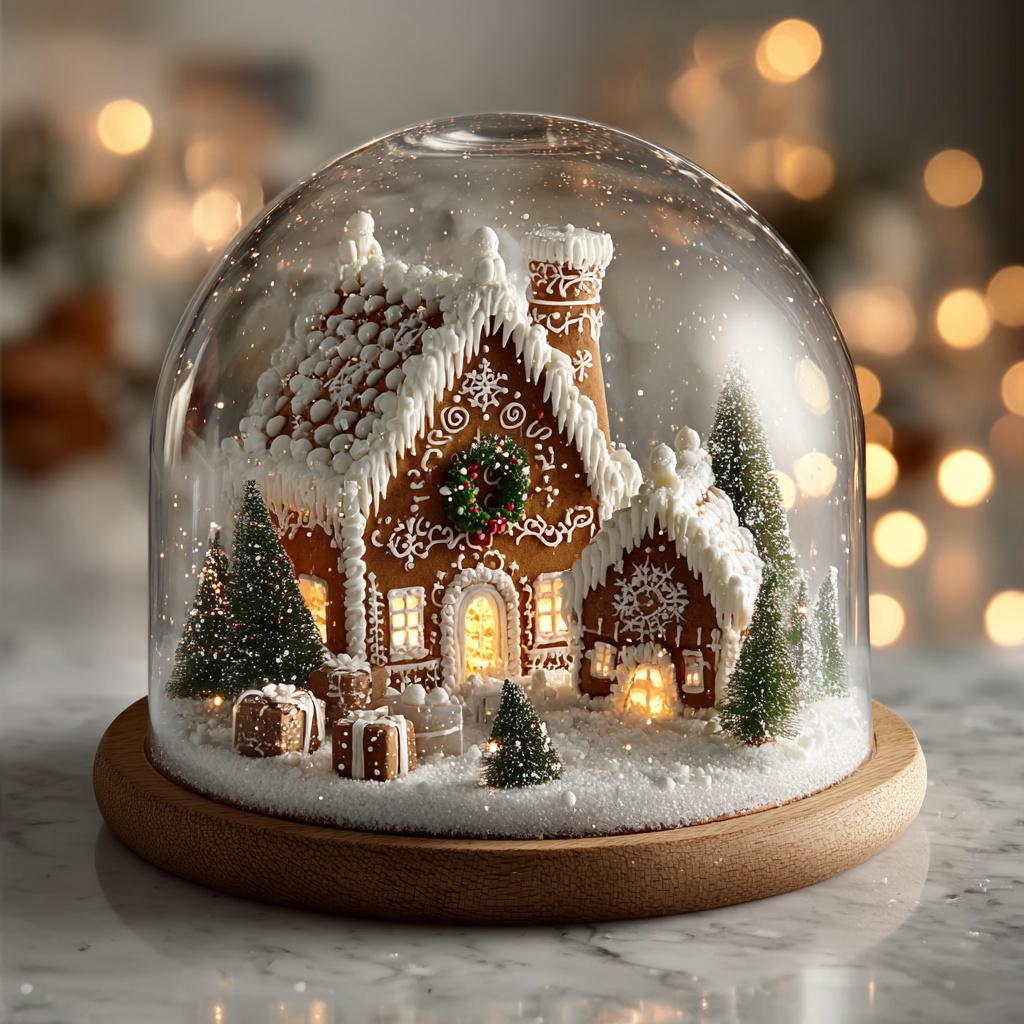
The Christmas Snow Globe Dessert Dome Recipe is a magical treat that brings a whimsical winter wonderland right to your holiday table. Imagine a clear dome unveiling a festive scene of chocolatey brownies, snowy coconut, and charming gingerbread houses, all wrapped in a sweet embrace of powdered sugar and delicate marshmallows. This dessert is as delightful to look at as it is to eat, making it the perfect showstopper for your holiday celebrations. Whether you’re sharing it with family or gifting it as a centerpiece, this dessert dome is sure to steal hearts and create lasting memories.
Ingredients You’ll Need
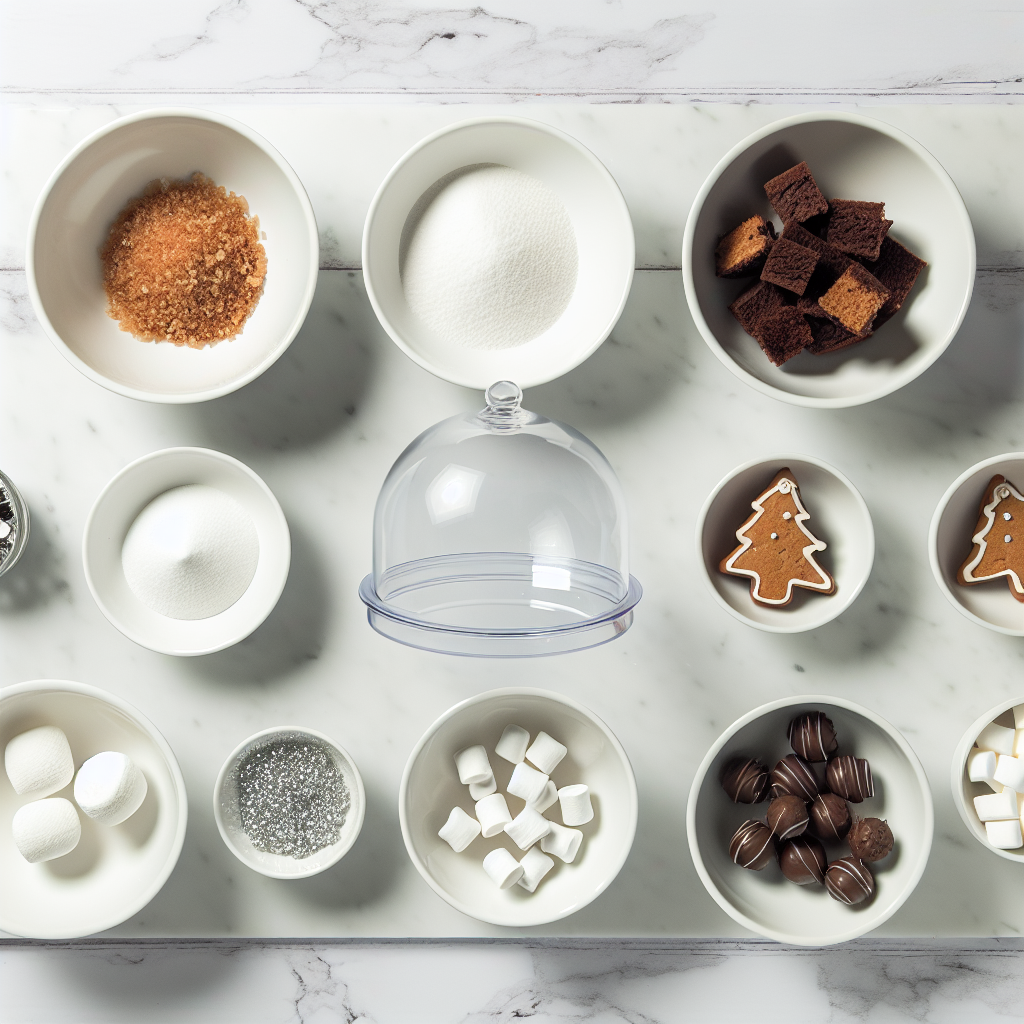
Whenever I whip up this Christmas Snow Globe Dessert Dome Recipe, I’m reminded how these simple yet essential ingredients come together to create a stunning visual and delicious taste experience. Each item brings a unique flavor, texture, or festive touch to the dome, making the final result truly special.
- Clear plastic dessert dome: This is your magical snow globe container that showcases the entire dessert scene.
- 2 cups mini brownies or chocolate cake cubes: The rich and moist base that forms the heart of the dessert.
- 1 cup powdered sugar: Sprinkled on top to mimic freshly fallen snow for that perfect wintery effect.
- 1 cup shredded coconut: Adds snowy texture and a subtle tropical flavor that enhances the sweetness.
- 1/2 cup mini marshmallows: Soft and pillowy accents that resemble fluffy snowballs.
- 1/2 cup chocolate truffles or cake pops: These add decadence and interest with their rich texture and shape.
- 6–8 gingerbread cookies (trees or houses): The festive village pieces that bring life to the snowy scene.
- 1/4 cup white chocolate chips, melted: This acts like edible glue to secure marshmallows and decorations.
- 1 tablespoon honey or corn syrup: Provides a sticky element to help hold everything in place with a glossy finish.
- Optional: edible silver pearls or festive sprinkles: These finishing touches add sparkle and holiday cheer.
How to Make Christmas Snow Globe Dessert Dome Recipe
Step 1: Prepare Your Serving Plate
Finding the right flat serving plate that securely fits your clear plastic dessert dome is the first exciting step. This plate will be the foundation of your snowy village, so make sure it is sturdy and just the right size to hold everything inside the dome without wobbling.
Step 2: Build the Base with Brownie or Cake Cubes
Arrange your mini brownies or chocolate cake cubes in the center of the plate, stacking them slightly to create a raised base. This not only adds dimension but also makes your snow globe scene feel like it has real depth. The rich chocolate flavor is the perfect contrast to all the snowy sweetness to come.
Step 3: Sprinkle with Powdered Sugar
Next, dust the brownies or cake cubes with powdered sugar evenly, creating that irresistible snow effect. This visual is key—it gently transforms the dessert into a winter wonderland right before your eyes, inviting everyone to take part in the magic.
Step 4: Add the Shredded Coconut for Texture
Scatter the shredded coconut over the powdered sugar to add both a visual and textural element resembling fresh snow. The tiny flakes catch the light beautifully and give a soft, snowy blanket finish that makes each bite feel like a winter stroll in a forest.
Step 5: Insert Gingerbread Cookies as Your Festive Village
Place gingerbread cookies upright around the base to create charming winter houses and trees in your snow globe. These cookies are the heart and soul of the scene, bringing a warm homemade holiday feel that is sure to delight kids and adults alike.
Step 6: Secure Decorations with Melted White Chocolate or Honey
Use the melted white chocolate chips or honey to carefully attach mini marshmallows, chocolate truffles, and any other decorations to your scene. Think of this as your edible glue that locks everything in place while adding a sweet, glossy finish to the details, keeping your snow globe intact.
Step 7: Add Finishing Touches with Edible Pearls or Sprinkles
For a little extra magic, gently decorate the scene with edible silver pearls or festive sprinkles. These small sparkles bring a holiday sparkle that mimics twinkling lights and shimmering snowflakes, enhancing the overall enchantment of your Christmas Snow Globe Dessert Dome Recipe.
Step 8: Cover and Chill
Once your scene is complete, carefully cover it with the clear dessert dome, enclosing your beautiful winter wonderland. Chill the dessert in the fridge for at least 15 minutes to allow the white chocolate or honey glue to set firmly, ensuring everything stays perfectly in place when it’s time to enjoy.
How to Serve Christmas Snow Globe Dessert Dome Recipe
Garnishes
When serving your Christmas Snow Globe Dessert Dome Recipe, a simple dusting of extra powdered sugar just before un-dome adds that fresh-fallen snow touch. You can also place a few sprigs of fresh rosemary or holly around the base for a lovely green contrast and holiday aroma that complements the sweet treat beautifully.
Side Dishes
This dessert shines best as the centerpiece, but you can complement it with lighter side dishes such as a crisp peppermint salad or a scoop of cinnamon-spiced whipped cream. These sides freshen the palate and balance the richness of the chocolate and sweetness within the dome.
Creative Ways to Present
Why not serve your Christmas Snow Globe Dessert Dome Recipe as individual mini snow globes for a personal touch at each place setting? Use mini clear domes and smaller portions, so each guest can have their own snowy village to marvel at and enjoy. It also makes for a wonderfully festive gift idea to take along to holiday parties.
Make Ahead and Storage
Storing Leftovers
If you happen to have any leftovers of this festive dessert dome (though it’s hard to resist finishing it in one sitting), keep it refrigerated with the dome securely placed. It will stay fresh for up to two days, preserving the soft textures and the delicate decorations.
Freezing
Freezing this dessert is not recommended because the textures of the brownies, marshmallows, and cookies can become compromised upon thawing. Plus, the visual charm of the snow globe effect is best enjoyed fresh and intact.
Reheating
This dessert is best served chilled and does not require reheating. If you prefer, you can let it sit at room temperature for 15-20 minutes before serving to take the chill off, which allows the flavors to become even more pronounced and the textures just perfect.
FAQs
Can I use other cake flavors instead of chocolate brownies?
Absolutely! While chocolate brownies give a rich base, you can experiment with vanilla or red velvet cake cubes for a different twist that still complements the snowy aesthetic beautifully.
Are there alternatives to the plastic dessert dome?
If you want a reusable option, consider a glass cloche; just be careful when handling it since it’s fragile. The key is to have a clear dome to preserve the snow globe effect.
Can I prepare the dessert dome in advance?
Yes, assembling the dome a few hours ahead of time is possible. Just keep it refrigerated and chilled to maintain the decorations and the fresh look right until the moment you serve it.
What if I don’t have white chocolate chips for the glue?
No worries! Honey or corn syrup works beautifully as a sticky natural adhesive to hold your marshmallows and decorations in place just as well.
How do I keep the gingerbread cookies from getting soggy?
To keep them crisp, only assemble the cookies into the dessert dome shortly before serving and store the assembled dome in a dry, cool environment. Avoid excessive moisture exposure to maintain their crunchiness.
Final Thoughts
This Christmas Snow Globe Dessert Dome Recipe is a joyful celebration of the holidays wrapped up in sweetness and charm. It’s perfect for those who love crafting something both beautiful and delicious to impress their family and friends. Give it a try this season and watch how it becomes the shining star of your festive table, filling everyone’s hearts with delight and wonder.
Print
Christmas Snow Globe Dessert Dome Recipe
- Prep Time: 20 minutes
- Cook Time: 0 minutes
- Total Time: 20 minutes
- Yield: 6 servings
- Category: Dessert
- Method: No-Cook
- Cuisine: American
Description
This delightful Christmas Snow Globe Dessert Dome is a festive and visually stunning holiday treat that transforms mini brownies, gingerbread cookies, and sweet decorations into a charming winter village scene under a clear dome. Perfect for holiday gatherings, this no-cook assembly recipe combines textures and flavors with a snowy aesthetic, making it a centerpiece that steals the holiday table.
Ingredients
Main Ingredients
- 2 cups mini brownies or chocolate cake cubes
- 1 cup powdered sugar
- 1 cup shredded coconut
- 1/2 cup mini marshmallows
- 1/2 cup chocolate truffles or cake pops
- 6–8 gingerbread cookies (trees or houses)
- 1/4 cup white chocolate chips, melted
- 1 tablespoon honey or corn syrup
Optional Decorations
- Edible silver pearls or festive sprinkles
Equipment
- 1 clear plastic dessert dome
- Flat serving plate that fits the dessert dome securely
Instructions
- Prepare the Serving Plate: Select a flat serving plate that fits the clear plastic dessert dome securely to ensure stability for the assembled dessert.
- Create the Base: Arrange the mini brownies or chocolate cake cubes in the center of the plate to form a raised base to give height and structure to the snow globe scene.
- Apply Snow Effect: Evenly sprinkle powdered sugar over the cake cubes to mimic freshly fallen snow, creating a festive snowy ground effect.
- Add Texture: Sprinkle shredded coconut on top of the powdered sugar to add texture and depth, enhancing the snow-like appearance.
- Set Up the Village: Place the gingerbread cookies upright around the base to form a charming winter village scene within the dome.
- Secure Decorations: Use melted white chocolate or honey to gently adhere the mini marshmallows, chocolate truffles, and other decorations in place to prevent shifting.
- Final Decorations: Lightly decorate the scene with edible silver pearls or festive sprinkles for an extra touch of holiday sparkle.
- Cover with Dome: Carefully cover the entire assembly with the clear plastic dessert dome, creating the snow globe effect.
- Chill Before Serving: Refrigerate the completed dessert dome for 15 minutes to allow the decorations to set and the scene to stabilize before serving.
Notes
- This dessert is assembled and served without baking, making it ideal for an easy and quick holiday centerpiece.
- Substitute brownies or cake cubes with gluten-free options if needed for dietary restrictions.
- Use white chocolate chips or candy melts to enhance the adhesion of decorations.
- Store the dessert dome in the refrigerator and consume within 1-2 days for best freshness.
- For a vegan version, replace marshmallows and chocolate components with plant-based alternatives.
- Handle the dessert dome carefully to avoid disturbing the delicate arrangement inside.


