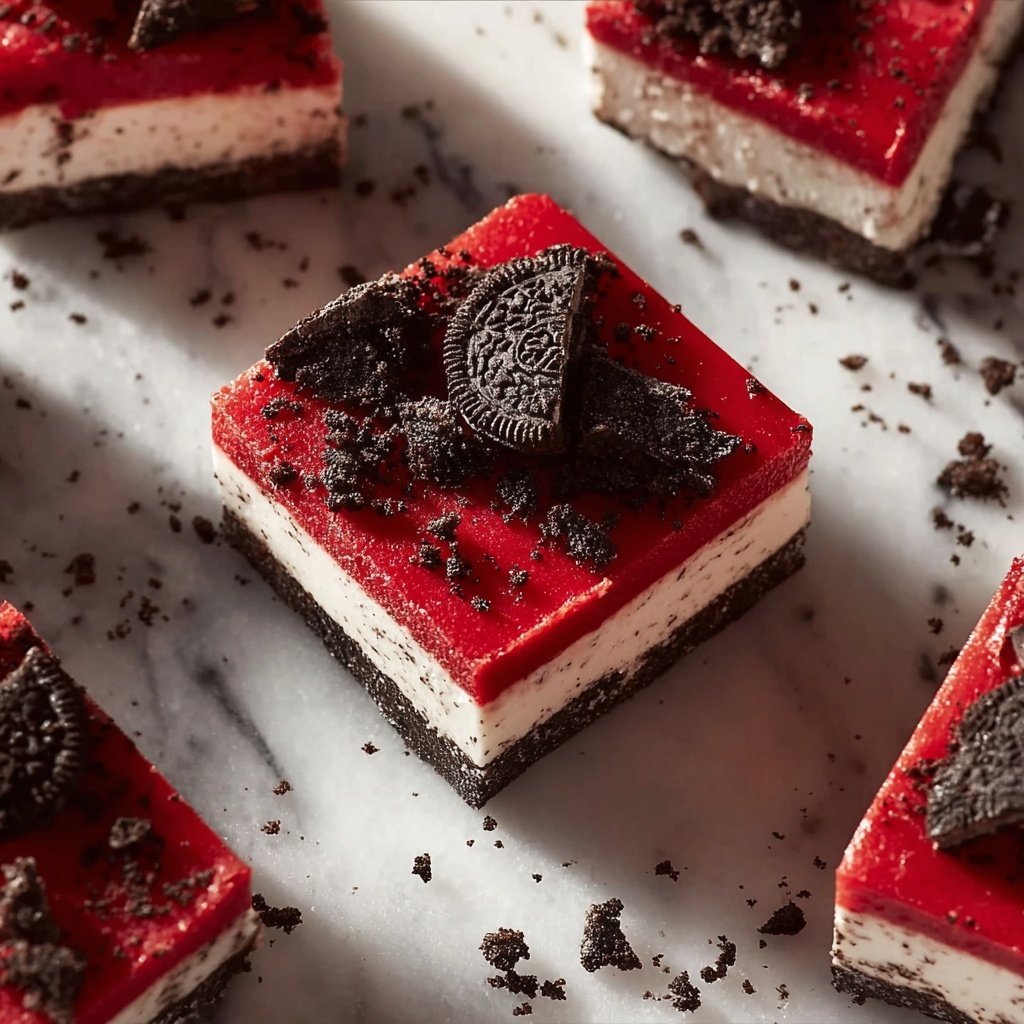
If you have a sweet tooth and love decadent desserts, you will absolutely adore this Red Velvet Oreo Fudge Recipe. It’s a luscious combination of creamy white and semi-sweet chocolate, the festive vibrancy of red velvet, and the irresistible crunch and flavor of crushed Oreos throughout. Perfect for celebrations or whenever you want to treat yourself and friends, this fudge brings a little magic to your dessert table with its stunning color, melt-in-your-mouth texture, and that classic Oreo twist that makes each bite truly unforgettable.
Ingredients You’ll Need
The beauty of this Red Velvet Oreo Fudge Recipe lies in its simple, carefully chosen ingredients. Each one plays a crucial role, from the smooth sweetness of white chocolate chips to the rich depth of semi-sweet chocolate chips, all the way to the signature crunch and flavor punch of Oreos. These essentials ensure the fudge tastes luxurious while keeping the process straightforward and fun.
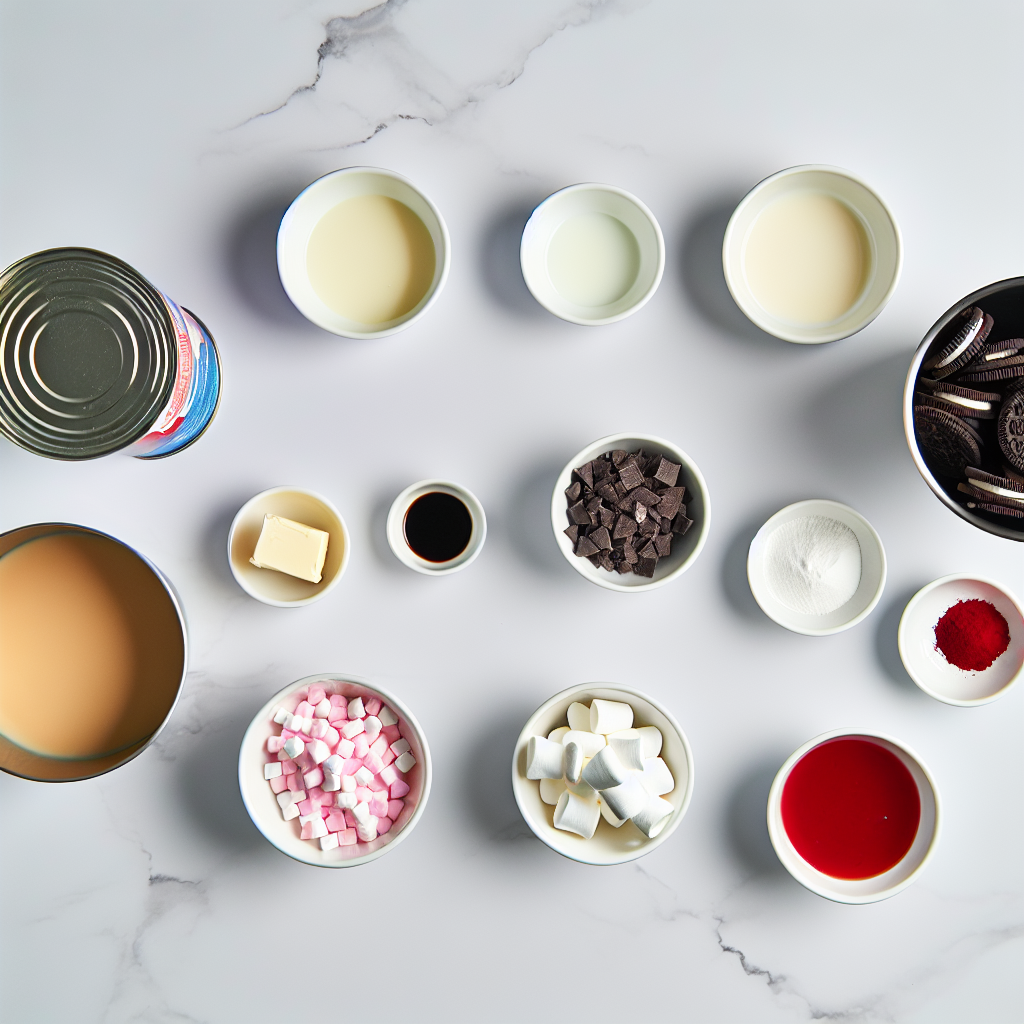
- Sweetened condensed milk (14 oz.): This adds creamy sweetness and gives the fudge its rich, smooth base.
- White chocolate chips (2 cups): For that gorgeous, velvety texture and elegant sweetness that complements the red velvet flavor.
- Semi-sweet chocolate chips (1 cup): Adds a touch of balanced chocolate richness to round out the taste.
- Mini marshmallows (2 cups): Helps create a soft, melt-in-your-mouth texture and adds a fun, fluffy element.
- Unsalted butter (2 tablespoons): Enhances creaminess and ensures the fudge sets perfectly.
- Vanilla extract (½ teaspoon): Boosts all the sweet flavors with a subtle aromatic note.
- Red food coloring (1 teaspoon): Gives the fudge its iconic bold red velvet color—adjust to get the shade you love.
- Crushed Oreos (2½ cups, about 24-28 Oreos): Adds that beloved crunchy texture and cookie flavor—plus extra for topping!
How to Make Red Velvet Oreo Fudge Recipe
Step 1: Prepare Baking Pan and Crush Oreos
Start by lining an 8×8 inch baking pan with parchment paper, be sure there’s enough overhang on the sides to make lifting the fudge out a breeze later on. Then, crush your Oreos in a plastic bag using a sturdy spoon until you get small, even pieces—these little cookie bits are what make the fudge so delightfully textured.
Step 2: Melt Ingredients Together
Set a medium saucepan over low to medium-low heat and combine the sweetened condensed milk, white chocolate chips, semi-sweet chocolate chips, butter cubes, and mini marshmallows. Stir constantly for about 8 to 10 minutes until all the ingredients melt smoothly together. Keeping the heat low is key to preventing any burning or grainy texture, so be patient and enjoy this lovely melting process.
Step 3: Add Flavor and Mix in Oreos
Once the mixture is completely smooth, remove the saucepan from heat. Stir in the vanilla extract for that extra burst of aroma and then add the red food coloring, blending it until you get that perfect red velvet hue. Finally, gently fold in about 2 cups of the crushed Oreos, spreading cookie goodness evenly throughout the fudge base.
Step 4: Transfer to Pan and Top
Pour the luscious fudge mixture into your prepared pan and spread it out evenly. Tap the pan lightly on the countertop a few times to settle the fudge and release any trapped air bubbles. Then, sprinkle the remaining crushed Oreos on top, pressing them gently into the fudge to make sure they stick beautifully and add extra crunch on every bite.
Step 5: Chill and Cut
Pop the pan into the refrigerator and chill the fudge for about 4 hours, until it is completely set and firm. When ready, use the parchment paper overhang to lift the fudge from the pan, then cut it into 1-inch squares or any size you prefer. This recipe can yield up to 64 delectable pieces that are perfect for sharing or savoring all by yourself!
How to Serve Red Velvet Oreo Fudge Recipe
Garnishes
To make your Red Velvet Oreo Fudge Recipe even more festive, consider adding a dusting of powdered sugar or cocoa powder for a delicate finish. A few whole Oreo pieces or some white chocolate shavings on top also create an inviting, elegant presentation that catches the eye and teases your taste buds.
Side Dishes
This fudge pairs beautifully with a cold glass of milk or a hot cup of coffee or tea—the creamy sweetness of the fudge balances nicely with these beverages. If you want to serve it during a party, fresh berries or light whipped cream on the side can add a refreshing contrast that brightens the rich flavors.
Creative Ways to Present
For a special gifting touch, wrap the fudge squares individually in colorful parchment or cellophane tied with a ribbon. You can also arrange them on a decorative platter or tiered dessert stand for an eye-catching dessert table that will have everyone reaching for seconds. Red and white themed parties really benefit from these vibrant, luscious treats as the shining star.
Make Ahead and Storage
Storing Leftovers
Store any leftover Red Velvet Oreo Fudge Recipe in an airtight container in the refrigerator. It keeps well for up to a week while maintaining its soft, creamy texture with that inviting Oreo crunch intact.
Freezing
You can freeze the fudge for longer storage by wrapping it tightly in parchment or plastic wrap and placing it in a freezer-safe container. When frozen, it lasts up to 2 months. Just thaw overnight in the fridge before enjoying.
Reheating
This fudge is best enjoyed chilled or at room temperature, so reheating is usually not necessary. If you want it a bit softer, let it sit at room temperature for 10–15 minutes. Avoid microwaving as it may melt unevenly and lose its perfect texture.
FAQs
Can I use regular chocolate instead of chips?
You can substitute regular baking chocolate chopped into small pieces, but chocolate chips are made to melt smoothly and consistently, making them ideal for this fudge recipe.
What if I don’t have mini marshmallows?
If mini marshmallows aren’t available, you can use regular-sized ones but cut them into smaller pieces for even melting and texture distribution.
Can I adjust the red food coloring amount?
Absolutely! The color intensity is up to your preference, so feel free to add a little less or more food coloring to get your perfect red velvet shade.
Is it necessary to refrigerate the fudge?
Yes, refrigerating the fudge helps it set properly and keeps the texture firm and satisfying. Room temperature alone will not achieve the same consistency.
How long does the fudge last at room temperature?
For best quality and safety, keep the fudge refrigerated. At room temperature, it may soften too much and won’t last more than a day or so.
Final Thoughts
This Red Velvet Oreo Fudge Recipe is a joyous treat that brings together all the flavors and textures you love in a dessert. Whether you’re making it for a special occasion or a cozy night in, it’s a crowd-pleaser that tastes as good as it looks. Don’t wait—grab those Oreos and start creating your own batch of this red velvet magic today!
Print
Red Velvet Oreo Fudge Recipe
- Prep Time: 15 minutes
- Cook Time: 10 minutes
- Total Time: 4 hours 25 minutes
- Yield: 36 servings (approximately 64 pieces when cut into 1-inch squares)
- Category: Dessert
- Method: Stovetop
- Cuisine: American
Description
This Red Velvet Oreo Fudge combines creamy white and semi-sweet chocolate with the classic crunch of Oreos, mini marshmallows, and a pop of red food coloring for a festive, rich, and indulgent treat. Perfect for parties, holidays, or any time you want a sweet, colorful dessert.
Ingredients
Fudge Mixture
- 1 can sweetened condensed milk (14 oz.)
- 2 cups white chocolate chips
- 1 cup semi-sweet chocolate chips
- 2 cups mini marshmallows
- 2 tablespoons unsalted butter, sliced into smaller pieces
- ½ teaspoon vanilla extract
- 1 teaspoon red food coloring (adjust to preference)
Oreos
- 2½ cups crushed Oreos (about 24–28 Oreos), plus extra as desired for topping
Instructions
- Prepare baking pan and crush Oreos: Line an 8×8 inch baking pan with parchment paper, allowing enough overhang on the sides for easy lifting of the fudge later. In a plastic bag, use a large spoon to crush the Oreos until broken into small pieces.
- Melt ingredients: In a medium saucepan over low to medium-low heat, combine the sweetened condensed milk, white chocolate chips, semi-sweet chocolate chips, butter, and mini marshmallows. Stir continuously for 8-10 minutes until everything is fully melted and smooth. Using lower heat helps prevent burning and ensures a creamy texture.
- Add flavor and mix Oreos: Remove the saucepan from heat. Stir in the vanilla extract and red food coloring until evenly mixed. Gently fold about 2 cups of the crushed Oreos into the fudge mixture, distributing them evenly without breaking them down further.
- Transfer and top: Pour the fudge mixture into the prepared baking pan, spreading it out evenly. Tap the pan on the countertop several times to settle the fudge and release any trapped air bubbles. Sprinkle the remaining crushed Oreos on top, gently pressing them into the fudge so they stick well.
- Chill and serve: Refrigerate the fudge for about 4 hours or until fully set and firm. Once set, use the parchment paper overhang to lift the fudge out of the pan. Cut into 1-inch pieces or your preferred size, yielding up to 64 pieces. Enjoy your creamy, delicious red velvet Oreo fudge!
Notes
- For best results, melt the fudge ingredients over low heat to avoid scorching.
- Adjust the amount of red food coloring to get your desired shade of red.
- You can store the fudge in an airtight container in the refrigerator for up to one week.
- For easier cutting, allow fudge to come slightly to room temperature before slicing.
- Use parchment paper with a good overhang to make removing the fudge from the pan quick and easy.


