
Delight in every bite of this Red Velvet Cake with Cream Cheese Frosting Recipe, a true classic that perfectly balances a tender, moist crumb with a tangy, luscious frosting. This cake’s vibrant red color paired with a hint of cocoa flavor and the creamy sweetness of cream cheese frosting make it a showstopper for any celebration or a special treat whenever your heart desires. Each slice feels like a slice of heaven, and once you try this recipe, it just might become your go-to dessert to share with friends and family.
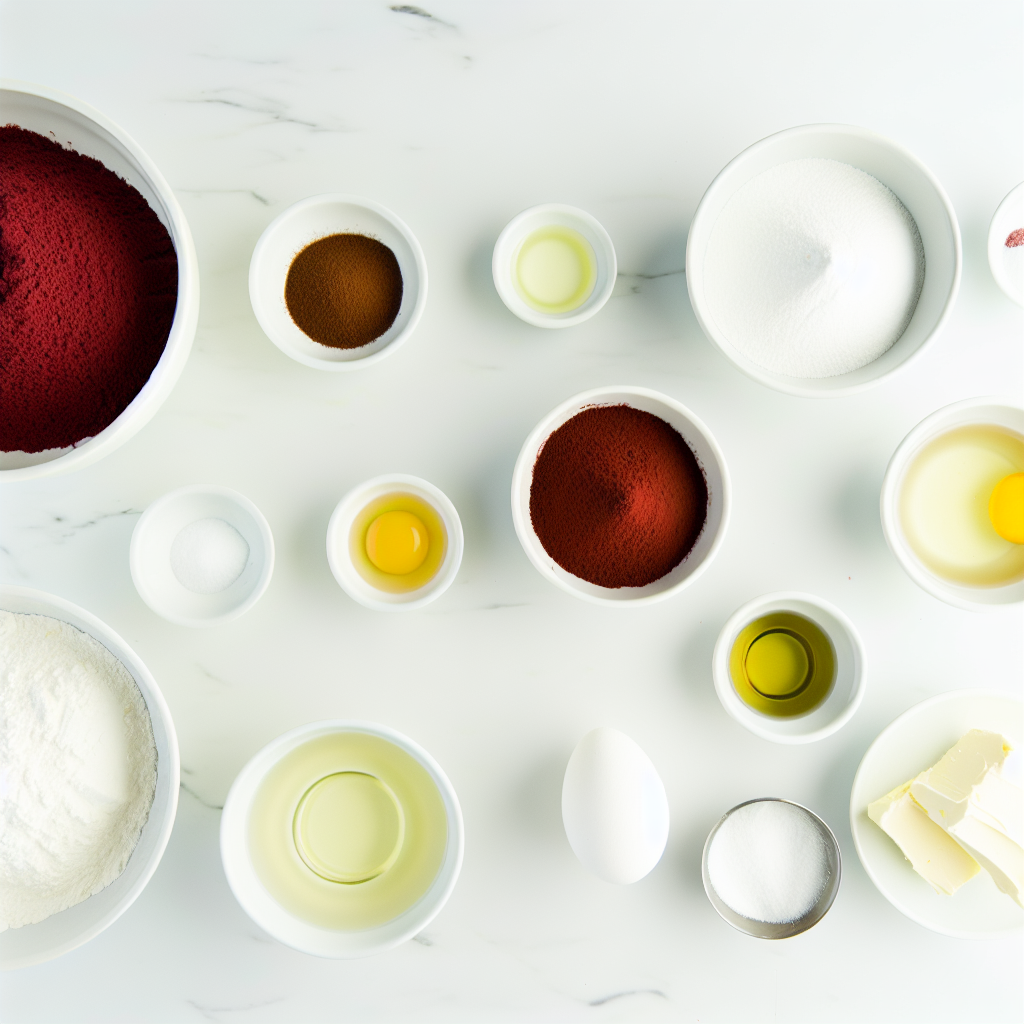
Ingredients You’ll Need
Gathering the right ingredients is key to nailing the perfect Red Velvet Cake with Cream Cheese Frosting Recipe. Each one plays a distinct role, creating the signature texture, flavor, and that enchanting red hue that makes this cake so unforgettable.
- All-purpose flour: The backbone of the cake providing structure and a tender crumb.
- Granulated sugar: Sweetens the batter and helps create a light texture.
- Baking soda: Acts as a leavening agent, helping the cake rise beautifully.
- Cocoa powder: Adds a subtle chocolate note without overpowering the cake.
- Salt: Enhances all the flavors to bring out the best in every bite.
- Vegetable oil: Keeps the cake moist and tender.
- Buttermilk (room temperature): Provides a slight tang and reacts with baking soda for a delicate crumb.
- Large eggs (room temperature): Bind the ingredients and add richness.
- Red food coloring: Gives the cake its iconic, vibrant red color; gel coloring is best for intensity.
- White vinegar: Activates the cocoa powder and enhances the cake’s tenderness.
- Vanilla extract: Adds warmth and depth to the flavor.
- Cream cheese (softened): Essential for the frosting, lending tanginess and creaminess.
- Unsalted butter (softened): Creates a smooth, rich frosting alongside the cream cheese.
- Powdered sugar: Sweetens the frosting while ensuring a silky texture.
- Pinch of salt: Balances the sweetness in the frosting perfectly.
How to Make Red Velvet Cake with Cream Cheese Frosting Recipe
Step 1: Prepare Your Pans and Preheat the Oven
Start by preheating your oven to 350°F (175°C). Grease two 9-inch round cake pans thoroughly, then flour them or line them with parchment paper to prevent sticking. This simple prep helps your cake layers come out perfectly shaped and easy to remove when they’re done baking.
Step 2: Mix the Dry Ingredients
In a large bowl, whisk together flour, granulated sugar, baking soda, cocoa powder, and salt. Getting these combined well now ensures a consistent crumb and even rise when you add the wet ingredients later.
Step 3: Combine Wet Ingredients Separately
In another bowl, beat together the vegetable oil, buttermilk, eggs, red food coloring, white vinegar, and vanilla extract until the mixture is smooth and well blended. This vibrant red liquid mixture is where the cake really starts to come to life.
Step 4: Blend Wet and Dry Ingredients Carefully
Pour the wet ingredients into the dry, mixing gently just until combined and smooth. Avoid overmixing as it can toughen the cake — tender is what we’re after!
Step 5: Bake the Cake
Divide the batter evenly between your prepared pans and place them in the oven. Bake for 30 to 35 minutes, or until a toothpick inserted into the center comes out clean. When done, let the cakes cool in the pans for about 10 minutes before transferring them to wire racks to cool completely. Cooling is crucial so the frosting doesn’t melt when applied.
Step 6: Make the Cream Cheese Frosting
Beat the softened cream cheese and butter together until fluffy and smooth. Gradually add powdered sugar, vanilla extract, and a pinch of salt, then beat until silky and spreadable. This frosting brings the perfect tangy contrast to the sweet cake layers.
Step 7: Frost the Cake
Place one cake layer on your serving plate and spread a generous layer of frosting over it. Top with the second cake layer and coat the entire outside with the remaining frosting. For neat slices, chill the cake for 30 minutes before cutting.
How to Serve Red Velvet Cake with Cream Cheese Frosting Recipe
Garnishes
To elevate your Red Velvet Cake with Cream Cheese Frosting Recipe, consider adding simple garnishes like fresh berries, a dusting of cocoa or powdered sugar, or even some edible flowers. These touches make your cake look as impressive as it tastes.
Side Dishes
Pair your cake with a scoop of vanilla ice cream, a cup of strong coffee, or a glass of cold milk to complement its rich texture and balance the sweetness.
Creative Ways to Present
Try serving your cake as individual mini cupcakes topped with the same luscious cream cheese frosting for a fun, party-friendly idea. Layer it with fresh strawberries between layers for a fruity twist, or create a checkerboard pattern with alternating red velvet and vanilla cake layers for a stunning visual surprise.
Make Ahead and Storage
Storing Leftovers
Your leftover Red Velvet Cake with Cream Cheese Frosting Recipe can be stored covered in the refrigerator for up to 4 days. Keep it tightly wrapped or in an airtight container to maintain moisture and freshness.
Freezing
You can freeze the cake layers (unfrosted) wrapped well in plastic wrap and foil for up to 3 months. Thaw overnight in the refrigerator before frosting. Alternatively, the fully frosted cake can be frozen covered tightly, but it’s best consumed within a month for optimal texture.
Reheating
If you prefer to enjoy your refrigerated or thawed cake at room temperature, simply let it sit out for about 30 minutes before serving. This brings back the frosting’s creamy texture and fresh cake softness, perfect for indulging.
FAQs
Can I use regular vinegar instead of white vinegar?
Yes, you can substitute white vinegar with apple cider vinegar if that’s what you have on hand. Both help activate the baking soda and enhance the cake’s tenderness without altering flavor significantly.
Is it necessary to use buttermilk?
Buttermilk is key in this Red Velvet Cake with Cream Cheese Frosting Recipe because it adds a mild tang and acidity that help the cake rise and keep it moist. If you don’t have buttermilk, you can make a substitute by adding a tablespoon of vinegar or lemon juice to a cup of milk and letting it sit for 5 minutes.
How can I get a more vibrant red color?
Use gel food coloring rather than liquid for a richer, deeper red tone. The concentrated color gels give a professional, eye-catching finish without adding extra liquid that could affect the batter.
Can I make this cake gluten-free?
For a gluten-free version, substitute the all-purpose flour with a gluten-free flour blend designed for baking. Be sure to check the blend contains xanthan gum or add it separately to mimic the structure of wheat flour.
What’s the best way to avoid the frosting from being too runny?
Make sure the cream cheese and butter are just softened and not melted before beating. If your frosting is too soft, chill it in the fridge briefly to firm up before spreading. Adding powdered sugar gradually also helps you achieve the perfect consistency.
Final Thoughts
There’s something incredibly comforting about making and sharing this Red Velvet Cake with Cream Cheese Frosting Recipe. It’s a timeless dessert that brings warmth, color, and joy to any occasion. Whether you’re celebrating a holiday, a birthday, or just in the mood for delicious cake, this recipe is sure to become a beloved classic in your kitchen. Give it a try—you might find you’re baking it again and again!
Print
Red Velvet Cake with Cream Cheese Frosting Recipe
- Prep Time: 20 minutes
- Cook Time: 35 minutes
- Total Time: 55 minutes plus cooling time
- Yield: 12 servings
- Category: Dessert
- Method: Baking
- Cuisine: American
- Diet: Vegetarian
Description
This classic Red Velvet Cake is a luscious, moist, and tender treat layered with a creamy and tangy cream cheese frosting. Perfect for birthdays, holidays, or Valentine’s Day, this American favorite combines a subtle cocoa flavor with a striking red color to create an irresistible dessert experience.
Ingredients
For the Cake
- 2 1/2 cups all-purpose flour
- 1 1/2 cups granulated sugar
- 1 teaspoon baking soda
- 1 teaspoon cocoa powder
- 1/2 teaspoon salt
- 1 1/2 cups vegetable oil
- 1 cup buttermilk (room temperature)
- 2 large eggs (room temperature)
- 2 tablespoons red food coloring
- 1 teaspoon white vinegar
- 2 teaspoons vanilla extract
For the Cream Cheese Frosting
- 8 ounces cream cheese (softened)
- 1/2 cup unsalted butter (softened)
- 3 1/2 cups powdered sugar
- 1 teaspoon vanilla extract
- pinch of salt
Instructions
- Preheat and Prepare Pans: Preheat your oven to 350°F (175°C). Grease and flour two 9-inch round cake pans or line them with parchment paper to ensure the cakes release easily after baking.
- Mix Dry Ingredients: In a large bowl, whisk together the all-purpose flour, granulated sugar, baking soda, cocoa powder, and salt until combined evenly to distribute the leavening and flavor elements.
- Combine Wet Ingredients: In a separate bowl, beat together the vegetable oil, room temperature buttermilk, eggs, red food coloring, white vinegar, and vanilla extract until the mixture is smooth and evenly colored.
- Blend Batter: Pour the wet ingredients into the dry ingredients and mix gently just until smooth and fully combined. Be careful not to overmix to keep the cake tender.
- Divide and Bake: Evenly divide the batter into the prepared cake pans. Bake in the preheated oven for 30 to 35 minutes, or until a toothpick inserted into the center comes out clean, indicating the cakes are fully baked.
- Cool Cakes: Let the cakes cool in the pans for 10 minutes to settle, then transfer them onto wire racks to cool completely before frosting.
- Prepare Frosting: Beat the softened cream cheese and unsalted butter together until fluffy. Add powdered sugar, vanilla extract, and a pinch of salt, then continue beating until the frosting is smooth and spreadable.
- Assemble and Chill: Spread frosting between the two cake layers, then cover the top and sides evenly with the remaining frosting. Chill the frosted cake for at least 30 minutes before slicing to achieve clean, neat cuts.
Notes
- Use gel food coloring for a more vibrant and intense red color.
- Cake layers can be baked ahead of time and frozen for future use.
- This cake is ideal for special occasions such as birthdays, holidays, or Valentine’s Day celebrations.


