
If there is one dessert that instantly brings comfort and the nostalgic taste of Southern hospitality to mind, it has to be the Classic Banana Pudding with Homemade Vanilla Custard Recipe. This luscious pudding combines velvety, smooth vanilla custard with layers of ripe banana slices and crunchy Nilla wafers. The result is an irresistible harmony of creamy, sweet, and slightly crunchy textures that make every bite feel like a warm, loving hug from your grandma’s kitchen. Whether you’re serving it for a family gathering or a casual weeknight treat, this recipe never fails to impress with its perfect balance of flavors and timeless charm.
Ingredients You’ll Need
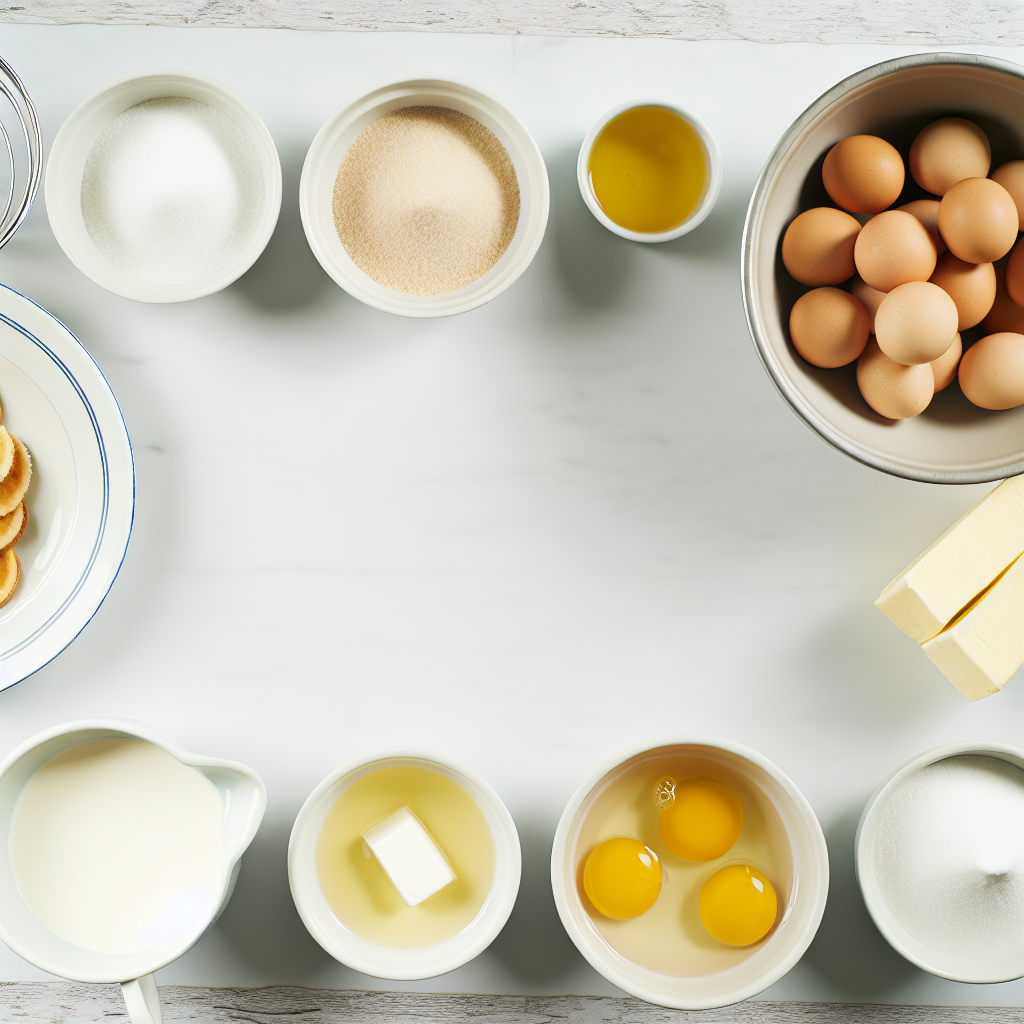
Gathering simple, high-quality ingredients is the secret to making this dessert shine. Each component plays a vital role in delivering the perfect taste, texture, and inviting golden color that defines the Classic Banana Pudding with Homemade Vanilla Custard Recipe.
- 3 Ripe Bananas: Choose bananas that are sweet and just ripe for the best flavor without any bitterness.
- 64 Nilla Wafers: Their crisp crunch beautifully contrasts with the creamy custard and tender bananas.
- 6 Egg yolks (room temp): These provide richness and help thicken the custard to a silky texture.
- 1 cup Sugar: Balances sweetness and helps the custard develop a smooth finish.
- 4 tablespoons Corn starch: Acts as a natural thickener for the custard, making it perfectly creamy without lumps.
- 2.5 cups Whole milk: The base of the custard, giving it a rich mouthfeel and mild flavor.
- 2 tablespoons Vanilla extract: Infuses the custard with warm, inviting vanilla notes.
- 2 tablespoons Butter: Adds a luxurious silkiness and depth once stirred into the cooked custard.
How to Make Classic Banana Pudding with Homemade Vanilla Custard Recipe
Step 1: Whisk the Egg Yolks, Sugar, and Corn Starch
Start by combining the egg yolks, sugar, and corn starch in a large bowl. Whisk them together until the mixture becomes smooth and pale yellow, which ensures even cooking later and a luscious texture without any graininess.
Step 2: Heat the Milk Gently
Next, pour the milk into a medium saucepan and place it over medium-high heat. Watch closely until the milk begins to foam gently along the edges—but do not let it boil. This step warms the milk just enough to temper the eggs and activate the thickening agent.
Step 3: Temper the Egg Mixture
Slowly drizzle the hot milk into the egg mixture while whisking constantly. This gradual combination helps prevent the eggs from scrambling, giving you a perfectly smooth custard base.
Step 4: Cook the Custard
Pour the entire mixture back into the saucepan and return it to medium heat. Whisk continuously until the custard starts to bubble and thickens enough to coat the back of your spoon. Then cook for another 60 seconds before removing it from the heat, ensuring the starch is fully cooked and the custard is silky.
Step 5: Add Butter and Vanilla
Immediately stir in the butter and vanilla extract. This enriches the custard with a velvety finish and layers of aromatic warmth that truly make this custard the heart of the Classic Banana Pudding with Homemade Vanilla Custard Recipe.
Step 6: Strain the Custard
Pour the custard through a fine mesh sieve into a clean bowl to catch any thick lumps and create a perfectly smooth texture that will meld beautifully with the bananas and wafers.
Step 7: Begin Layering the Pudding
Spoon a small amount of custard into the bottom of an 8 x 8 inch glass casserole dish. Then cover this base with a single layer of Nilla wafers, followed by a layer of thinly sliced bananas placed on top of each wafer, and finally, dollop about one-third of the custard over everything.
Step 8: Repeat the Layers
Repeat the layers two more times with wafers, banana slices, and custard. These repeated layers will give your pudding those classic, enticing stripes of flavor and texture that make each spoonful delightful.
Step 9: Finish with a Wafers Layer
On top of the final custard layer, add one more layer of Nilla wafers to create a crisp, textured finish that’s not completely submerged, giving a little extra bite as you dig in.
Step 10: Chill the Pudding
Cover the assembled pudding and refrigerate it for at least 2 hours, and up to overnight. This chilling time lets the flavors meld and the wafers soften just enough to absorb some of that dreamy homemade custard.
Step 11: Ready to Serve
Serve your Classic Banana Pudding with Homemade Vanilla Custard Recipe as is or elevate it with a generous scoop of Cool Whip or freshly whipped cream for an extra airy touch that balances the creamy richness below.
How to Serve Classic Banana Pudding with Homemade Vanilla Custard Recipe
Garnishes
A great garnish can transform the presentation and add an unexpected twist. Try topping your pudding with a sprinkle of crushed Nilla wafers or toasted pecans for crunch. Fresh mint leaves add a lovely pop of color and a hint of refreshing aroma, making the dish feel even more special.
Side Dishes
Pair this sweet treat with light, fresh accompaniments like a crisp green salad or sliced seasonal fruits to balance the richness of the pudding. It’s also amazing alongside a cup of strong coffee or iced tea to round out your dessert experience.
Creative Ways to Present
If you want to impress guests or personalize the dessert, try serving the pudding in individual glass cups or mason jars. Layer everything directly inside for charming servings that highlight the lush strata of bananas, wafers, and custard. You can also top each with a dollop of whipped cream and a wafer standing upright for an elegant look.
Make Ahead and Storage
Storing Leftovers
Leftover banana pudding can be tightly covered and stored in the refrigerator for up to 3 days. The flavor only deepens after resting, but note the wafers will continue to soften, creating a more uniform, creamy texture over time.
Freezing
Freezing is not recommended for this Classic Banana Pudding with Homemade Vanilla Custard Recipe because the bananas and custard do not freeze well and will separate or become mushy when thawed, detracting from that perfect homemade texture.
Reheating
This pudding is best served chilled and not reheated, as warming will break down the custard texture and soften the wafers too much. If you want a warmer dessert, try serving freshly made pudding instead or heat a small portion briefly with whipped cream on top.
FAQs
Can I use instant pudding mix instead of making homemade custard?
While instant pudding mix is a quicker option, it won’t give you the same depth of flavor or creamy texture as this Classic Banana Pudding with Homemade Vanilla Custard Recipe made from scratch. The homemade custard adds richness and a smoothness that elevated desserts are known for.
How many servings does this recipe make?
This recipe yields about 9 servings, making it a perfect size for a family gathering or small party. You can easily double it for larger crowds.
Can I substitute the Nilla wafers with another cookie?
Yes, you can experiment with other light, crisp cookies like vanilla wafers or shortbread. Just keep in mind the texture and sweetness may vary slightly, but the classic flavor profile is best maintained with Nilla wafers.
What’s the best way to slice bananas for the pudding?
Slice the bananas evenly into about 1/4 inch thick slices. This size balances nicely between softening in the pudding and maintaining structure, so each bite has identifiable banana flavor and texture.
Can I make this dessert vegan or dairy-free?
Traditional banana pudding with homemade custard relies on eggs and whole milk, so to make it vegan or dairy-free, you would need to substitute with plant-based milk and an egg alternative along with thickening agents like agar or cornstarch. However, it will have a different texture and flavor than the Classic Banana Pudding with Homemade Vanilla Custard Recipe.
Final Thoughts
I can honestly say this Classic Banana Pudding with Homemade Vanilla Custard Recipe has a way of turning ordinary days into something special. The tender bananas, crisp wafers, and rich custard come together to create a timeless Southern dessert that sings with warmth and love. Give it a try, and I promise you’ll find yourself reaching for seconds—and maybe even making it again sooner than you think.
Print
Classic Banana Pudding with Homemade Vanilla Custard Recipe
- Prep Time: 15 minutes
- Cook Time: 30 minutes
- Total Time: 45 minutes (plus at least 2 hours chilling)
- Yield: 9 servings
- Category: Dessert
- Method: Stovetop
- Cuisine: Southern American
- Diet: Vegetarian
Description
This Classic Banana Pudding with Homemade Vanilla Pudding is a nostalgic Southern dessert featuring layers of creamy, rich vanilla custard, fresh banana slices, and crisp Nilla wafers. The homemade vanilla pudding is smooth and luscious, made from scratch with egg yolks, sugar, and milk, creating a decadent treat perfect for gatherings or a comforting sweet snack.
Ingredients
Fruit
- 3 Ripe Bananas
Cookies
- 64 Nilla Wafers
Vanilla Pudding
- 6 Egg yolks (room temperature)
- 1 cup Sugar
- 4 tablespoons Corn starch
- 2.5 cups Whole milk
- 2 tablespoons Vanilla extract
- 2 tablespoons Butter
Instructions
- Mix egg yolks, sugar, and corn starch: In a large bowl, combine the 6 egg yolks, 1 cup sugar, and 4 tablespoons corn starch. Whisk together until the mixture is well blended and pale yellow in color, ensuring a smooth base for the pudding.
- Heat the milk: Pour 2.5 cups of whole milk into a medium saucepan and heat it over medium-high heat. Watch carefully and remove from heat as the milk begins to foam, but before it reaches a boil.
- Temper the eggs: Gradually drizzle the hot milk into the egg yolk mixture while whisking continuously to prevent curdling and combine the ingredients smoothly.
- Cook the custard: Pour the combined mixture back into the saucepan. Cook over medium heat, whisking constantly, until bubbles form and the custard thickens. Continue cooking for an additional 60 seconds to set the pudding, then remove from heat.
- Add vanilla and butter: Stir in 2 tablespoons butter and 2 tablespoons vanilla extract to enrich the custard, whisking until fully incorporated and smooth.
- Strain the pudding: Pour the pudding through a fine mesh sieve into a large bowl to remove any lumps, ensuring a silky texture for the final dessert.
- Layer the dessert: In an 8 x 8 inch glass casserole dish, spread a small amount of the custard on the bottom. Arrange a single layer of Nilla wafers (about 21-22 wafers) over the custard, then place banana slices on top of each wafer. Pour approximately one-third of the custard over the bananas.
- Repeat layers: Repeat the layering process two more times with wafers, banana slices, and custard, building up the pudding in three tiers total.
- Finish with wafers: Top the final layer with one last layer of Nilla wafers to create a crisp topping.
- Chill the pudding: Cover the dish and refrigerate the pudding for at least 2 hours or up to overnight, allowing the flavors to meld and the wafers to soften slightly.
- Serve: Serve the banana pudding chilled, either plain or topped with Cool Whip or freshly whipped cream for extra richness.
Notes
- Use ripe bananas for the best natural sweetness and flavor.
- Make sure the egg yolks are at room temperature to avoid curdling.
- Do not let the milk boil to prevent a burnt flavor.
- Whisk constantly while cooking the custard to prevent lumps and sticking.
- Chilling the pudding for several hours improves texture and flavor.
- Feel free to add whipped cream or Cool Whip topping before serving for added creaminess.

