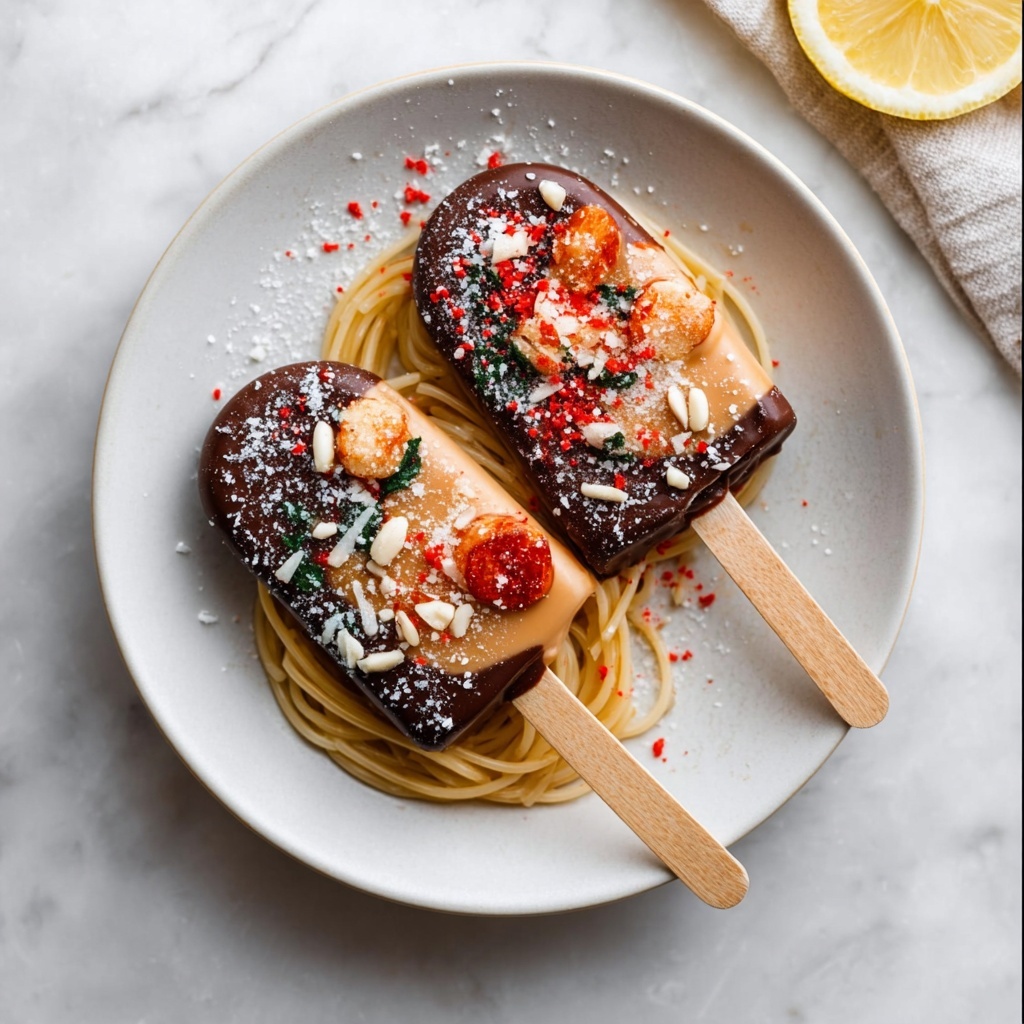
If you have a sweet tooth and love delightful treats that are both simple to make and deliciously satisfying, then you’re in for a real treat with this Easy Creamy Vegan Chocolate Popsicles Recipe. These popsicles are rich, velvety, and bursting with chocolatey goodness, all while being completely plant-based. Using only a handful of simple ingredients, you can whip up a batch of perfectly creamy frozen delights that will brighten up any warm day and impress your friends and family with minimal effort. Dive into this recipe and discover a nourishing dessert that feels indulgent without any fuss.
Ingredients You’ll Need
The magic of this Easy Creamy Vegan Chocolate Popsicles Recipe lies in its simplicity. Each ingredient plays a crucial role, whether it’s lending creaminess, depth of chocolate flavor, or that perfect balance of sweetness and richness.
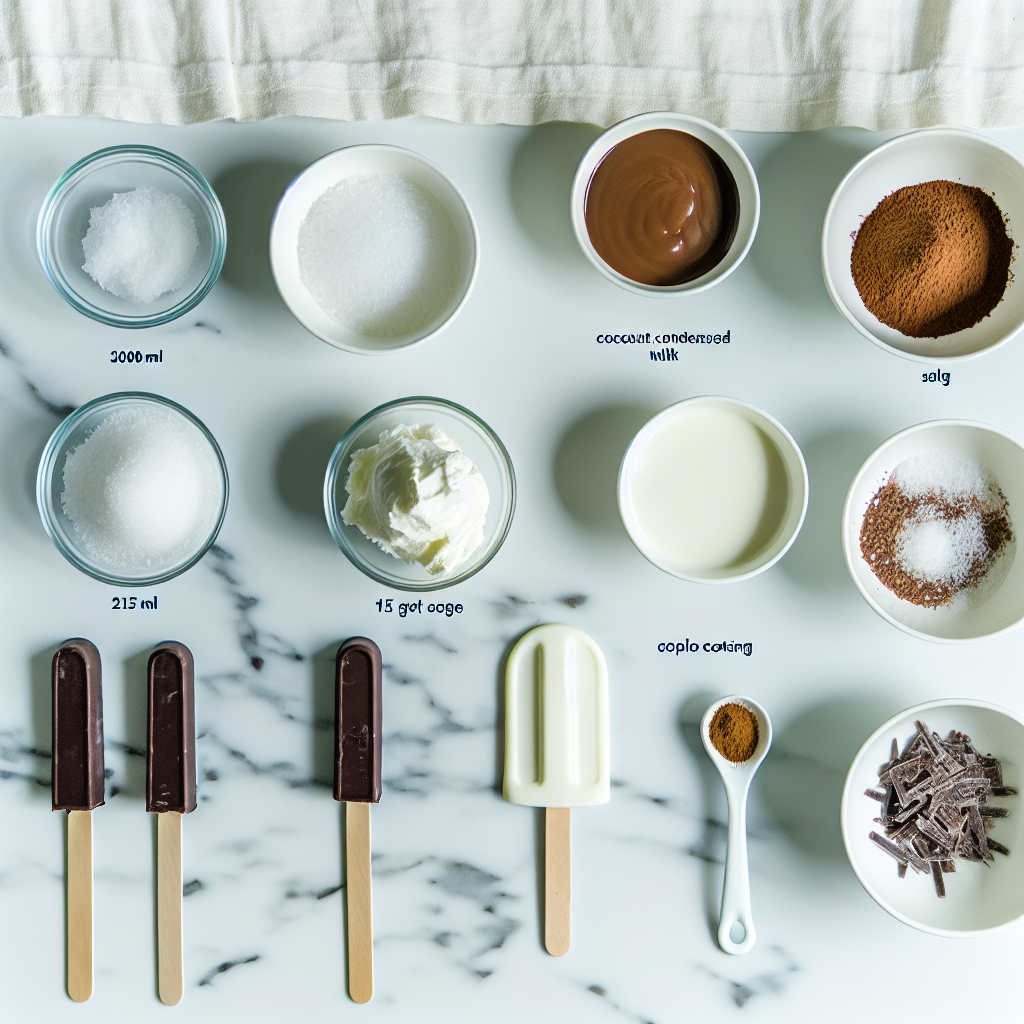
- 400 ml coconut whipped cream: This provides the luscious, creamy base that makes the popsicles so smooth and indulgent.
- 215 g coconut condensed milk: Adds natural sweetness and helps bind the ingredients together beautifully for the perfect frozen texture.
- 55 g high-quality cacao powder: Infuses rich, authentic chocolate flavor that every chocolate lover will adore.
- Pinch of salt: Enhances the chocolate notes and balances the sweetness perfectly.
- 1 teaspoon vanilla extract (optional): Lends aromatic warmth and depth to the overall flavor.
- 100 g dark chocolate (optional for coating): For that extra crispy, chocolatey shell outside the creamy popsicle.
- 1 teaspoon coconut oil or peanut butter (optional for coating): Helps melt and smooth the chocolate coating, adding a subtle richness.
- Chopped nuts (optional for coating): Adds delightful crunch and texture contrast.
How to Make Easy Creamy Vegan Chocolate Popsicles Recipe
Step 1: Prepare Your Workspace and Ingredients
Before diving into making the popsicles, arrange your popsicle molds and sticks on a clean surface. Measure out all your ingredients carefully to have everything ready, making the process smooth and enjoyable.
Step 2: Combine the Base Mixture
Place the coconut whipped cream, coconut condensed milk, cacao powder, pinch of salt, and vanilla extract (if using) into a small saucepan. Gently warm over low heat, stirring frequently until the mixture becomes uniform and pourable, but be careful not to let it boil as this can affect the texture.
Step 3: Fill the Popsicle Molds
Pour the luscious chocolate mixture evenly into your 8 prepared popsicle molds. Insert the sticks firmly into place, ensuring they stand straight. Then, pop the molds into the freezer for at least 3 hours or until the popsicles are completely set and frozen solid.
Step 4: Release the Popsicles
When the time comes to enjoy, remove the popsicle molds from the freezer. For metal or plastic molds, dip them briefly in very hot water for about 3 seconds to loosen the popsicles. Then, gently pull on the sticks to release. Silicone molds are even easier—just press them out gently from the bottom. Let the popsicles sit at room temperature for a few minutes if they feel too hard, especially on chilly days.
Step 5: Optional Chocolate Coating
If you want to add a decadent touch, line a tray with baking paper. Melt the dark chocolate with coconut oil or peanut butter using a double boiler method until smooth and liquid. Dip each popsicle into the melted chocolate, then sprinkle with chopped nuts if you like. Place the dipped popsicles onto the tray and return to the freezer for about 5 minutes to allow the chocolate shell to set perfectly.
How to Serve Easy Creamy Vegan Chocolate Popsicles Recipe
Garnishes
To elevate the presentation, consider sprinkling crushed nuts, coconut flakes, or a drizzle of dairy-free chocolate sauce over the popsicles for a fun and inviting look. Fresh berries can also add a vibrant color contrast and a pop of juicy freshness.
Side Dishes
These creamy vegan chocolate popsicles shine as a standalone treat, but pairing them with a fresh fruit salad or a scoop of vegan ice cream complements their deep chocolate flavor and adds a fresh, lively texture contrast to the dessert experience.
Creative Ways to Present
Serve these popsicles in a rustic wooden tray lined with parchment paper for a charming touch, or arrange them vertically in a tall glass filled with edible flowers or tiny mint leaves for a playful, photogenic way to impress your guests. They also make fantastic party favors when wrapped individually in parchment paper and tied with twine.
Make Ahead and Storage
Storing Leftovers
Any leftover popsicles can be stored in an airtight container or ziplock bag in the freezer. This keeps them fresh and ready to enjoy whenever a chocolate craving strikes.
Freezing
For best results, freeze the popsicles for a minimum of 3 hours to ensure they are completely firm. Avoid refreezing once thawed, as this can impair texture and flavor.
Reheating
Since these popsicles are a frozen treat, reheating is not necessary. However, if they are too firm to bite, simply let them sit at room temperature for 2 to 3 minutes to soften slightly before enjoying.
FAQs
Can I substitute the coconut whipped cream?
Yes! If you prefer, you can use other plant-based creams such as almond or oat cream, but coconut whipped cream is ideal for its richness and texture that complements the chocolate perfectly.
Is this recipe nut-free?
The base recipe is nut-free, but if you choose to add peanut butter in the chocolate coating or chopped nuts as garnish, that will introduce nuts. You can easily omit those for a nut-free version.
Can I make popsicles without a mold?
If you don’t have popsicle molds, you can use small paper cups and insert wooden sticks once the mixture is partially frozen, but molds will give you the best shape and easiest removal.
How long do these popsicles last in the freezer?
They are best enjoyed within 1 to 2 weeks to maintain their creamy texture and fresh taste, but they can be stored up to a month without significant quality loss.
Can I add other flavors like mint or orange?
Absolutely! A teaspoon of peppermint extract or a little zest of orange peel can be whisked into the mixture to add unique twists. Just adjust the vanilla accordingly to balance the flavors.
Final Thoughts
This Easy Creamy Vegan Chocolate Popsicles Recipe is truly a treasure to keep in your dessert repertoire. It’s incredibly straightforward, universally loved, and delightfully creamy, making it perfect for any occasion. Whether you’re treating yourself or impressing guests, these popsicles will bring pure joy with every bite. So grab your ingredients and give them a try—you might just find your new favorite frozen indulgence.
Print
Easy Creamy Vegan Chocolate Popsicles Recipe
- Prep Time: 10 Minutes
- Cook Time: 3 Hours
- Total Time: 3 Hours 10 Minutes
- Yield: 8 Servings (8 popsicles)
- Category: Desserts
- Method: Freezing
- Cuisine: Australian
- Diet: Vegan, Vegetarian, Gluten Free, Dairy-Free
Description
Delight in these Easy Creamy Chocolate Popsicles, a rich and smooth frozen treat made with just three staple ingredients. This vegan and gluten-free dessert combines coconut whipped cream, coconut condensed milk, and high-quality cacao powder for an indulgent yet simple handmade chocolate popsicle perfect for any occasion.
Ingredients
Base Mixture
- 400 ml coconut whipped cream
- 215 g coconut condensed milk
- 55 g high-quality cacao powder
- Pinch of salt
- 1 teaspoon vanilla extract (optional)
Optional Chocolate Coating
- 100 g dark chocolate
- 1 teaspoon coconut oil or peanut butter
- Chopped nuts (optional)
Instructions
- Prepare Moulds and Ingredients: Arrange popsicle moulds and sticks on your workspace, ensuring all ingredients are correctly measured and ready to use for a smooth preparation process.
- Combine Ingredients: Place coconut whipped cream, coconut condensed milk, cacao powder, a pinch of salt, and vanilla extract (if using) into a small saucepan.
- Warm Mixture: Warm the mixture over low heat, stirring frequently until the blend is uniform and pourable. Be careful not to let it boil to maintain the creamy texture.
- Fill Moulds: Pour the chocolate mixture evenly into 8 popsicle moulds, insert sticks, and place them in the freezer for at least 3 hours or until completely set.
- Remove Popsicles: For metal or plastic moulds, briefly dip in very hot water for 3 seconds to loosen and pull out popsicles by the sticks. For silicone moulds, gently press each popsicle out.
- Soften Before Serving: Let popsicles sit at room temperature for a few minutes to soften slightly, especially in cooler environments.
- Optional Chocolate Coating: Line a tray with baking paper. Melt dark chocolate with coconut oil or peanut butter using a double boiler until smooth and liquid.
- Dip Popsicles: Dip each popsicle into the melted chocolate, then place onto the lined tray. Sprinkle with chopped nuts if desired.
- Set Coating: Transfer dipped popsicles back to the freezer for 5 minutes to harden the chocolate coating.
- Storage: Store popsicles in an airtight container or ziplock bag in the freezer until ready to enjoy.
Notes
- Ensure the popsicle mixture is fully combined but avoid overheating to maintain an optimal creamy texture.
- Silicone moulds make it easier to release popsicles without the need for dipping in hot water.
- Using high-quality cacao powder enhances the flavor and richness of the popsicles.
- Be cautious not to boil the mixture during warming to preserve the consistency and flavor.
- Allergen check: review ingredients such as nuts in coatings to accommodate dietary restrictions.

