
If you love the irresistible combination of savory bacon and gooey cheese, you are going to adore this Cheesy Thumbprint Bacon Jam Recipe. These bite-sized delights offer a perfect balance of sharp cheddar melting into a buttery crumbly dough, crowned with a sweet and smoky onion bacon jam. It is an absolutely crowd-pleasing treat that manages to be both elegant and comforting, perfect for parties or casual snacking. Once you try these, you’ll find yourself reaching for more every time!
Ingredients You’ll Need
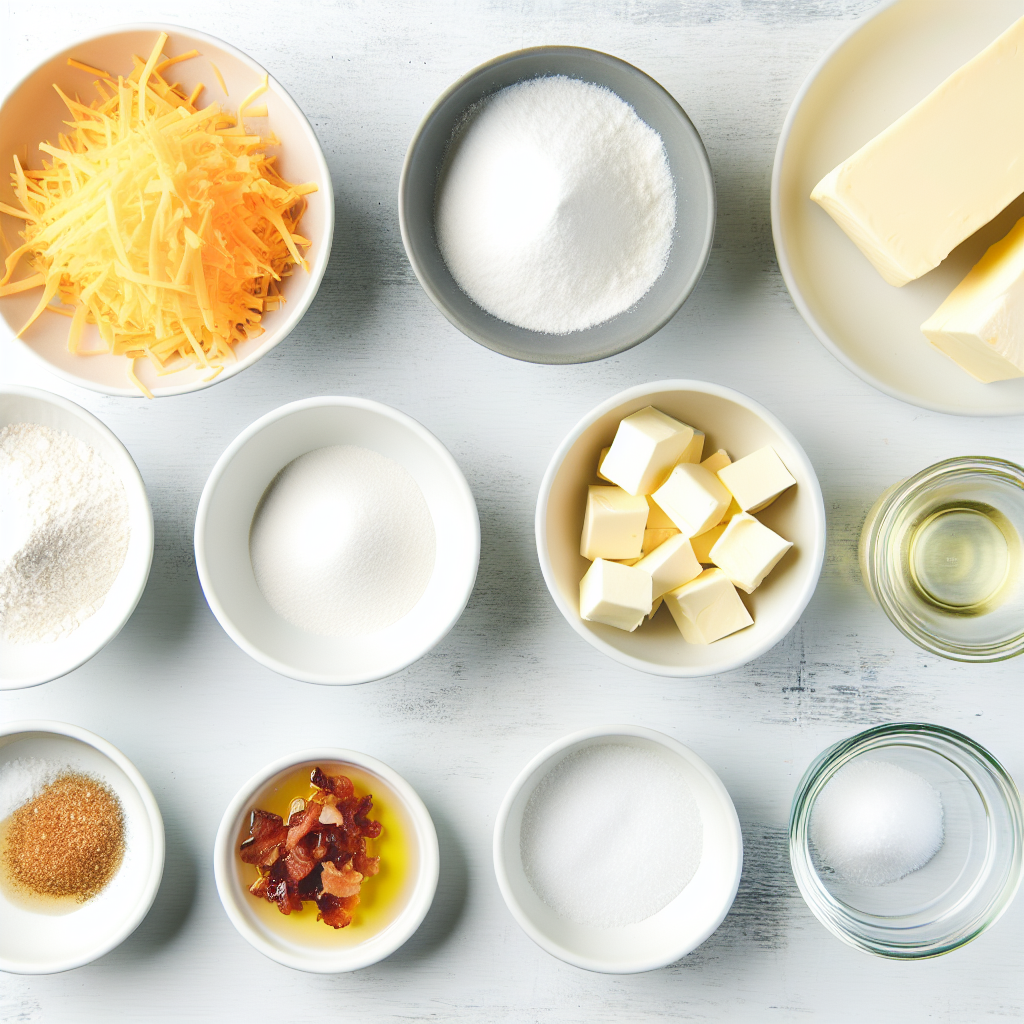
The beauty of this recipe lies in its simplicity; each ingredient plays a key role in creating the perfect harmony of texture and flavor. From the sharpness of the cheddar to the rich, flaky butter, every component is thoughtfully chosen to bring out the best in your Cheesy Thumbprint Bacon Jam Recipe.
- 2 cups sharp cheddar cheese, shredded: Adds tangy, melty richness that makes every bite irresistible.
- 1 cup all-purpose flour: Provides structure and a tender crumb to the dough.
- 6 tablespoons unsalted butter, chilled and cubed: Brings flakiness and buttery depth, essential for that melt-in-your-mouth feel.
- 1/2 teaspoon kosher salt: Balances the flavors and enhances the savoriness of the cheese and bacon jam.
- 1/4 teaspoon garlic powder: Offers a subtle kick of aroma without overpowering the other flavors.
- 1 cup homemade onion bacon jam: This star topping delivers sweetness, smokiness, and a luxurious jammy texture.
- Chopped parsley, for serving: Adds a fresh, vibrant contrast and a pop of color to the finished bites.
How to Make Cheesy Thumbprint Bacon Jam Recipe
Step 1: Prepare the Dough
Begin by combining the shredded cheddar cheese, all-purpose flour, chilled cubed butter, kosher salt, and garlic powder in a food processor. Pulse until the mixture looks like coarse meal. This texture is crucial to ensure your dough bakes into a scrumptiously flaky yet sturdy base. Once ready, bring the crumbs together with your hands until you form a cohesive dough ball. This hands-on step lets you feel the dough’s perfect consistency before chilling.
Step 2: Chill the Dough
Wrap the dough ball in plastic wrap, flatten it into a disk, and refrigerate for about 30 minutes. Chilling is key to allowing the butter to firm up again, which results in a tender, flaky crust once baked. It’s a small wait that guarantees a big payoff in texture and flavor.
Step 3: Preheat the Oven and Prepare the Baking Sheet
Set your oven to 400°F and line a baking sheet with parchment paper. This prevents sticking and promotes even baking, helping your thumbprints bake up perfectly golden without any fuss during cleanup.
Step 4: Shape the Dough Balls
Remove the chilled dough and portion it into 1 1/2-inch diameter balls. Arrange these on the lined baking sheet with about an inch of space in between to allow for slight spreading during baking. This uniform sizing ensures consistent cooking and beautiful presentation.
Step 5: Bake and Create Indentations
Bake the dough balls for 7 to 8 minutes until they start to turn golden. Then, while still warm, press the back of a teaspoon into the center of each ball creating a perfect little well for the bacon jam. This step is what transforms these bites into delightful thumbprints ready for their crowning glory.
Step 6: Fill with Bacon Jam and Bake Again
Spoon roughly a teaspoon of your homemade onion bacon jam into each indentation. Return the tray to the oven and bake for another 7 to 8 minutes until the dough is beautifully golden and the topping is set and bubbly. This second bake melds the flavors together and locks in the jam’s amazing texture.
Step 7: Cool and Garnish
Let your baked treats cool on a rack to room temperature – this resting time helps the dough firm up just enough for handling. Before serving, sprinkle with chopped parsley for a fresh burst of color and bright flavor. Now you have irresistibly delicious cheesy thumbprints ready to enjoy warm, at room temperature, or even cold.
How to Serve Cheesy Thumbprint Bacon Jam Recipe
Garnishes
Chopped parsley is a classic choice to add a hint of fresh color and a subtle herbal note that cuts through the richness. You can also experiment with a light dusting of smoked paprika or a tiny drizzle of balsamic glaze for an elegant touch that’s sure to impress your guests.
Side Dishes
These cheesy thumbprints pair wonderfully with light, fresh accompaniments. Consider a crisp green salad with a tangy vinaigrette, or a simple bowl of mixed olives to round out your appetizer spread. The bacon jam’s sweetness and the cheese’s sharpness shine even brighter when balanced by something bright and refreshing.
Creative Ways to Present
Presentation is key when sharing the Cheesy Thumbprint Bacon Jam Recipe with others. Arrange the thumbprints on a rustic wooden board or a sleek slate platter, and add small bowls of extra onion bacon jam for dipping. For a party, you can serve them alongside mini cocktail picks for effortless finger food elegance.
Make Ahead and Storage
Storing Leftovers
If you happen to have leftovers (and believe me, that’s a good problem to have), place them in an airtight container and store in the refrigerator for up to three days. This keeps the thumbprints fresh while preserving the delightful flavors and flaky texture.
Freezing
Want to keep these delicious bites on hand for any occasion? Freeze the unbaked dough balls arranged on a baking sheet until solid, then transfer to a freezer-safe bag for up to two months. When you’re ready, bake them straight from frozen, adding a few extra minutes to the baking time. You can also freeze fully baked thumbprints, but texture is best preserved with the dough method.
Reheating
To reheat, pop the thumbprints in a preheated oven at 350°F for about 5 to 7 minutes until warm and slightly crisp. Avoid microwaving as it can make the dough soggy and less enjoyable. Reheating this way restores that fresh-from-the-oven charm perfectly.
FAQs
Can I use pre-made bacon jam instead of homemade?
Absolutely! Store-bought bacon jam can be a time-saver and works well in this recipe. Just make sure it’s a high-quality jam with a good balance of sweetness and savoriness to complement the cheddar and dough.
What if I don’t have a food processor?
You can easily make the dough by hand using a fork or pastry cutter to blend the butter into the flour and cheese until it resembles coarse crumbs. Then gently knead by hand until the dough forms a ball. It might take a little extra effort but the results are just as tasty.
Can I substitute a different cheese?
Sharp cheddar is ideal for its bold flavor and melting properties, but you can experiment with other cheeses like Monterey Jack or Gruyere for unique twists. Just keep in mind the cheese’s moisture content and taste intensity as they will change the final flavor and texture.
How long can I keep the homemade onion bacon jam?
When stored in a sealed jar in the refrigerator, homemade onion bacon jam stays fresh for up to two weeks. Its robust flavors actually develop more depth when given a day or two to meld, making it even better on your next batch of cheesy thumbprints.
Can these be made gluten-free?
Yes! Substitute the all-purpose flour for a gluten-free blend designed for baking. Make sure your blend includes a binding agent like xanthan gum for the best texture. The rest of the recipe remains the same, delivering gluten-free cheesy bacon jam goodness.
Final Thoughts
This Cheesy Thumbprint Bacon Jam Recipe is one of those magical bites that delivers BIG flavor in a small, perfectly handheld package. Its simplicity is its charm, and the homemade touch really elevates it into a memorable treat you’ll want to share over and over again. Whether for a gathering, snack, or party platter, give it a try—you’re going to fall in love with every cheesy, jammy morsel!
Print
Cheesy Thumbprint Bacon Jam Recipe
- Prep Time: 15 minutes
- Cook Time: 16 minutes
- Total Time: 45 minutes
- Yield: 24 servings
- Category: Appetizer
- Method: Baking
- Cuisine: American
Description
These Cheesy Thumbprint Bacon Jam bites are a savory and irresistible appetizer featuring a crumbly cheddar cheese dough filled with flavorful homemade onion bacon jam. Perfect for parties or casual snacking, these bite-sized treats combine sharp cheddar, buttery dough, and a sweet-savory bacon jam filling baked to a golden perfection and garnished with fresh parsley.
Ingredients
Cheese Dough
- 2 cups sharp cheddar cheese, shredded
- 1 cup all-purpose flour
- 6 tablespoons unsalted butter, chilled and cubed
- 1/2 teaspoon kosher salt
- 1/4 teaspoon garlic powder
Filling and Garnish
- 1 cup homemade onion bacon jam
- Chopped parsley, for serving
Instructions
- Make the dough: Combine shredded cheddar cheese, all-purpose flour, chilled cubed unsalted butter, kosher salt, and garlic powder in a food processor. Pulse until the mixture resembles coarse meal. Gather the crumbs together with your hands to form a cohesive dough ball.
- Chill the dough: Transfer the dough to plastic wrap, flatten into a disk, and wrap securely. Refrigerate for approximately 30 minutes to allow the dough to firm up.
- Prepare for baking: Preheat the oven to 400°F (200°C). Line a baking sheet with parchment paper to ensure even baking and prevent sticking.
- Shape the dough balls: Remove the dough from the refrigerator. Portion into 1 1/2-inch diameter balls and arrange them about 1 inch apart on the prepared baking sheet.
- First bake: Bake the dough balls in the preheated oven for 7 to 8 minutes. Remove from the oven, then press a teaspoon into the center of each one to create an indentation.
- Fill and bake again: Spoon approximately 1 teaspoon of homemade onion bacon jam into each indentation. Return to the oven and bake for an additional 7 to 8 minutes, or until golden and the surface appears set.
- Cool and garnish: Transfer baked appetizers to a rack and allow them to cool to room temperature. Prior to serving, garnish with chopped parsley. Enjoy warm, at room temperature, or cold.
Notes
- Make sure the butter is very cold for the best texture in the dough.
- The homemade onion bacon jam should be thick enough to hold its shape when spooned into the indentations.
- You can prepare the dough and bacon jam in advance to save time on the day of serving.
- These appetizers can be served warm or at room temperature depending on preference.
- Store leftovers in an airtight container in the refrigerator for up to 3 days.


