
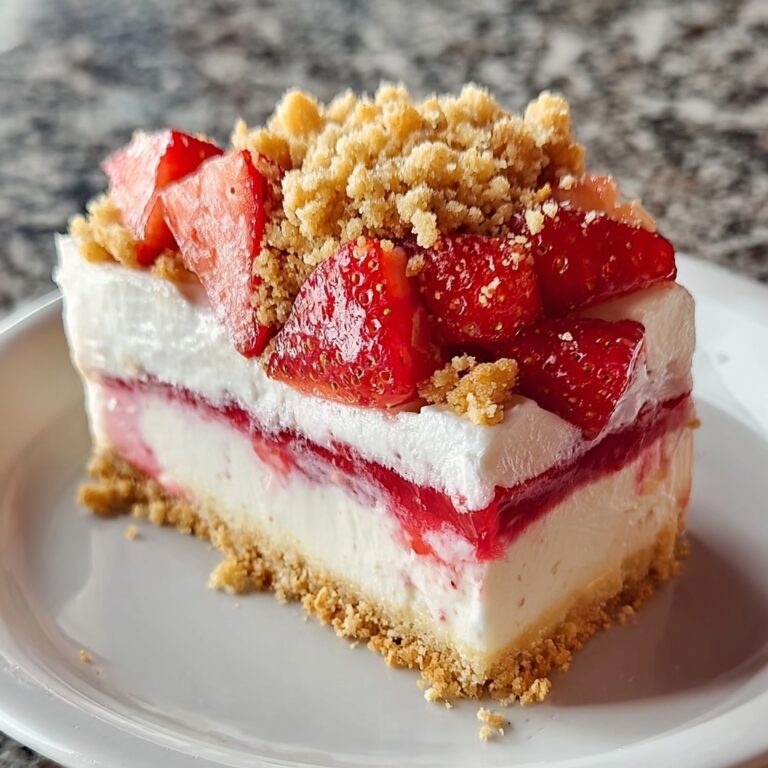
If you’re on the lookout for a divine, guilt-free treat that combines the irresistible flavor of cheesecake with the vibrant freshness of strawberries, you’re going to fall head over heels for this Strawberry Cheesecake Protein Balls (No Bake) Recipe. These little bites deliver creamy richness, a punch of natural sweetness, and a boost of protein, all without needing an oven. They are perfect for a quick snack, a pre-workout bite, or a healthy dessert craving. Trust me, once you make these, they’ll become your go-to anytime you want something luscious but wholesome.
Ingredients You’ll Need
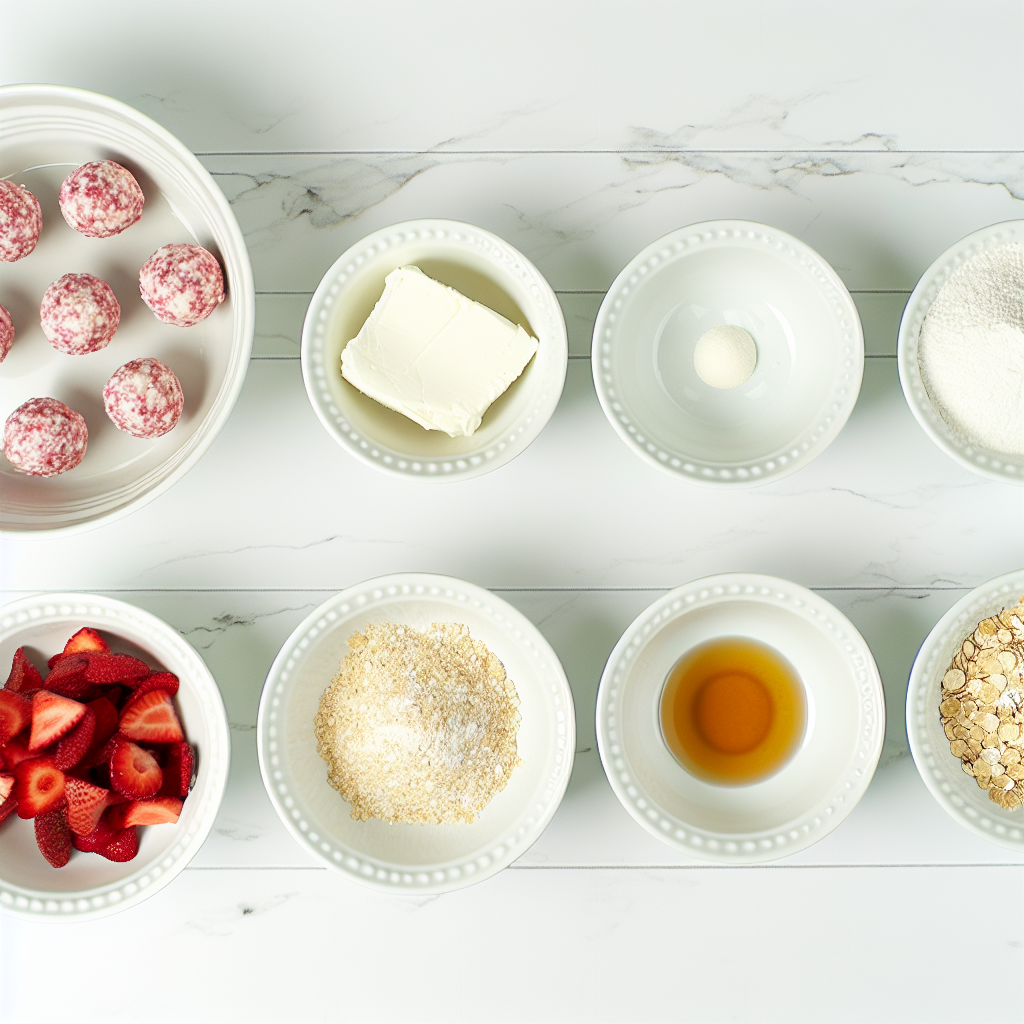
What’s great about this Strawberry Cheesecake Protein Balls (No Bake) Recipe is how every ingredient plays a vital role in crafting the perfect balance of flavor, texture, and that gorgeous pink hue. Plus, they are all straightforward pantry staples or easy-to-find items that come together with minimal fuss.
- Vanilla protein powder (1 cup, approx. 80g): This provides a creamy base and a healthy protein boost—whey or casein works beautifully.
- Reduced-fat cream cheese (4 oz/½ cup, softened): The star of the cheesecake flavor, lending luscious smoothness.
- Freeze-dried strawberries (½ cup, crushed into powder): Intense strawberry flavor and vibrant color without adding moisture.
- Oat flour (¼ cup, approx. 30g): A wholesome binder with a subtle nutty taste, gluten-free if needed.
- Maple syrup or honey (2-3 tablespoons, to taste): Natural sweeteners that enhance the dessert-like feel without overpowering.
- Vanilla extract (1 teaspoon): Adds a warm, aromatic note to round out the flavors.
- Pinch of salt: This small touch lifts all the flavors, balancing sweetness wonderfully.
- Optional coatings: Extra crushed freeze-dried strawberries, shredded unsweetened coconut, powdered sugar substitute, or graham cracker crumbs—perfect for adding texture and a pretty finishing touch.
How to Make Strawberry Cheesecake Protein Balls (No Bake) Recipe
Step 1: Preparation & Setup
Start by making sure your cream cheese is at room temperature so it blends easily. Crush those freeze-dried strawberries into a fine powder using a food processor or a rolling pin—this powder is key for that intense strawberry cheesecake flavor and the gorgeous pink color. Line a baking sheet or plate with parchment paper where the balls will chill later. Getting everything ready upfront makes the process smooth and fun.
Step 2: Cream the Cheesecake Base
Beat the softened cream cheese in a bowl for a couple of minutes until it’s super smooth and lump-free. Then add your maple syrup or honey, vanilla extract, and a pinch of salt. Mix everything thoroughly until you see a glossy, luscious mixture forming and don’t forget to scrape down the sides of the bowl to incorporate all that goodness.
Step 3: Infuse Strawberry Flavor
Next, sprinkle in the finely crushed freeze-dried strawberry powder. Stir this in until it’s fully integrated and watch your mixture turn the most delightful shade of pink as it fills your kitchen with a wonderful fruity aroma. This step really makes the Strawberries pop!
Step 4: Incorporate Dry Binders
Now add the vanilla protein powder and oat flour into the bowl. Fold and press with a spatula until the dough starts to come together into a thick, uniform mass. If it feels too dry, add a splash of milk, just half a teaspoon at a time, until it’s moldable. If it’s too sticky or wet, add a little more oat flour or protein powder. Taste the dough and adjust the sweetness if needed—this part lets you make it truly your own.
Step 5: Form the Protein Balls
Using a small cookie scoop or a spoon, portion out the dough and gently roll each piece between your palms until you have smooth, firm balls about one to one and a half inches in diameter. Try not to roll too hard; you want them compact but still soft enough to bite into delightfully.
Step 6: Apply Optional Coating (Optional)
For an extra burst of flavor and a pretty finish, roll the protein balls in your choice of coating—whether it’s more crushed freeze-dried strawberries for an extra tangy kick, shredded coconut for tropical flair, a sugar substitute for sweetness, or graham cracker crumbs to mimic that classic cheesecake crust. Place the coated balls on the parchment-lined baking sheet, giving them some room to chill evenly.
Step 7: Chill to Perfection
Pop the baking sheet into the refrigerator and chill for at least 30 to 60 minutes. For optimal texture and flavor, chilling for a couple of hours or even overnight truly makes a difference. If you’re in a rush, a quick 15 to 20-minute freeze firms them up nicely without turning them rock hard.
Step 8: Serve and Store
Once chilled, your Strawberry Cheesecake Protein Balls are ready to enjoy straight away. They’re perfect for a quick protein-packed treat. Store any leftovers in an airtight container in the fridge where they will stay fresh for about a week. For longer storage, freeze them in a freezer-safe container for up to 1-2 months and thaw safely in the fridge or at room temperature before digging in.
How to Serve Strawberry Cheesecake Protein Balls (No Bake) Recipe
Garnishes
Sprinkle a little extra crushed freeze-dried strawberry powder on top or dust with shredded coconut for a pretty, inviting look. You can also opt for a light dusting of powdered sugar substitute for a classic cheesecake flair. Garnishes not only elevate the visual appeal but also add a delightful textural contrast.
Side Dishes
These protein balls pair wonderfully with a fresh fruit salad or a dollop of Greek yogurt for a well-rounded snack or light breakfast. A cup of herbal tea or iced coffee complements the creamy strawberry-cheesecake notes beautifully, making for a balanced and satisfying mini-meal.
Creative Ways to Present
Consider serving the protein balls in small cupcake liners or arrange them on a colorful platter with fresh strawberry slices around the edges. You can even thread a few on a skewer for a playful and portable snack. The versatility in presentation makes these balls perfect for potlucks, parties, or just elevating your everyday snack time.
Make Ahead and Storage
Storing Leftovers
Keep any leftover Strawberry Cheesecake Protein Balls in an airtight container inside your refrigerator. They’ll stay fresh and maintain their delightful texture for up to seven days, making them a handy snack to grab anytime during your busy week.
Freezing
If you want to stash some for later, freeze the protein balls in a sealed freezer-safe bag or container. They can last for one to two months frozen without losing flavor or texture. When you’re ready, simply thaw them in the fridge overnight or for a few hours at room temperature.
Reheating
Since these are no-bake protein balls, reheating is not necessary and not recommended. They taste best chilled or at room temperature when that creamy cheesecake texture and fresh strawberry flavor shine through perfectly.
FAQs
Can I use other types of protein powder?
Absolutely! While vanilla whey or casein protein powder is recommended for the best flavor and texture, you can substitute with plant-based protein powders. Just keep in mind the different absorption rates and flavors might slightly change the final texture and taste.
What if I don’t have oat flour? Can I substitute it?
You can replace oat flour with almond flour or a gluten-free all-purpose flour blend. These alternatives will alter the texture a bit, making it either denser or crumblier, but they still work well in the recipe.
Are these protein balls suitable for vegetarians?
Yes! All the ingredients are vegetarian-friendly, so these Strawberry Cheesecake Protein Balls (No Bake) Recipe treats work well for anyone who avoids meat but includes dairy in their diet.
Can I make these nut-free?
Definitely. This recipe is naturally nut-free if you choose oat flour and a protein powder that doesn’t contain nuts. Just double-check your protein powder ingredient label to ensure no nut cross-contamination if allergies are a concern.
How long do these protein balls last at room temperature?
Since they contain cream cheese, it’s best to keep them refrigerated and only leave them out for short periods (a couple of hours max) before eating to ensure freshness and safety.
Final Thoughts
I can’t recommend this Strawberry Cheesecake Protein Balls (No Bake) Recipe enough for anyone who loves a sweet yet wholesome snack that’s quick to make and packed with flavor. These protein balls are a beautiful blend of creamy cheesecake goodness and vibrant strawberry brightness, all wrapped up in a bite-sized package. Give them a try—you just might find yourself making them again and again.
Print
Strawberry Cheesecake Protein Balls (No Bake) Recipe
- Prep Time: 25 minutes
- Cook Time: 0 minutes
- Total Time: 1 hour 25 minutes (including chilling time)
- Yield: 16 servings
- Category: Snacks
- Method: No-Cook
- Cuisine: American
- Diet: Low Fat
Description
These no-bake Strawberry Cheesecake Protein Balls combine the creamy tang of cheesecake with the sweet, vibrant flavor of freeze-dried strawberries. Packed with protein powder and oat flour for wholesome energy, these bite-sized treats are perfect for a healthy snack or post-workout fuel. Quick to prepare and requiring no cooking, they offer a delicious and convenient way to satisfy your sweet tooth while sticking to your nutrition goals.
Ingredients
Protein Ball Mixture
- 1 cup (approximately 80g) vanilla protein powder (whey or casein recommended)
- 4 oz (approximately 1/2 cup) reduced-fat cream cheese, softened
- 1/2 cup (approximately 40g) freeze-dried strawberries, crushed into fine powder
- 1/4 cup (approximately 30g) oat flour (certified gluten-free if needed)
- 2–3 tablespoons maple syrup or honey (to taste)
- 1 teaspoon vanilla extract
- Pinch of salt
Optional Coatings
- Extra crushed freeze-dried strawberries
- Shredded unsweetened coconut
- Powdered sugar substitute
- Graham cracker crumbs
Instructions
- Preparation & Setup: Ensure the cream cheese is at room temperature for easy mixing. Crush freeze-dried strawberries into a fine powder using a food processor or rolling pin. Measure all dry and wet ingredients accurately. Line a baking sheet or plate with parchment paper to chill the protein balls later.
- Cream the Cheesecake Base: In a medium bowl, beat the softened cream cheese for 1-2 minutes until smooth and lump-free. Add the maple syrup or honey, vanilla extract, and a pinch of salt. Mix well until fully combined and slightly glossy, scraping down the bowl sides as needed.
- Infuse Strawberry Flavor: Add the crushed freeze-dried strawberry powder to the cream cheese mixture. Mix thoroughly until the powder is fully incorporated, transforming the mixture to a vibrant pink color and releasing a fruity aroma.
- Incorporate Dry Binders: Add the vanilla protein powder and oat flour to the bowl. Using a spatula, press and fold the mixture until a thick, uniform dough forms. Adjust consistency by adding a splash of milk if too dry or more oat flour/protein powder if too wet. Taste and adjust sweetness if desired.
- Form the Protein Balls: Using a small cookie scoop or spoon, portion out the dough. Roll each portion between your palms to form smooth, compact balls about 1 to 1.5 inches in diameter, applying gentle pressure to shape them firmly.
- Apply Optional Coating (Optional): Roll each protein ball in your choice of coating—extra crushed freeze-dried strawberries, shredded unsweetened coconut, powdered sugar substitute, or graham cracker crumbs—then place on the parchment-lined sheet, spacing them out.
- Chill to Perfection: Place the baking sheet in the refrigerator and chill for at least 30-60 minutes to firm up. For best texture and flavor, chill for 2-3 hours or overnight. Alternatively, freeze for 15-20 minutes to speed firming, avoiding freezing solid.
- Serve and Store: Enjoy the protein balls once well chilled. Store leftovers in an airtight container in the refrigerator for up to one week. For longer storage, freeze in a freezer-safe container for 1-2 months, thawing before serving.
Notes
- Use whey or casein protein powder for best texture and flavor.
- If oat flour is not available, finely ground oats can be substituted.
- Adjust sweetness by adding more or less maple syrup/honey according to taste.
- Store protein balls properly to maintain freshness and texture.
- You can customize coatings for different flavors and appearances.
- Ensure cream cheese is properly softened for a smooth mixture.
- These are a great no-bake, high-protein snack option suitable for on-the-go.
