
If you are looking for a fun, indulgent, yet protein-packed snack, the Cream Cheese Oreo Protein Balls: No-Bake Power Bites Recipe is exactly what you need. These bite-sized treats perfectly balance creamy richness, crunchy Oreo texture, and a boost of protein, all without ever turning on your stove. Whether you’re craving something sweet after a workout or a playful dessert to share with friends, these no-bake power bites deliver pure joy in every morsel.
Ingredients You’ll Need
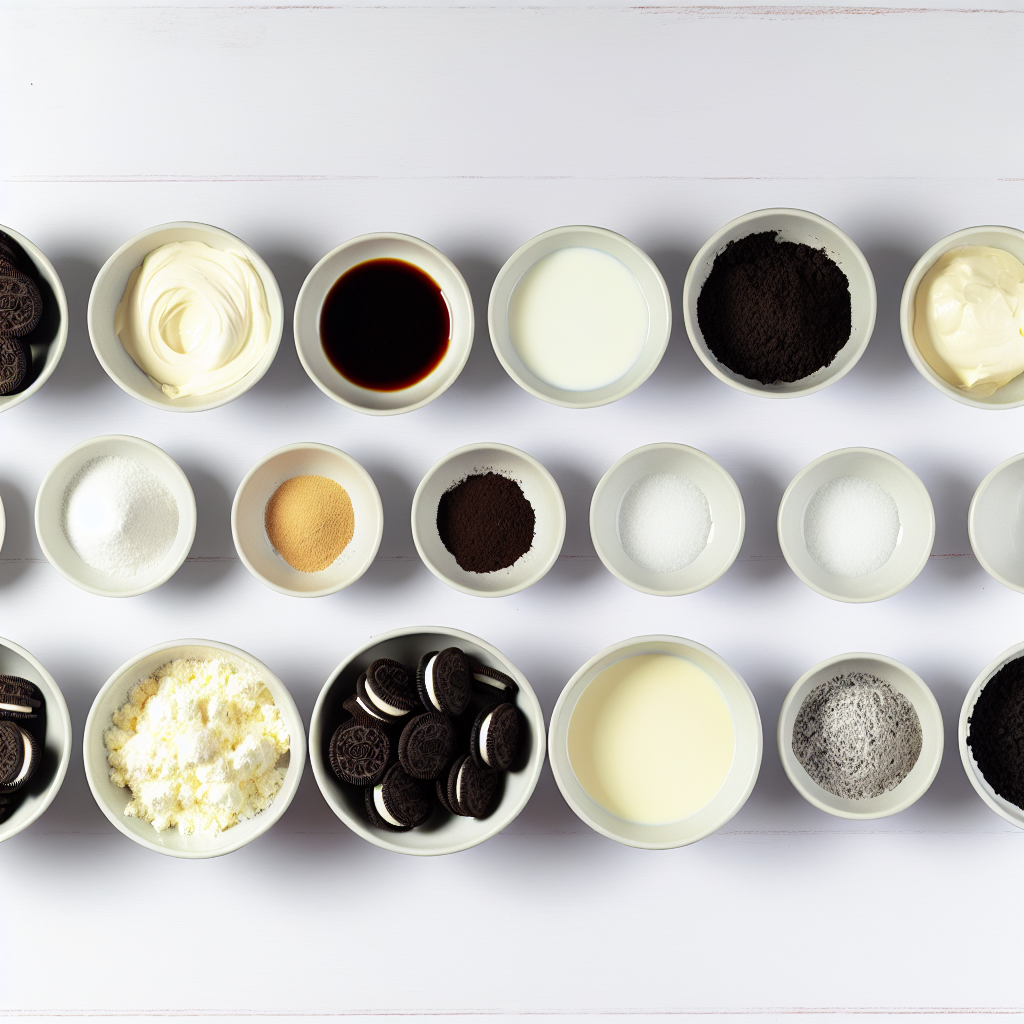
Gathering the right ingredients is the secret to making these Cream Cheese Oreo Protein Balls: No-Bake Power Bites Recipe truly shine. Each element plays an essential role in flavor, texture, and that satisfying bite that keeps you coming back for more.
- Cream Cheese: Provides a creamy, tangy base that binds the mixture and enriches the flavor.
- Oreo Cookies: Crushed to bring chocolatey crispness and a sweet crunch, including the iconic cream filling for balance.
- Vanilla Protein Powder: Adds a boost of protein and a subtle vanilla undertone that complements the Oreos perfectly.
- Milk: Helps achieve the perfect dough consistency, making the balls easy to shape.
- Vanilla Extract (optional): Enhances the overall sweetness and adds a lovely aromatic depth.
- Pinch of Salt: Balances sweetness and intensifies the flavors.
- Optional Mix-ins: Mini chocolate chips, chopped nuts, or shredded coconut provide extra texture and flair.
How to Make Cream Cheese Oreo Protein Balls: No-Bake Power Bites Recipe
Step 1: Crush the Oreos
Begin by crushing the Oreo cookies into fine crumbs, either with a food processor or by placing them in a resealable bag and gently bashing them with a rolling pin. Leaving a few small chunks will add delightful texture to your power bites, making each bite interesting and fun.
Step 2: Soften the Cream Cheese
Allow the cream cheese to soften at room temperature or heat it in short 10-second bursts in the microwave until spreadable but not melted. This is crucial for mixing evenly with the cookie crumbs later on.
Step 3: Combine Cream Cheese and Oreos
Mix the softened cream cheese and crushed Oreos in a large bowl until the mixture becomes uniform and beautifully blended. This creamy and crumbly mixture is the foundation of the recipe.
Step 4: Add Protein Powder and Milk
Slowly incorporate the vanilla protein powder into your Oreo-cream cheese mixture. If it feels too dry to form into balls, add milk one tablespoon at a time, just enough to bring the dough together. The milk helps maintain that perfect texture without making it too sticky.
Step 5: Flavor and Mix-ins
At this stage, fold in the vanilla extract and a pinch of salt to heighten the flavors. If you like, mix in mini chocolate chips, chopped nuts, or shredded coconut to add your own twist of texture and taste.
Step 6: Shape into Balls
Scoop about one tablespoon of the mixture and gently roll it between your palms to form balls. Slightly wetting your hands prevents the mixture from sticking, making this step quick and mess-free.
Step 7: Arrange on Tray
Place the neatly rolled balls onto a parchment-lined tray or plate to keep them from sticking while chilling.
Step 8: Chill to Set
Refrigerate the balls for at least an hour so they firm up beautifully. If you’re in a hurry, freezing them for 30 minutes works just as well and speeds up the process.
Step 9: Optional Finishing Touch
For an extra-special presentation, roll the chilled balls in more crushed Oreos, cocoa powder, or shredded coconut. This adds a lovely decorative finish and an additional layer of flavor.
How to Serve Cream Cheese Oreo Protein Balls: No-Bake Power Bites Recipe
Garnishes
These power bites look fabulous with a sprinkle of crushed Oreos or tiny chocolate chips on top, so feel free to get creative. You can even drizzle a little melted chocolate for a gourmet touch that will wow anyone lucky enough to try them.
Side Dishes
Serve these protein balls alongside fresh fruit like strawberries or banana slices to balance richness with bright, juicy freshness. A warm cup of coffee or tea makes an excellent accompaniment, turning these bites into the perfect afternoon pick-me-up.
Creative Ways to Present
Arrange the Cream Cheese Oreo Protein Balls: No-Bake Power Bites Recipe on a decorative platter alongside nuts, dried fruits, or small bowls of nut butter or berry jam. Wrapping individual bites in parchment or cellophane with a ribbon makes delightful gifts or party favors.
Make Ahead and Storage
Storing Leftovers
You can store these no-bake power bites in an airtight container in the refrigerator for up to 5 days. Keeping them chilled ensures they stay firm and fresh, ready whenever you want a quick snack or dessert.
Freezing
For longer storage, the protein balls freeze wonderfully. Place them in a freezer-safe container with parchment paper between layers to prevent sticking. They keep well for up to 3 months and thaw quickly in the fridge or at room temperature.
Reheating
Since these are no-bake, reheating is not necessary and not recommended because it would soften the texture. Simply let frozen balls thaw for a few minutes before enjoying the perfect creamy and crunchy experience.
FAQs
Can I use a different type of cookie instead of Oreos?
Absolutely! While Oreos provide a classic flavor and texture, you can experiment with any chocolate sandwich cookie or even crushed graham crackers for a unique twist. Just be sure to include some filling or moisture to keep the mixture binding well.
Is it okay to substitute the cream cheese with something else?
Cream cheese is key to the creamy, tangy texture in this recipe, but you can try mascarpone or even softened ricotta cheese for a slightly different but delicious result. Just keep an eye on moisture to ensure the balls hold their shape.
What type of protein powder works best?
Vanilla-flavored whey or plant-based protein powder works beautifully here. You can also try chocolate protein powder for a more chocolatey profile. Avoid flavored powders with strong spices or unusual ingredients that might clash with the Oreos.
Can I make these vegan or dairy-free?
Yes! Use a dairy-free cream cheese alternative and plant-based milk. Make sure to select Oreos or similar cookies that are vegan-friendly, and use a plant-based protein powder to keep everything aligned with your dietary choices.
How do I prevent the mixture from being too sticky?
Adding milk gradually helps control the moisture level. Also, chilling the dough before rolling can reduce stickiness. Wetting your hands slightly will make rolling smoother and less messy.
Final Thoughts
I can’t recommend the Cream Cheese Oreo Protein Balls: No-Bake Power Bites Recipe enough for anyone craving a simple, delightful treat that feels special yet fuels your day. These little balls of bliss are as fun to make as they are to eat, and trust me, they disappear fast every time! Give them a try and share the joy with your friends or family—you’ll see why they are an instant favorite.
Print
Cream Cheese Oreo Protein Balls: No-Bake Power Bites Recipe
- Prep Time: 10 minutes
- Cook Time: N/A
- Total Time: 10 minutes
- Yield: 20 balls
- Category: Snack
- Method: No-Cook
- Cuisine: American
Description
These Cream Cheese Oreo Protein Balls are delicious sweet no-bake power bites that combine the creamy richness of cream cheese with the crunch and flavor of Oreo cookies and protein powder. Perfect as a quick snack or post-workout treat, they require minimal ingredients and come together in just 10 minutes with no cooking required.
Ingredients
Main Ingredients
- 8 oz (227g) Cream Cheese, softened to room temperature
- 15–20 Oreo Cookies, crushed into fine crumbs (cream filling included)
- 1 cup (30g) Vanilla Protein Powder (or chocolate)
- 2–3 tbsp Milk (dairy or plant-based)
- 1 tsp Vanilla Extract (optional)
- Pinch of Salt
Optional Mix-ins
- Mini chocolate chips
- Chopped nuts (almonds, walnuts)
- Shredded coconut
Instructions
- Crush the Oreos: Use a food processor or place the Oreo cookies in a resealable bag and bash them with a rolling pin until they become fine crumbs. Leave some small chunks for added texture if you like.
- Soften the cream cheese: Let the cream cheese sit at room temperature or microwave in short 10-second bursts until it’s soft and spreadable but not runny.
- Mix cream cheese and Oreos: In a mixing bowl, combine the softened cream cheese with the crushed Oreos, stirring until the mixture is uniform and fully blended.
- Add protein powder and milk: Gradually stir in the vanilla protein powder. If the mixture becomes too dry, add milk one tablespoon at a time until the dough holds together without being sticky.
- Incorporate vanilla and salt: Mix in the vanilla extract and a pinch of salt to enhance flavor. Add any optional ingredients like mini chocolate chips, chopped nuts, or shredded coconut at this point.
- Form the balls: Scoop about one tablespoon of the mixture and roll it between your hands into balls. Wetting your hands slightly can help prevent sticking.
- Place on tray: Arrange the formed balls on a parchment-lined tray or plate to keep them from sticking.
- Chill the protein balls: Refrigerate for at least one hour to firm up. If you are short on time, freeze them for 30 minutes instead.
- Add finishing touches (optional): For a decorative finish, roll the chilled balls in extra crushed Oreos, cocoa powder, or shredded coconut before serving.
Notes
- Use any flavor of protein powder you prefer; vanilla or chocolate works best to complement the Oreo flavor.
- For a dairy-free option, use plant-based cream cheese and milk alternatives.
- Store the protein balls in an airtight container in the refrigerator for up to 5 days or freeze for longer storage.
- Adjust milk quantity carefully to prevent the mixture from becoming too wet or dry.
- These make excellent grab-and-go snacks or dessert bites that are high in protein.


