
If you are craving a dish that hugs you from the inside, look no further than the Kielbasa and Pierogi Bake: Discover the Ultimate Comfort Dish! Recipe. This dish brings together hearty, tender pierogi and savory slices of browned kielbasa, all topped with luscious sour cream and melted cheddar cheese. With simple ingredients that combine to create an explosion of flavors and textures, it’s truly a soul-satisfying experience that feels like a warm embrace on a plate. Whether it’s a busy weeknight or a cozy weekend treat, this bake checks all the boxes for easy preparation and incredible taste.
Ingredients You’ll Need
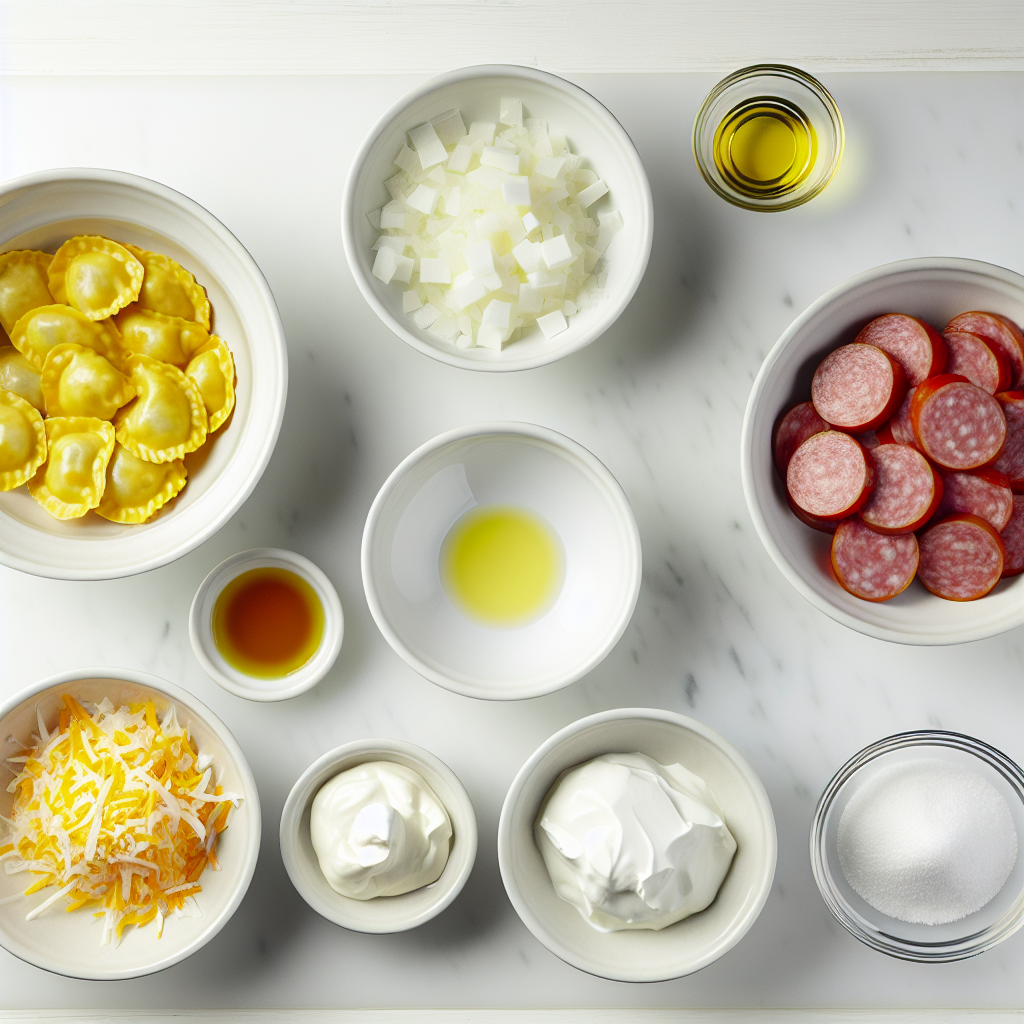
This recipe shines because of its simplicity and the quality of each ingredient. Every component plays a crucial role in building the dish’s rich flavor, appealing texture, and inviting appearance.
- 1 pound kielbasa, sliced: Provides a smoky, savory base with juicy, meaty bites.
- 1 package frozen pierogi (about 16 ounces): Adds a tender, pillowy texture that complements the kielbasa perfectly.
- 1 onion, chopped: Brings natural sweetness and depth after being gently sautéed.
- 2 cups shredded cheddar cheese: Melts into a creamy, tangy layer that binds everything beautifully.
- 1 cup sour cream: Offers rich creaminess that balances the savoriness of the meat and cheese.
- 1 tablespoon olive oil: Essential for sautéing the onions and kielbasa, infusing extra flavor.
- Salt and pepper to taste: To enhance and perfectly season the entire bake.
How to Make Kielbasa and Pierogi Bake: Discover the Ultimate Comfort Dish! Recipe
Step 1: Preheat and Prepare
Starting off right means preheating your oven to 375°F (190°C), so it’s ready for baking your masterpiece perfectly. This temperature is ideal for cooking everything evenly and creating that golden, bubbly cheese topping that we all love.
Step 2: Sauté Onions to Sweetness
Heat the olive oil in a skillet over medium heat and toss in the chopped onions. Cook them until they become translucent and fragrant. This step unlocks their natural sweetness, which adds a subtle, rich flavor that balances the dish.
Step 3: Brown the Kielbasa
Next, add the sliced kielbasa to the same skillet and cook it until it’s nicely browned on all sides. This browning not only intensifies the sausage’s flavor but also adds a delightful texture contrast that makes each bite exciting.
Step 4: Assemble the Layers
Grab a large baking dish, and start by layering the frozen pierogi evenly on the bottom. Then, spread the cooked kielbasa and onions over the top of the pierogi. This layering ensures each forkful gets a perfect blend of pierogi softness and kielbasa savoriness.
Step 5: Add Cream and Cheese
Spread the sour cream over the kielbasa and pierogi layers. This smooth coating adds richness and helps keep everything moist during baking. After that, sprinkle the shredded cheddar cheese evenly across the top, creating that irresistible cheesy crust.
Step 6: Season to Perfection
Don’t forget to season the dish with salt and freshly ground black pepper. This simple touch brings all the ingredients into harmony and enhances the overall taste.
Step 7: Bake and Enjoy
Place your dish in the oven and bake for 30 to 35 minutes until the cheese melts fully, forming a bubbly and beautifully browned topping. Once out of the oven, allow it to cool for a few minutes so the layers can set slightly before serving. This makes for the perfect, gooey comfort food experience.
How to Serve Kielbasa and Pierogi Bake: Discover the Ultimate Comfort Dish! Recipe
Garnishes
Fresh garnishes like chopped green onions or a sprinkle of fresh parsley add a pop of color and a slight freshness that contrasts beautifully with the rich bake. A dollop of sour cream on the side can give an extra creamy touch that guests will adore.
Side Dishes
Pairing the bake with a crisp green salad or some lightly steamed vegetables provides a refreshing balance to this hearty dish. Pickled cucumbers or sauerkraut are also traditional complements that add tang and brighten each bite.
Creative Ways to Present
For a fun and casual gathering, serve the bake family-style right from the dish so everyone can scoop their own portions. You could even try individual ramekins for personal servings that make it feel extra special and beautiful.
Make Ahead and Storage
Storing Leftovers
Once cooled, transfer any leftovers to an airtight container and store them in the refrigerator for up to three days. The flavors actually deepen overnight, making for an even tastier second serving.
Freezing
If you want to save it for later, this bake freezes wonderfully. Wrap it tightly in foil or use a freezer-safe container, and it will keep for up to two months. Just be sure to thaw in the fridge before reheating for the best texture.
Reheating
To reheat, pop the bake into a 350°F (175°C) oven for about 20 minutes until warmed through and the cheese is bubbly again. Avoid microwaving to maintain the crispy top and prevent the pierogi from getting soggy.
FAQs
Can I use fresh pierogi instead of frozen?
Absolutely! Fresh pierogi work beautifully in this recipe and might even cook faster, so keep an eye on the bake’s progress in the oven to avoid overcooking.
Is there a vegetarian alternative to kielbasa?
Yes, you can substitute plant-based sausage or even smoked tofu to create a vegetarian-friendly version without sacrificing flavor or heartiness.
Can I make this recipe gluten-free?
Look for gluten-free pierogi options or make homemade gluten-free pierogi to enjoy this dish while adhering to gluten restrictions.
What cheese works best if I don’t have cheddar?
Sharp white cheddar is ideal, but you can also use Monterey Jack, Colby, or even a mix of mozzarella and your favorite semi-hard cheese for a melty topping.
How spicy is this dish?
This recipe is mellow and comforting in flavor, but if you like a kick, you can add a pinch of smoked paprika or a dash of hot sauce when browning the kielbasa.
Final Thoughts
There’s something truly irresistible about the Kielbasa and Pierogi Bake: Discover the Ultimate Comfort Dish! Recipe that makes it an instant favorite in any kitchen. Simple ingredients, straightforward steps, and a taste that feels like a warm hug combine to create a dish you’ll want to make again and again. I encourage you to try it out and share it with your loved ones—you’ll be handing over a little piece of comfort and joy with every delicious bite.
Print
Kielbasa and Pierogi Bake: Discover the Ultimate Comfort Dish! Recipe
- Prep Time: 15 minutes
- Cook Time: 35 minutes
- Total Time: 50 minutes
- Yield: 4 to 4 servings
- Category: Main Course
- Method: Baking
- Cuisine: Polish-American
Description
This Kielbasa and Pierogi Bake is a hearty and comforting dish, perfect for a cozy meal. Featuring tender pierogi layered with savory browned kielbasa and onions, topped with creamy sour cream and melted cheddar cheese, this baked casserole combines rich flavors and satisfying textures to create an ultimate comfort food experience.
Ingredients
Main Ingredients
- 1 pound kielbasa, sliced
- 1 package frozen pierogi (about 16 ounces)
- 1 onion, chopped
- 2 cups shredded cheddar cheese
- 1 cup sour cream
- 1 tablespoon olive oil
- Salt and pepper to taste
Instructions
- Preheat the Oven: Preheat your oven to 375°F (190°C) to prepare it for baking the casserole.
- Sauté Onions: In a skillet, heat the olive oil over medium heat. Add the chopped onion and sauté until it becomes translucent and fragrant, about 5 minutes.
- Cook Kielbasa: Add the sliced kielbasa to the skillet with onions and cook until the kielbasa is nicely browned, enhancing its flavor and texture.
- Layer Ingredients: In a large baking dish, arrange a layer of frozen pierogi evenly at the bottom, followed by spreading the sautéed kielbasa and onion mixture over the pierogi.
- Add Dairy Toppings: Spread the sour cream evenly over the kielbasa and onion layer, then generously sprinkle shredded cheddar cheese on top to create a rich, melty topping.
- Season: Sprinkle salt and pepper over the top according to your taste preferences to enhance all the flavors.
- Bake: Place the baking dish in the preheated oven and bake for 30 to 35 minutes, or until the cheese is bubbly, golden, and slightly crispy on top.
Notes
- You can substitute cheddar cheese with mozzarella or a cheese blend for a different flavor profile.
- For a spicier kick, add some sliced jalapeños or a dash of smoked paprika to the sausage and onion mixture.
- If you prefer softer pierogi, you can boil them briefly before layering.
- Serve with a side of sour cream or a fresh green salad to balance the richness.
- Leftovers reheat well in the oven or microwave, maintaining great flavor and texture.


