
If you’re a fan of that irresistible crunchy peanut butter bar, then you’re in for an absolute treat with this Butterfinger Balls Recipe. These bite-sized delights combine creamy peanut butter, irresistible Butterfinger Bits, and rich chocolate into one decadent, easy-to-make dessert that’s perfect for any occasion. Whether you’re bringing a dish to a party or indulging in a sweet snack at home, this recipe transforms classic flavors into a fun, melt-in-your-mouth experience you’ll want to make again and again.
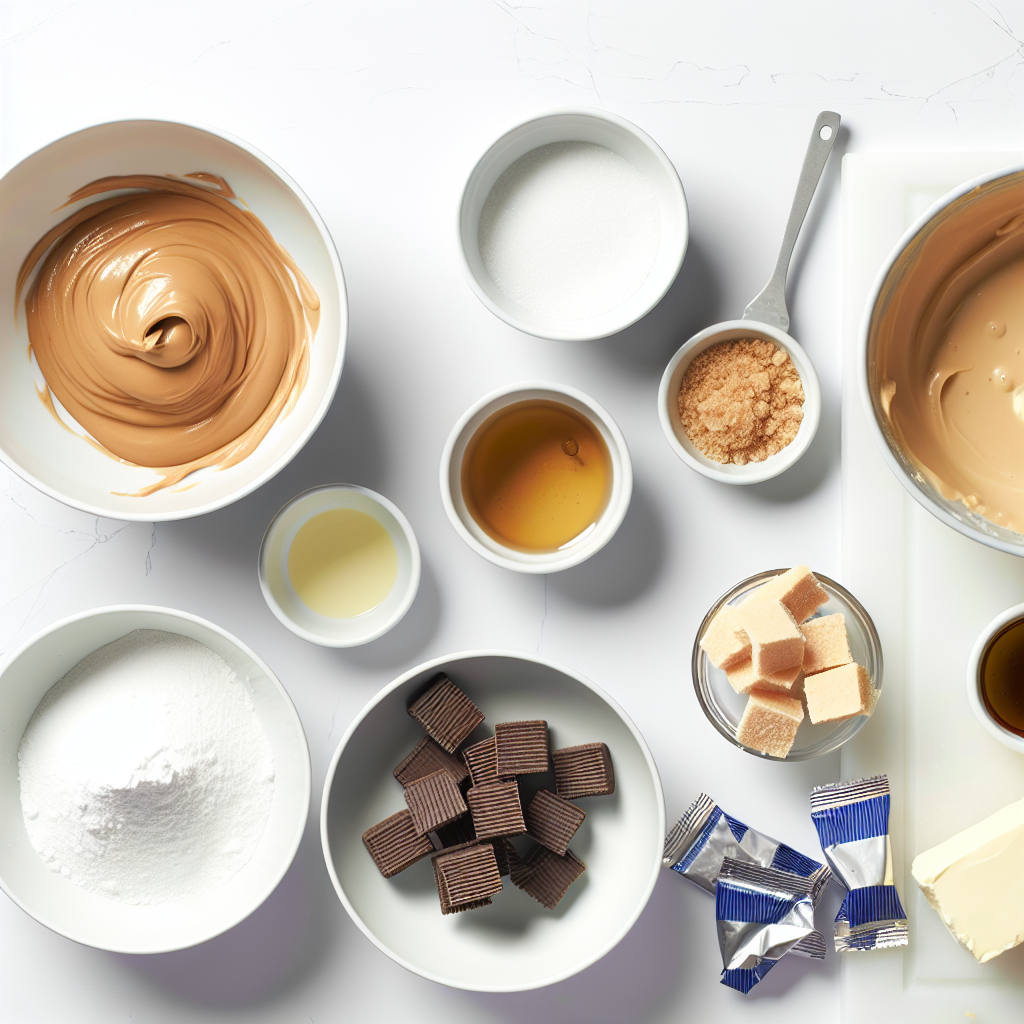
Ingredients You’ll Need
Getting the perfect Butterfinger Balls starts with simple, quality ingredients that each add their own magic. From the creamy peanut butter to the crunchy Butterfinger Bits, every component plays a key role in building flavor, texture, and that luscious finish.
- Creamy peanut butter: Provides the rich, smooth base that holds everything together and delivers that beloved nutty flavor.
- Salted butter: Adds a subtle savory balance and creamy texture when softened and whipped in.
- Vanilla extract: Boosts the overall flavor with warm, aromatic notes.
- Powdered sugar: Sweetens the mixture while ensuring a silky, no-grainy texture.
- Butterfinger Bits: Introduce delightful crunch and that iconic candy bar taste; plus, extra bits for an eye-catching topping.
- Chocolate melting wafers: Create a smooth, shiny coating that perfectly encases the rich filling inside.
How to Make Butterfinger Balls Recipe
Step 1: Mix the peanut butter base
Start by adding the creamy peanut butter, softened salted butter, and vanilla extract to a large bowl or stand mixer. Cream these ingredients together for about 30 seconds until they form a smooth, luscious blend. This step is essential because it creates the soft, flavorful foundation for the entire recipe.
Step 2: Add sweetness with powdered sugar
Sift the powdered sugar into the peanut butter mixture to avoid any lumps and then beat the combination until everything is completely smooth. This creates a sweet and creamy dough that will soon transform into those irresistible Butterfinger balls you love.
Step 3: Fold in the Butterfinger Bits
Gently mix in 1½ cups of Butterfinger Bits, ensuring they’re evenly distributed throughout the dough. These crunchy candy pieces are the secret to delivering that unmistakable Butterfinger texture, adding a playful crunch to every bite.
Step 4: Chill the mixture
Pop the mixture into the refrigerator for 30 minutes to firm up. Chilling helps the dough hold together when you shape it into balls, making the next step much easier and less messy.
Step 5: Shape into balls and chill again
Line a cookie sheet with parchment paper and use a medium cookie scoop to portion out the chilled dough. Roll each scoop into a ball with your hands, then place them on the cookie sheet. Freeze them for another 20 to 30 minutes—this quick chill is crucial for creating a solid shape before coating them with chocolate.
Step 6: Melt the chocolate wafers
While the balls chill, melt your chocolate melting wafers in a wide glass bowl using 30-second intervals in the microwave. Stir between each interval to ensure a smooth, glossy chocolate perfect for dipping. The melting process should be gentle to avoid scorching the chocolate.
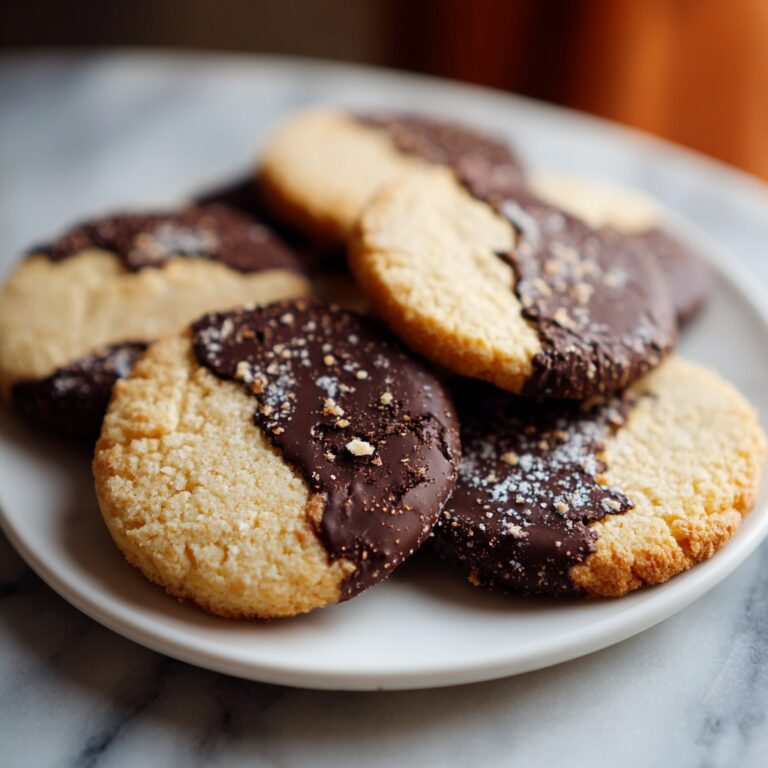
Step 7: Dip and coat the balls
Using a fork or dipping tool, submerge each chilled ball into the melted chocolate until fully coated. Carefully transfer them back onto the parchment-lined sheet. This rich chocolate shell adds a irresistible finish to each Butterfinger ball.
Step 8: Add finishing touches
Before the chocolate hardens, sprinkle the tops of the coated balls with extra Butterfinger Bits for a decorative and delicious crunch. Let the chocolate set entirely at room temperature or place the tray in the refrigerator for faster hardening. Once firm, your Butterfinger Balls Recipe is ready to enjoy!
How to Serve Butterfinger Balls Recipe
Garnishes
Adding a sprinkle of Butterfinger Bits on top gives a colorful, crunchy garnish that not only looks inviting but boosts flavor. For a touch of elegance, try dusting with a little cocoa powder or drizzling a contrasting white chocolate over the top.
Side Dishes
These Butterfinger Balls pair wonderfully with a scoop of vanilla ice cream or alongside a rich cup of coffee or hot chocolate. Their sweet, crunchy nature complements creamy or warm beverages beautifully, turning snack time into a little celebration.
Creative Ways to Present
Consider serving them in mini cupcake liners for a charming individual treat or arranging them on a dessert platter with fresh fruit and edible flowers to impress guests. You can also skewer a few on decorative sticks to create fun dessert kebabs perfect for parties.
Make Ahead and Storage
Storing Leftovers
If you have any Butterfinger Balls left over, store them in an airtight container in the refrigerator. They will stay fresh and delicious for up to one week, making them an excellent make-ahead treat for busy days or unexpected guests.
Freezing
Butterfinger Balls freeze beautifully. Place them in a freezer-safe container with parchment layers between to prevent sticking. When sealed tightly, they can be frozen for up to three months without losing their delightful flavor or texture.
Reheating
No need to worry about complicated reheating. Simply thaw your Butterfinger Balls in the refrigerator overnight before serving. This gentle thaw ensures the chocolate coating remains intact and the inside is soft and creamy, just like the day you made them.
FAQs
Can I use crunchy peanut butter instead of creamy?
While creamy peanut butter works best for a smooth texture, you can use crunchy peanut butter if you prefer some extra nuttiness. Just keep in mind it will add more texture to the filling, which some might love but others may find a little less smooth.
Is it necessary to chill the mixture before shaping the balls?
Yes! Chilling the mixture helps it firm up so it can be rolled easily without sticking to your hands. It also helps the balls keep their shape during the chocolate-dipping process, making your life much easier.
Can I substitute the chocolate melting wafers with regular chocolate?
You can, but melting wafers are specially designed to melt smoothly and harden nicely without needing additional ingredients. If you use regular chocolate, consider adding a bit of shortening or oil to achieve the right consistency.
What’s the best way to store these if I want to take them to a party?
Pack them in a single layer in an airtight container and keep them chilled until ready to serve. If the day is warm, transport them in a cooler to prevent the chocolate from melting.
Can I add other mix-ins besides Butterfinger Bits?
Absolutely! While Butterfinger Bits are the star here, you can experiment with chopped nuts, toffee bits, or even mini chocolate chips for a twist. Just keep the ratio balanced to maintain the perfect texture and flavor.
Final Thoughts
If you want a crowd-pleaser that’s simple to make yet packed with nostalgic flavor, the Butterfinger Balls Recipe is your new best friend. Each bite is a harmonious mix of creamy, crunchy, and chocolaty goodness that’s incredibly satisfying. I can’t wait for you to make these and enjoy every delicious moment — trust me, this recipe will quickly earn a permanent spot in your dessert rotation!
Print
Butterfinger Balls Recipe
- Prep Time: 20 minutes
- Cook Time: 0 minutes
- Total Time: 1 hour 30 minutes
- Yield: 34 servings
- Category: Dessert
- Method: No-Cook
- Cuisine: American
Description
Delight in these irresistible Butterfinger Balls, a no-bake treat combining creamy peanut butter, rich chocolate, and crunchy Butterfinger bits. Perfect for parties or as a sweet snack, these bite-sized balls are dipped in melted chocolate and topped with more Butterfinger pieces for extra crunch and flavor.
Ingredients
Main Ingredients
- 1⅓ cup creamy peanut butter
- ½ cup salted butter, softened
- 1 teaspoon vanilla extract
- 2 cups powdered sugar
- 1½ cups Butterfinger bits, plus extra for topping (optional)
- 3 cups chocolate melting wafers
Instructions
- Cream the Base: In a large bowl or stand mixer, combine the creamy peanut butter, softened salted butter, and vanilla extract. Beat together for about 30 seconds until smooth and well blended.
- Add Powdered Sugar: Sift the powdered sugar into the mixture to avoid lumps and beat until the mixture becomes smooth and consistent.
- Mix in Butterfinger Bits: Gently fold in the Butterfinger bits until evenly incorporated throughout the peanut butter mixture.
- Chill the Mixture: Refrigerate the mixture for 30 minutes to firm up and make it easier to shape.
- Shape the Balls: Line a cookie sheet with parchment paper. Using a medium cookie scoop, portion out the chilled peanut butter mixture and roll it into balls by hand. Place each ball on the parchment-lined sheet. Then freeze the balls for 20 to 30 minutes to further firm them up.
- Melt the Chocolate: While the balls chill in the freezer, melt the chocolate melting wafers in a wide glass bowl by heating in 30-second intervals, stirring between each until fully melted and smooth.
- Dip the Balls in Chocolate: Using a fork or dipping tool, dip each peanut butter ball into the melted chocolate, ensuring it is fully coated.
- Decorate and Set: Place the chocolate-coated balls back on the parchment paper. Quickly sprinkle the tops with additional Butterfinger bits if desired. Allow the chocolate to fully harden at room temperature or in the refrigerator before serving.
Notes
- Ensure the peanut butter and butter are softened to room temperature for smooth mixing.
- Sifting the powdered sugar helps prevent lumps in the mixture.
- You can substitute chocolate melting wafers with good quality chocolate chips if needed.
- Keep the balls chilled well to avoid them melting when dipping in chocolate.
- Store finished Butterfinger Balls in an airtight container in the refrigerator for up to one week.
