
If you’re searching for a fun and festive way to sweeten your holiday celebrations, you can’t go wrong with this Christmas Tree Brownie Bites Recipe. These adorable mini brownies capture all the rich, chocolatey goodness you love, topped with swirls of green frosting and sparkly sprinkles that look just like miniature Christmas trees. Perfect for sharing at holiday parties or enjoying as a holiday treat at home, these bites combine simplicity, charm, and delicious flavor in every single piece. Once you try them, they’re sure to become a seasonal favorite you’ll reach for every year.
Ingredients You’ll Need
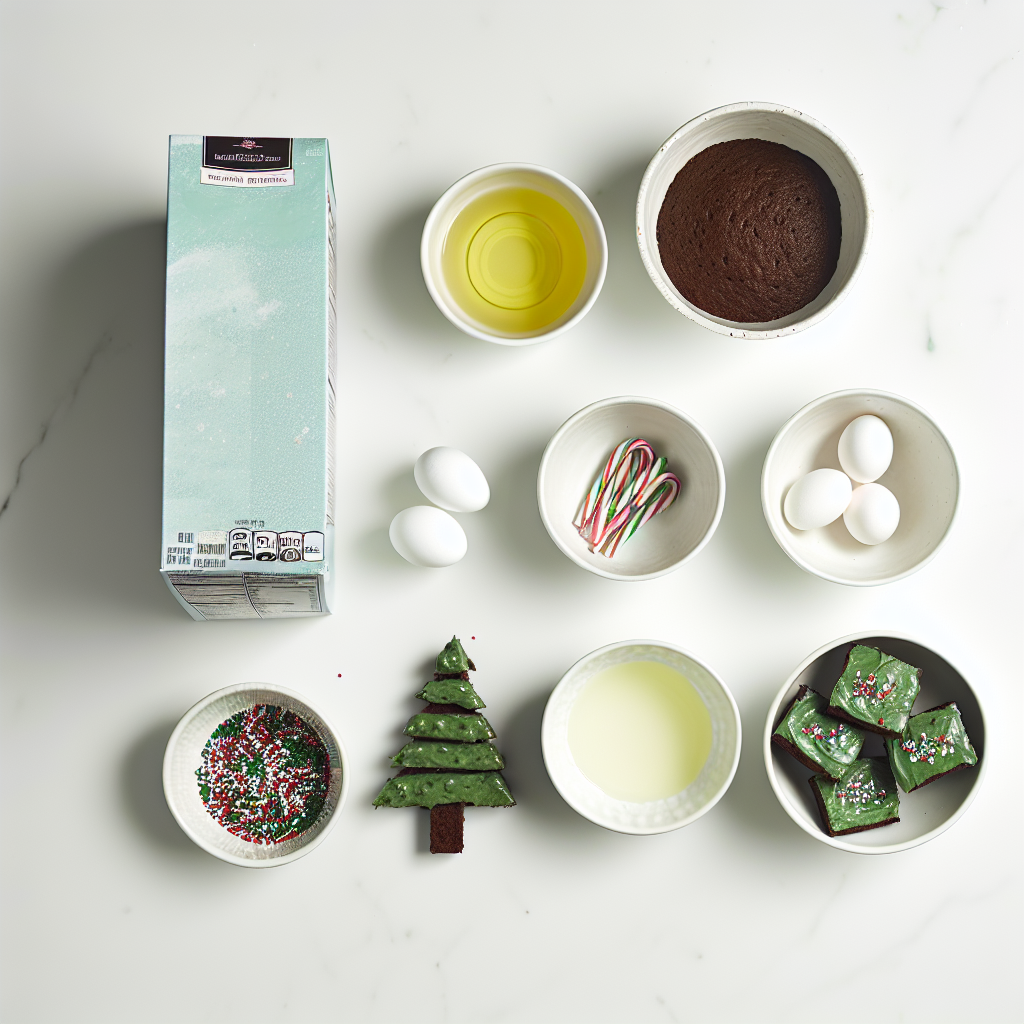
The magic of this Christmas Tree Brownie Bites Recipe comes from simple pantry staples working together to create a festive masterpiece. Each ingredient plays a key role in delivering moist brownies with a fun holiday look and festive flavors.
- 1 box brownie mix (plus eggs, oil, and water as directed): The base of these bites, ensuring rich and fudgy brownies with minimal effort.
- 1 cup green-tinted vanilla frosting: Adds a creamy texture and that vibrant tree-green color essential for the festive effect.
- ¼ cup holiday sprinkles or decorating sugar: Provides that extra sparkle and crunch that make these treats visually captivating and tasty.
- 12 small candy canes, broken in half: Act as the “trunks” for each Christmas tree, adding a sweet peppermint twist.
- 24 mini star sprinkles or small yellow candies: These little stars crown each tree bite perfectly, completing the holiday look.
- Nonstick spray: Keeps everything from sticking and makes cleanup a breeze.
How to Make Christmas Tree Brownie Bites Recipe
Step 1: Prepare and Bake the Brownies
Start by preheating your oven to 350°F or follow the temperature suggested on your brownie mix box. Lightly coat a mini muffin tin with nonstick spray to keep the brownie bites from sticking. Prepare the brownie batter according to the package directions—it’s quick and straightforward, so no fuss here! Spoon the batter into each mini muffin cup, filling them about three-quarters full to allow room for rising. Bake for 12 to 15 minutes, or until a toothpick inserted in the center comes out with just a few moist crumbs attached. This ensures fudgy but thoroughly cooked brownies.
Step 2: Cool and Remove Brownie Bites
Once the brownies are done, allow them to cool completely right in the pan. Cooling is crucial since warm brownies won’t hold up well for decorating. After they have cooled, gently remove the brownie bites and set them on a wire rack to ensure they don’t get soggy from residual heat.
Step 3: Create the Christmas Tree Trunks
Take half of a candy cane and carefully insert it into the bottom of each brownie bite. These candy cane pieces act as charming tree trunks and add a delightful peppermint element. Be sure to insert them gently so the brownies don’t crumble.
Step 4: Frost with Green Swirls
Now for the fun part! Pipe or spoon the green-tinted vanilla frosting onto the top of each brownie bite in a swirled pattern resembling a Christmas tree. To keep the frosting nice and firm, it helps if your brownies are completely cooled and chilled briefly beforehand. The texture and color of the frosting really bring these bites to life.
Step 5: Add Festive Decorations
Finish each tree by sprinkling them with holiday sprinkles or decorating sugar for a festive sparkle. Don’t forget to top each tree with a mini star sprinkle or a tiny yellow candy to mimic the star that shines at the top of every perfect Christmas tree. This final touch makes these bites picture-perfect.
How to Serve Christmas Tree Brownie Bites Recipe
Garnishes
For an added layer of holiday spirit, consider dusting your Christmas Tree Brownie Bites with a light sprinkle of powdered sugar, mimicking fresh snow. You might also pair them with tiny edible glitter or crushed peppermint pieces for added texture and sparkle. These little touches elevate your presentation and surprise your guests with delightful flavors and festive looks.
Side Dishes
These brownie bites are perfect on their own but also pair beautifully with a glass of cold milk, a mug of hot cocoa, or a scoop of vanilla ice cream. If you’re serving a holiday dessert spread, consider placing them alongside cookies, fruitcake bites, or peppermint bark to complement the seasonal flavors.
Creative Ways to Present
Presentation is everything, especially during the holidays! Arrange your Christmas Tree Brownie Bites Recipe on a festive platter lined with evergreen sprigs or red and gold ribbons. For parties, try skewering them on wooden sticks to create a brownie tree stand or place them in colorful mini cupcake liners for easy serving. Wrapping a few in cellophane tied with a bow makes for charming edible gifts.
Make Ahead and Storage
Storing Leftovers
If you have any leftovers, store them in an airtight container at room temperature for up to 3 days. Keeping them airtight preserves the fudgy texture of the brownies and maintains the freshness of the frosting and decorations.
Freezing
You can freeze these brownie bites for longer storage. Place them in a single layer on a baking sheet to freeze solid, then transfer to a freezer-safe container or bag. They can be frozen for up to 3 months. When ready to enjoy, thaw them in the refrigerator overnight to keep the frosting intact.
Reheating
To refresh the brownies after storage, warm them gently in the microwave for about 10 seconds. Avoid overheating to prevent the frosting from melting. This quick warming brings out the chocolate flavor and makes them soft and irresistible again.
FAQs
Can I use homemade brownies for the Christmas Tree Brownie Bites Recipe?
Absolutely! While the recipe uses a boxed mix for convenience, homemade brownies work wonderfully and let you control the flavor and texture exactly how you like it. Just bake them in mini muffin tins and follow the decorating steps to make your Christmas tree bites.
What if I don’t have green frosting? Can I use something else?
If you don’t have green frosting on hand, you can tint vanilla frosting with a few drops of green food coloring. Alternatively, cream cheese frosting works well too and can be dyed green for a tangy twist that complements chocolate wonderfully.
Are there alternative “tree trunks” besides candy canes?
Yes! Pretzel sticks make a great crunchy substitute for candy cane trunks and add a salty contrast to the sweet brownies. You can also try thin cookie sticks or even edible wafer rolls if you want a variation in texture.
How should I pipe the frosting to look like a Christmas tree?
Use a piping bag fitted with a star or round tip and start at the top, swirling in wider circles as you move downward to create a conical “tree” shape. If you don’t have a piping bag, a zip-top bag with a corner snipped off works just as well!
Can I make these ahead of time for a party?
Definitely. You can bake the brownie bites and store them unadorned for a couple of days, then decorate with frosting and sprinkles on the day of the event. This helps keep the frosting fresh and the decorations vibrant for your guests.
Final Thoughts
There is nothing quite as joyful as sharing sweet treats that celebrate the season, and this Christmas Tree Brownie Bites Recipe brings both holiday spirit and scrumptious chocolate to your table in a playful, elegant way. Whether you’re baking with family, prepping for a party, or gifting friends, these little tree-shaped delights are bound to brighten the festivities. So grab your ingredients, roll up your sleeves, and make some magic happen—your holiday taste buds will thank you!
Print
Christmas Tree Brownie Bites Recipe
- Prep Time: 15 minutes
- Cook Time: 15 minutes
- Total Time: 30 minutes
- Yield: 24 brownie bites
- Category: Dessert
- Method: Baking
- Cuisine: American
- Diet: Vegetarian
Description
Celebrate the holidays with these festive Christmas Tree Brownie Bites. Easy to make using a boxed brownie mix, these mini treats are baked to perfection, topped with green vanilla frosting piped into a tree shape, decorated with colorful sprinkles, and finished with a candy cane trunk and star topper. Perfect for parties, gift giving, or holiday dessert tables.
Ingredients
Brownie Bites
- 1 box brownie mix (plus eggs, oil, and water as called for on the box)
Decorations
- 1 cup green-tinted vanilla frosting (store-bought or homemade)
- ¼ cup holiday sprinkles or decorating sugar
- 12 small candy canes, broken in half for “trunks”
- 24 mini star sprinkles or small yellow candies (for toppers)
- Nonstick spray
Instructions
- Preheat and Prepare: Preheat your oven to 350°F (or follow the temperature directed on your brownie mix box). Lightly grease a mini muffin tin with nonstick spray to prevent sticking.
- Make Brownie Batter: Prepare the brownie batter according to the package instructions, mixing the brownie mix with eggs, oil, and water as directed until smooth.
- Fill Muffin Cups: Spoon the batter into the mini muffin cups, filling each about three-quarters full for perfect bite-sized brownies.
- Bake: Bake the brownie bites for 12 to 15 minutes, or until a toothpick inserted in the center comes out mostly clean but with a few moist crumbs.
- Cool Brownies: Allow the brownie bites to cool completely in the pan. Once cool, carefully remove them and place on a wire rack to finish cooling.
- Add Candy Cane Trunks: Insert half of a broken candy cane into the bottom of each brownie bite to create the appearance of a tree trunk.
- Pipe Frosting: Using a piping bag or zip-top bag with a corner snipped off, pipe green-tinted vanilla frosting on top of each brownie in a swirled shape resembling a Christmas tree.
- Decorate: Sprinkle holiday sprinkles or decorating sugar over the frosting, then top each with a mini star sprinkle or small yellow candy to mimic a star on top of the tree.
- Serve or Store: Enjoy immediately or store the decorated brownie bites in an airtight container for later serving.
Notes
- Use a homemade brownie recipe if you prefer more control over ingredients and flavor.
- To fill the mini muffin tins more easily and neatly, transfer the brownie batter into a piping bag or zip-top bag with a small corner cut off.
- Chilling the brownies before decorating helps keep the frosting firm and makes piping easier.
- Store the finished brownie bites in an airtight container at room temperature for up to 3 days.


