
If you’ve ever wished to enjoy the rich, creamy delight of tiramisu in a bite-sized treat, then you’re in for a real treat with this 10-Minute Tiramisu Balls Recipe. These little wonders capture all the classic flavors of tiramisu—coffee-soaked ladyfingers, luscious mascarpone cream, and a dusting of cocoa—while being unbelievably quick and simple to prepare. Perfect for last-minute guests or a sweet personal indulgence, these tiramisu balls are flavorful, elegant, and utterly addictive.
Ingredients You’ll Need
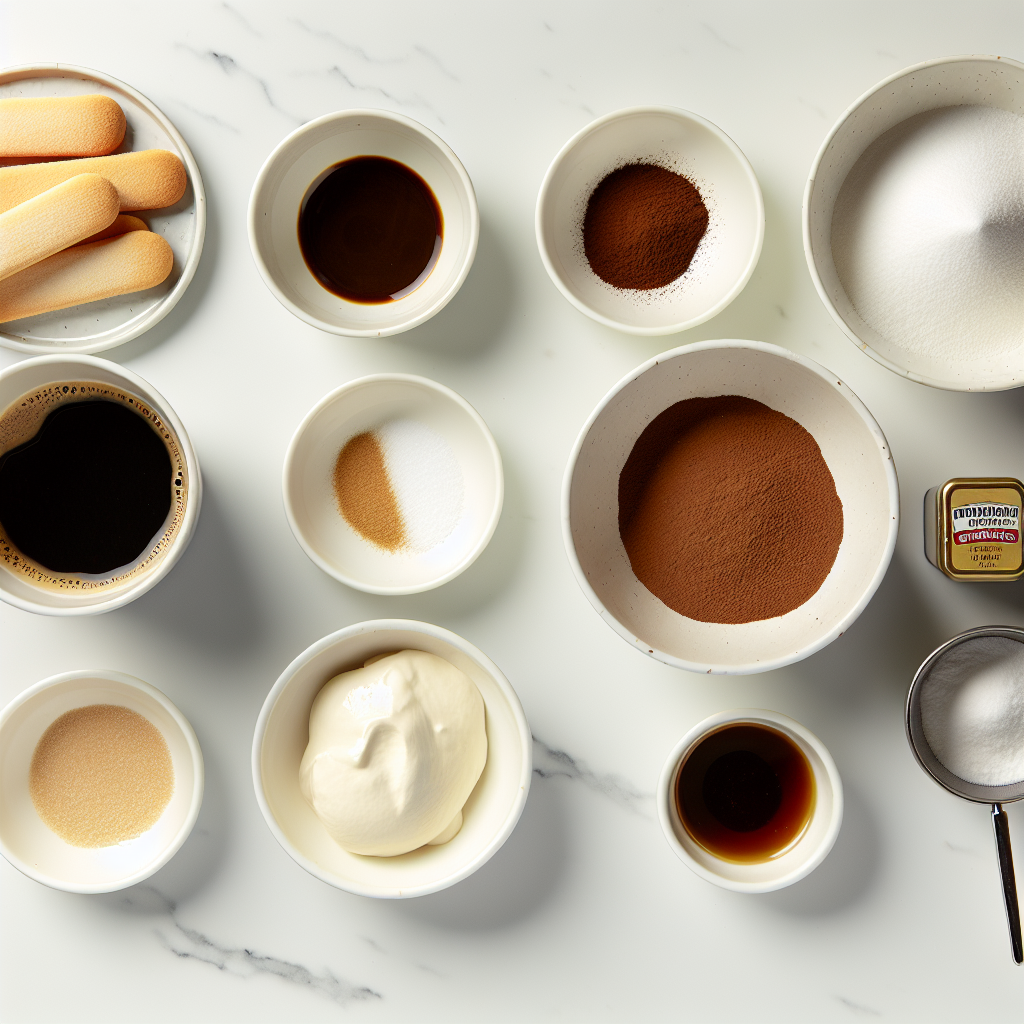
The beauty of this 10-Minute Tiramisu Balls Recipe is in its straightforward, quality ingredients. Each one plays a vital role in creating that luscious texture, rich flavor, or beautiful presentation that makes these treats unforgettable.
- 200g ladyfingers (savoiardi): The classic base of tiramisu, these light and airy cookies provide the perfect crumbly texture.
- ½ cup brewed espresso, cooled: Real coffee flavor is essential here; cooling it keeps the mixture smooth without melting the mascarpone.
- 250g mascarpone cheese: This creamy Italian cheese brings that signature richness and silkiness to the balls.
- ½ cup powdered sugar: Adds the perfect touch of sweetness without graininess, blending smoothly into the mascarpone.
- 1 teaspoon vanilla extract: Enhances the overall flavor with a warm, aromatic note.
- Pinch of salt: Balances the sweetness and emphasizes the deep coffee and cream flavors.
- 1 tablespoon coffee liqueur (optional): For those who want a boozy hint, this adds depth and complexity.
- 1 tablespoon cocoa powder: Mixed into the balls for that unmistakable chocolate-coffee combo everyone loves.
- Additional cocoa powder for dusting: The final flourish adds elegance and a bitter contrast to the sweet cream.
How to Make 10-Minute Tiramisu Balls Recipe
Step 1: Crush the Ladyfingers
The first step is all about texture. Pop your ladyfingers into a food processor and pulse until they become fine crumbs. These crumbs form the body of your tiramisu balls, giving them that delightful crumbly yet cohesive bite that’s essential to the treat.
Step 2: Prepare the Mascarpone Mixture
Next, whisk your mascarpone cheese, powdered sugar, vanilla extract, and a pinch of salt in a large bowl. Take your time here and aim for a smooth, creamy texture without lumps. This step is key for achieving that luscious mouthfeel tiramisu is known for.
Step 3: Add Coffee Flavors
Once your base is creamy, pour in the cooled espresso and coffee liqueur if you’re using it. Gently stir this mixture to evenly incorporate the coffee flavor throughout, making sure every bite is infused with that perfect coffee kick.
Step 4: Combine Crumbs with Cream
Now fold the finely crushed ladyfinger crumbs into your mascarpone mixture. This slow, gentle folding ensures that every crumb is coated with that dreamy creaminess without turning into a paste. The mixture will thicken and become easy to shape.
Step 5: Shape into Balls
Here the fun begins! Using your hands, scoop small portions of the mixture and roll them into walnut-sized balls. Try to keep them consistent in size for even setting and catching everyone’s eye when served.
Step 6: Dust and Chill
Place the tiramisu balls on a lined tray and dust generously with cocoa powder. Refrigerate for at least 30 minutes to allow them to firm up. If you prefer a softer, creamier bite, you can serve them immediately, but chilling helps the flavors meld together beautifully.
How to Serve 10-Minute Tiramisu Balls Recipe
Garnishes
For a touch of flair, sprinkle a little extra cocoa powder or finely grated dark chocolate over the top before serving. You can also add a few coffee beans or a small sprig of fresh mint to each plate—it adds a luxurious finish and a pop of color.
Side Dishes
These tiramisu balls shine as a standalone dessert, but they pair wonderfully with fresh berries or a light fruit salad to cut through the richness. A small glass of sweet dessert wine or espresso alongside makes for a delightful Italian-themed tasting experience.
Creative Ways to Present
Consider serving these tiramisu balls in elegant mini cupcake liners or on a decorative platter arranged beside espresso cups for an impressive finish to any gathering. For a party touch, try stacking them pyramid-style or threading onto cocktail picks for easy grabbing.
Make Ahead and Storage
Storing Leftovers
Store any extra tiramisu balls in an airtight container in the refrigerator. They hold up beautifully for 2 to 3 days, retaining their moist texture and rich flavor, making them perfect for prepping in advance for events or indulgent weeknight treats.
Freezing
If you want to keep your tiramisu balls longer, freezing is your friend. Place them in a single layer on a baking sheet to freeze initially, then transfer to a freezer-safe container. They freeze well for up to a month; just thaw overnight in the refrigerator before serving.
Reheating
These tiramisu balls are best enjoyed chilled or at room temperature. Avoid heating them in the microwave, as the mascarpone will soften too much and lose that delightful firmness. Simply let them sit out for 10 to 15 minutes before serving if needed.
FAQs
Can I make these tiramisu balls without a food processor?
Absolutely! You can place the ladyfingers in a sturdy plastic bag and crush them with a rolling pin or heavy pan until they’re fine crumbs. It might take a bit more effort, but the results are just as delicious.
Is it necessary to use coffee liqueur?
Nope! The coffee liqueur is optional and adds an extra layer of flavor, but the espresso itself provides plenty of that classic coffee richness, so the tiramisu balls will still taste fantastic without it.
Can I use instant coffee instead of brewed espresso?
While brewed espresso gives the most authentic flavor, strong instant coffee dissolved in a small amount of hot water works well as a substitute. Just be sure to let it cool completely before mixing.
How long do tiramisu balls need to chill?
Refrigerating for at least 30 minutes helps them set and develop flavor, but if you’re in a hurry, you can enjoy them right away. Keep in mind that chilling makes shaping easier and enhances the overall texture.
Can I make these vegan or dairy-free?
Traditional tiramisu balls rely on mascarpone and ladyfingers, which are dairy-based. However, you can experiment with vegan cream cheese alternatives and store-bought vegan cookies, though the texture and flavor might be slightly different from the classic.
Final Thoughts
If you’re craving a dessert that feels indulgent yet comes together in almost no time, this 10-Minute Tiramisu Balls Recipe is a dream come true. It’s proof you don’t need to spend hours in the kitchen to enjoy that classic tiramisu magic—these little balls pack the same beautiful flavors in a fun, approachable bite. Give it a go, and I promise these will become your new go-to for impressing friends or sneaking in a treat just for yourself.
Print
10-Minute Tiramisu Balls Recipe
- Prep Time: 10 minutes
- Cook Time: N/A
- Total Time: 10 minutes plus chilling time
- Yield: About 20 tiramisu balls
- Category: Dessert
- Method: No-Cook
- Cuisine: Italian
Description
These 10-Minute Tiramisu Balls are a delightful no-bake dessert that captures the classic flavors of traditional tiramisu in a convenient, bite-sized form. Made with crushed ladyfingers, creamy mascarpone, and coffee, these easy-to-prepare treats are perfect for quick indulgence or elegant entertaining.
Ingredients
Base
- 200g ladyfingers (savoiardi)
Filling
- ½ cup brewed espresso, cooled
- 250g mascarpone cheese
- ½ cup powdered sugar
- 1 teaspoon vanilla extract
- Pinch of salt
- 1 tablespoon coffee liqueur (optional)
Finishing
- 1 tablespoon cocoa powder
- Additional cocoa powder for dusting
Instructions
- Crush Ladyfingers: Place the ladyfingers in a food processor and pulse until they become fine crumbs, which will form the base texture of the tiramisu balls.
- Prepare Mascarpone Mixture: In a large mixing bowl, combine mascarpone cheese, powdered sugar, vanilla extract, and a pinch of salt. Mix thoroughly until the mixture is smooth and creamy.
- Add Coffee Flavor: Stir the cooled espresso and optional coffee liqueur into the mascarpone mixture, blending well to evenly infuse the coffee flavor.
- Combine with Crumbs: Gradually fold the crushed ladyfingers into the mascarpone mixture, ensuring the crumbs are fully incorporated to create a consistent mixture ideal for shaping.
- Shape Balls: Using your hands, take small portions of the mixture and roll them into walnut-sized balls, ensuring they are evenly shaped.
- Chill and Dust: Place the tiramisu balls on a lined tray, dust generously with cocoa powder, then refrigerate for at least 30 minutes to set, or serve immediately for a softer texture.
Notes
- For a stronger coffee flavor, increase espresso quantity or add more coffee liqueur.
- If you prefer a firmer texture, refrigerate the balls longer than 30 minutes.
- Store leftover tiramisu balls covered in the refrigerator for up to 3 days.
- Use decaf espresso if you want a caffeine-free version.
- Optional dusting with cocoa powder can be replaced with grated chocolate or finely crushed espresso beans for variation.


